HP OpenVMS Systems |
|
Web
Services Integration Toolkit for OpenVMS Developer’s
Guide April 2008 This document contains information that will
help you use the development tools in this release of WSIT for OpenVMS. Software
Version Web Services Integration Toolkit Hewlett-Packard Company © 2008 Hewlett-Packard Development Company, L.P.
Intel, Intel Inside, and Itanium are trademarks
of Intel Corporation in the Microsoft, Windows, Windows XP, Visual Basic,
Visual C++, and Win32 are trademarks of Microsoft Corporation in the Java and all Java-based marks are trademarks or
registered trademarks of Sun Microsystems, Inc. in the All other product names mentioned herein may be
trademarks of their respective companies. Confidential computer software. Valid license from
HP and/or its subsidiaries required for possession, use, or copying. Consistent
with FAR 12.211 and 12.212, Commercial Computer Software, Computer Software
Documentation, and Technical Data for Commercial Items are licensed to the U.S.
Government under vendor’s standard commercial license. Neither HP nor any of its subsidiaries shall be
liable for technical or editorial errors or omissions contained herein. The
information in this document is provided “as is” without warranty of any kind
and is subject to change without notice. The warranties for HP products are set
forth in the express limited warranty statements accompanying such products.
Nothing herein should be construed as constituting an additional warranty. C O N T E N T S INTRODUCTORY INFORMATION – FOR ALL USERS 1. USING
THE WEB SERVICES INTEGRATION TOOLKIT FOR OPENVMS 1.1 Overview 1.2 Preparing
the Original (Legacy) Application 1.3 Exposing an OpenVMS 3GL Application:
Typical Development Steps 1.4 Wrapping
a 3GL Application: C Sample 1.4.1 Server/Application Build Procedure 1.4.2
Customizing the Build Environment 1.5 Wrapping
an ACMS Application: ACMS Sample 1.7 Using
ANT with the Web Services Integration Toolkit 1.7.1 Ant Setup 1.7.2 Configuring the
wsit-ant-user.properties File 1.7.3 Using the wsit-ant-userbuild.xml
Build File 1.7.4 Ant Property Descriptions 1.7.5 Ant Target Descriptions 1.7.6
Custom Ant Tasks 1.8 Using
Distributed NetBeans with the Web Services Integration Toolkit 1.8.1 WSIT Build Templates 1.8.2 Using the WSIT-Supplied Ant Version 1.9.1 Server Process Security 1.9.2 Per User Security 1.10 WSIT
Tools and Parameters 1.10.1
In-Process/Out-of-Process Parameters 1.10.2
POJO/JSP Sample Client Parameters 1.11 OBJ2JAVA.COM 2.1 Types
of OpenVMS Applications 2.3.1 Sessions 2.3.2
Application Reusability 2.3.3 Using Multiple Processes to Scale
Applications 2.3.4 Specifying Out-of-Process Deployment
Options 2.3.4.1 Out-of-Process Account Preparation
and Requirements 2.4 Web
Services Integration Toolkit Interfaces 2.4.1
Application Interfaces (User Supplied) 2.4.2 OpenVMS Datatypes Supported by WSIT 2.4.3 Passing Mechanisms 2.4.4 JavaBean Interface (Generated by
WSIT) 2.4.5 Datatype Mapping 2.4.5.1 String Datatype 2.4.6 Parameter Usages 2.5 Design
Restrictions for Wrapped Applications 2.5.3 Pointer Types Not Supported 2.5.4 Single Instantiated WSIT JavaBean
Cannot Be Shared Among Multiple Threads 2.5.5 Languages Tested with the OBJ2IDL
Tool 2.5.6 Tips and Hints for Supported
Languages 2.5.8 Programming with Nested Structures ADVANCED INFORMATION – FOR EXPERIENCED USERS 3. ADVANCED
OUT-OF-PROCESS CONFIGURATION 3.2 Case
B: Sequentially Reusable 3.3 Case
C: Concurrently Reusable 3.4 Case
D: Concurrently Reusable with Multiple
Threads 3.5 Single Threaded Applications –- Automatic Stack Expansion 3.6 Example: Using the Debugger 4. MAPPING BLOBS AND OTHER UNFORMATTED DATA 5. USING
TEMPLATES TO GENERATE CODE 5.1 Modifying
Velocity Templates 5.2 Generating
Code with IDL2CODE.JAR 5.3 Example 1: Writing a New Template 5.4 Example
2: Modifying an Existing Template 6.3 Enumerator
Block 6.4 Typedef Block 6.5 Primitive
Block 6.6 Structure
Block 6.7 Field Block 6.7.1 Field
Array Tag 6.8 Routine
Block 6.9 Parameter Block 6.9.1 Parameter Array Tag B. Program
Listing - STOCK.XML C. Program
Listing - StockCaller.Java F. Program
Listing - mathcaller.java About Web
Services Integration Toolkit for OpenVMS Documentation This Developer’s
Guide contains information about how to use the tools in the Web Services
Integration Toolkit for OpenVMS, and things to consider as you prepare your legacy
application. The Installation
Guide and Release Notes includes system requirements and installation
instructions for OpenVMS, as well as release notes for the current release of
the Web Services Integration Toolkit for OpenVMS. For the latest release information, refer to the
Web Services Toolkit for OpenVMS web site at http://www.hp.com/products/openvms/webservices/.
1 U S I N G W E B S E R V I C E S I N T E G R A T I O N T O O L K I T 1.1 Overview The Web Service Integration Toolkit for OpenVMS
(WSIT) contains a collection of integration tools. These tools are easy to use,
highly extensible, based on standards and built on open source technology. The toolkit can be used to call OpenVMS
applications written in 3GL languages, such as C, BASIC, COBOL, FORTRAN, and
ACMS from newer technologies and languages such as Java, Microsoft .NET, Java
-RMI, JMS, and web services. The Web Service Integration Toolkit is focused
on integrating at the API level. It generates a JavaBean wrapper for a supplied
OpenVMS application interface (API). At runtime, you can specify if the
application will be run in the process of the caller (in-process) or in separate
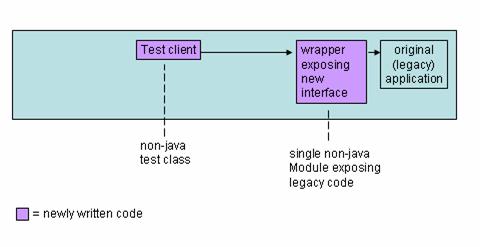
processes (out-of-process) managed by the WSIT runtime. 1.2 Preparing the Original (Legacy) Application Using the Web Services Integration Toolkit for
OpenVMS, as with all programmatic integration, requires some upfront
development work before you can begin performing the integration. Your existing
application is likely to have been written long ago and will benefit from
having a wrapper expose a new and clean interface. The new interface will
expose the legacy implementation. Separating the interface from the
implementation provides encapsulation and the ability to easily extend and
reuse the implementation. Before you use the Web Services Integration
Toolkit or any other integration technology, you must evaluate the original application
and design one or more interface classes to expose different features of the
business logic. These new interfaces should be tested with a simple client
before you use the Web Services Integration Toolkit. When you know that the
interface classes are working properly, you can use WSIT to extend the use of
the new interface to the Java environment.
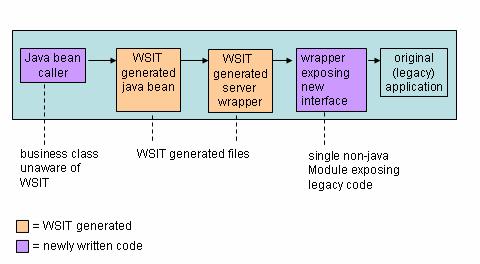
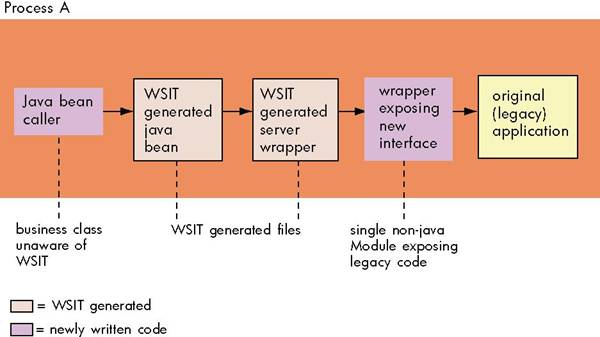
After you have prepared the application, WSIT
can extend the features of the new interface to Java as shown in the following
diagram.
1.3 Exposing
an OpenVMS 3GL Application: Typical Development Steps Following are the development steps required to
use the Web Services Integration Toolkit to expose an OpenVMS 3GL or ACMS
application. Note that these steps are only required for the development phase.
It is expected that the application has been prepared as discussed in the
previous section. Note: These tools were renamed in a pre-V1.0
field test kit. See Chapter 3 in the
Installation Guide and Release Notes for a table containing the old and new
file names. 1. Create XML IDL file (on I64) Create an XML interface definition file (IDL)
that describes the interface to be exposed. You create an XML IDL file using
the tool named OBJ2IDL.EXE (for 3GL languages) or STDL2IDL.JAR (for ACMS).
Note: OBJ2IDL.EXE runs on OpenVMS I64
only. If you are using WSIT on OpenVMS
Alpha, see Section 2.5.5 for information about the HP TestDrive program. 2. Validate XML IDL file Verify that the XML IDL file correctly describes
the interface being exposed. If it does not, manually update the XML IDL file
until the interface definition is correct. VALIDATE.JAR allows you to verify
that an XML IDL file conforms to the openvms-integration.xsd schema. 3. Generate components For the interface being exposed, generate one
WSIT server interface wrapper and one WSIT Java Bean using IDL2CODE.JAR. The
generated source code must be built on the OpenVMS system that hosts the
application. 4. Use the generated code Call the generated WSIT JavaBean from the
technology of your choice, including BEA WLS, Apache Axis, JMS, Java RMI, J2EE
or another JavaBean. 1.4 Wrapping a
3GL Application: C Sample The following steps demonstrate how to wrap a 3GL
application using the math sample program found in WSI$ROOT:[SAMPLES.C]. Other
3GL sample programs can be found in WSI$ROOT:[SAMPLES.COBOL] and
WSI$ROOT:[SAMPLES.BASIC]. (See Section 1.5 for information about a sample
program that wraps an ACMS application.) The information in this section is also included
in WSI$ROOT:[SAMPLES.C]MATH-SAMPLE.README. Note: For demonstration purposes only, the steps
below use the wsi$root:[samples.c] directory as the default directory. HP recommends that you
copy the contents of this directory into your own local directory before performing these
steps. Step 1:
Generate an Interface Definition with OBJ2IDL The tool OBJ2IDL.EXE is used to generate an XML
interface definition file (IDL). (For information
about manually reading or modifying an IDL, see Chapter 5.) Establish
a foreign command: $ obj2idl =
"$WSI$ROOT:[tools]obj2idl.exe" Compile
the wrapper that exposes the new interface: $ set def WSI$ROOT:[samples.c] $ cc/debug/noopt math.c Note: Your code must be compiled with the /DEBUG
option for the OBJ2IDL parser to work properly. Use
OBJ2IDL to generate an XML file with the interface definition: $ obj2idl -f WSI$ROOT:[samples.c]math.obj The tool OBJ2IDL creates the file math.xml. See
the Appendix for a full listing of math.xml. You should become familiar with the XML
description of OpenVMS applications. Review the math.xml file and notice the
overall structure of the file. Following
are the level 1 tags used to define an interface. These tags contain lower level tags and more
information. <OpenVMSInterface> <Primitives></Primitives> Define
the fundamental types referenced in the interface. <Routines></Routines>
Define
the callable routines of the interface. <Structures></Structures> Define
the structures of the interface. <Typedefs></Typedefs> Define
the type definitions of the interface. </OpenVMSInterface> Note: To view the XML file with coloring and a
collapsible outline, use Internet Explorer. Step 2:
Validate the Generated XML File The OBJ2IDL tool is sometimes unable to extract
a complete interface definition from the supplied object file. When the tool is
missing data or has made assumptions, a comment is placed in the XML file below
the line of concern. The file math.log is also generated from
OBJ2IDL. Use this file to conveniently see an overview of the comments within
the XML file. (ACMS does not create a .log file.) $ ty math.log Generated IDL file:
WSI$ROOT:[samples.c]math.xml Tue Apr 5 11:22:37 2005 In this case the tool did not report any issues.
However, even in cases where the log file has not generated any error or
warning, you should always review the XML file to ensure that the interface
definition is exactly correct. It is very important that the XML IDL describe
the interface accurately to generate correct code in Step 3. The validate.jar tool is provided to allow you
to verify that an XML IDL file conforms to the openvms-integration.xsd schema.
Use this tool to validate all XML IDL files before they are passed to the
IDL2CODE tool. The IDL2CODE tool does not validate the XML IDL file. The validate tool is an executable JAR file. To
run the tool, you must supply two parameters: an XML IDL file and the
openvms-integration schema. For example: $ java -jar wsi$root:[tools]validate.jar
-x wsi$root:[samples.c]math.xml –s
wsi$root:[tools]openvms-integration.xsd Step 3:
Generate WSIT Components with IDL2CODE Use the tool IDL2CODE.JAR (also called the
Generator) to create a server wrapper for the application and a JavaBean
client. This tool requires certain JAR files to be in the Java classpath. A
command procedure is supplied to add these files to the java$classpath logical.
(The java$classpath logical lets you define a class path using OpenVMS file
specification syntax. Defining this logical overrides the classpath logical, if
set.) $ @WSI$ROOT:[tools]wsi-setenv - wsi$dev The New JAVA$CLASSPATH is: "JAVA$CLASSPATH" =
"WSI$ROOT:[LIB]WSIRTL.JAR" (LNM$JOB_86F82E00) = "[]" =
"WSI$ROOT:[LIB]VELOCITY-DEP-1_4.JAR" = "WSI$ROOT:[TOOLS]IDL2CODE.JAR" $ To generate files for the math demo, use the
following command. In this case, the
tool is passed the math.xml file and the application is named math. All generated files for the application are
placed in a subdirectory named generated. $ create/dir [.generated] $ java
"com.hp.wsi.Generator" -i math.xml -a math -o [.generated] File:
./generated/mathServer/build-math-server.com generated. File: ./generated/mathServer/methIds.h
generated. File:
./generated/mathServer/structkeys.h generated. File: ./generated/mathServer/math.wsi
generated. File: ./generated/mathServer/math.opt generated. File:
./generated/mathServer/math-server.h generated. File:
./generated/mathServer/math-server.c generated. File: ./generated/math/build-math-jb.com
generated. File: ./generated/math/Imath.java
generated. File: ./generated/math/mathImpl.java generated. *** Application math generated! *** $ Step 4:
Build the generated WSIT Components Build the
server: This command procedure installs the server image
after it has been built. This requires writing
to the WSI$ROOT:[DEPLOY] directory, which may be write protected on your
system. (This is a security
measure. Have your system manager assist
you if your account does not have the required privileges.) $ set def
WSI$ROOT:[samples.c.generated.mathserver] $ @BUILD-MATH-SERVER Begin server build procedure. ..configuring switches and compiler
options ..compiling native server code ..linking shareable image ..installing server image End server build procedure. $ Build the
client: The JavaBean build procedure creates a JAR file
that contains the WSI Java classes used to call the server created earlier. $ SET DEF
WSI$ROOT:[samples.c.generated.math] $ @BUILD-MATH-JB Begin java bean build procedure. The New JAVA$CLASSPATH is: "JAVA$CLASSPATH" = "WSI$ROOT:[LIB]WSIRTL.JAR"
(LNM$JOB_86D5AE00) = "[]" =
"WSI$ROOT:[LIB]VELOCITY-DEP-1_4.JAR" = "WSI$ROOT:[TOOLS]IDL2CODE.JAR" ..Compiling structure classes ..Compiling math Interface classes ..Creating math.JAR file from classes End of JavaBean build procedure. Step 5a:
Run the Math Sample “In-Process” You can run the math sample program in-process
or out-of-process. In-process means that the application will be run in the
process of the caller. (Follow the instructions in step 5b instead of 5a if you
want to run the sample out-of-process.) Add the
math.jar file to the java$classpath. $ @WSI$ROOT:[tools]wsi-setenv –
WSI$ROOT:[samples.c.GENERATED.math]math.jar The New JAVA$CLASSPATH is: "JAVA$CLASSPATH" =
"WSI$ROOT:[LIB]WSIRTL.JAR" (LNM$JOB_86F82E00) = "[]" =
"WSI$ROOT:[LIB]VELOCITY-DEP-1_4.JAR" = "WSI$ROOT:[TOOLS]IDL2CODE.JAR" =
"WSI$ROOT:[SAMPLES.C.GENERATED]MATH.JAR" $ In the normal course of development, you would
now need to write a JavaBean to call the math JavaBean that was generated
above. However, for the purpose of this demonstration, a JavaBean file named
mathcaller.java is provided in the directory WSI$ROOT:[samples.c]. See the
Appendix for a source listing of this file. Compile
the supplied JavaBean: $ set def WSI$ROOT:[samples.c] $ javac mathcaller.java Run the
supplied JavaBean: $ java mathcaller Sum of 10 and 15 is 25 Product of 10 and 15 is 150 $ Step 5b:
Run the Math Sample “Out-of-Process” You can run the math sample program either in-process
or out-of-process. Out-of-process means that the sample will be run in a
separate process managed by the WSIT runtime. (Follow the instructions in step
5a instead of 5b if you want to run the sample in-process.) Add the
math.jar file to the java$classpath. $ @WSI$ROOT:[tools]wsi-setenv -
WSI$ROOT:[samples.c.GENERATED.math]math.jar The New JAVA$CLASSPATH is: "JAVA$CLASSPATH" =
"WSI$ROOT:[LIB]WSIRTL.JAR" (LNM$JOB_86F82E00) = "[]" =
"WSI$ROOT:[LIB]VELOCITY-DEP-1_4.JAR" = "WSI$ROOT:[TOOLS]IDL2CODE.JAR" =
"WSI$ROOT:[SAMPLES.C.GENERATED.MATH]MATH.JAR" $ In the normal course of development, you would
now need to write a JavaBean to call the math JavaBean that was generated
above. However, for the purpose of this
demonstration, a JavaBean file named mathcaller.java is provided in the
directory WSI$ROOT:[samples.c]. See the
Appendix for a source listing of this file. Modify the
provided Java file: To run the math sample out-of-process, make the
following changes to mathcaller.java: • Call a different constructor • Call remove when done with server These changed lines are underlined in the
following listing of mathcaller.java. $ type mathcaller.java import math.*; import java.io.*; import com.hp.wsi.WsiIpcContext; public class mathcaller { /** Creates a new instance of public mathcaller() { } public static void main(String[] args) { try { mathImpl math = new mathImpl(new
WsiIpcContext()); int num1 =
10; int num2 = 15; int result; result = math.sum(num1, num2); System.out.println("Sum of " +
num1 + " and " + num2 + "is " + result); result = math.product(num1, num2); System.out.println("Product of
" + num1 + " and " + num2 + "is " + result); math.remove(); } catch (Exception e) { System.out.println("Exception
thrown"); } } } Important: Review
WSI$ROOT:[DEPLOY]MATH.WSI. By default, the deployment configuration file is the
most restrictive. It assumes the application is not reusable, therefore it
needs a new server process for every client. After evaluating your application,
you can modify math.wsi to scale the deployment configuration for the
application. See Chapter 2, Deployment Considerations, for more information. Compile
the supplied JavaBean: $ set def WSI$ROOT:[samples.c] $ javac mathcaller.java Run the
supplied JavaBean: $ java mathcaller Sum of 10 and 15 is 25 Product of 10 and 15 is 150 $ 1.4.1
Server/Application
Build Procedure The Web Services Integration Toolkit generates a
command procedure to build a server. The
generated command procedure, named build-<appname>-server.com, creates a
shareable image named <appnam>.exe and copies it to the deployment
directory WSI$ROOT:[DEPLOY]. The WSIT
runtime loads this shareable image to process requests from the WSIT generated
JavaBean. The shareable image <appnam>.exe is
composed of three parts: • The object file provided by the user (in the
XML IDL file) to expose the application interface. For example,
wsi$root:[samples.c]math.obj located in wsi$root:[samples.c]math.xml. • A
WSIT object file named <appname>-server.obj which exposes the application
interface with a set of fixed WSIT entry points. The source file for this
object file is <appname>-server.c. • A
WSIT shareable image containing common reusable procedures. This shareable image is named
SYS$LIBRARY:WSI$COMMON.EXE. This shareable image must provide entry points
for the WSIT runtime to call. The entry
points for all WSIT applications are always the same. The entry points are as follows: Symbol
Name Symbol Type WSI$INIT PROCEDURE WSI$EXIT PROCEDURE WSI$START_SESSION PROCEDURE WSI$END_SESSION PROCEDURE WSI$ACMS_SIGN_IN PROCEDURE WSI$ACMS_SIGN_OUT PROCEDURE WSI$VMS_LOGIN PROCEDURE WSI$VMS_LOGOUT PROCEDURE WSI$INVOKE PROCEDURE WSI$INVOKE_DCL PROCEDURE WSI$GET_FILE PROCEDURE WSI$INFO_BLOCK DATA WSI$DCL_PROC_MAPS DATA
WSI$FILENAME_MAPS DATA 1.4.2 Customizing the Build Environment In the default behavior described in the
preceding section, the application’s interface object module is expected to
process the requests without calling others modules. While this approach allows
WSIT applications to be quickly prototyped, it is obviously not sufficient for
“real” applications. The application being wrapped will almost always
be composed of many object modules, object libraries, and/or shareable images.
These object modules need to be packaged into a shareable image that includes
the WSIT files described above. You can package the object modules in two ways,
as follows: • Add the few WSIT build elements to the
existing application’s build environment.
(This is the recommended method.) • Add the application files to the WSIT server
build command procedure. If you choose the recommended option above, the
file <appname>.opt provides an overview of the files and entry points
that must be added to the new application’s shareable image. If you decide to integrate the WSIT files into
your application, remember that the application must be built as a shareable
image named <appnam>.exe and must be copied to the WSIT deployment
directory WSI$ROOT:[DEPLOY]. 1.5 Wrapping
an ACMS Application: ACMS Sample The following steps demonstrate how to wrap an
ACMS application using the sample program found in
WSI$ROOT:[SAMPLES.ACMS]. Sample programs
written in 3GL languages can be found in WSI$ROOT:[SAMPLES.C],
WSI$ROOT:[SAMPLES.COBOL], and WSI$ROOT:[SAMPLES.BASIC]. (See Section 1.4 for
information about a sample program that wraps a C application.) The information in this section is also included
in WSI$ROOT:[SAMPLES.ACMS]ACMS-SAMPLE.README. Important: Before you run this sample program, make sure
ACMS is properly configured and running on your system. This ACMS application exists in a nondistributed
environment and illustrates some common functions of an administrative system
using an Rdb database. For example, in this system, a user adds a new employee
record to a master file or updates an existing employee record. The following files (a modified version of the
Getting Started tutorial included with ACMS for OpenVMS) are installed by the
Web Services Integration Toolkit for OpenVMS installation in the
WSI$ROOT:[SAMPLES.ACMS] directory: acms-sample.readme;1 acmscaller.java;1 ACMSEXAMPLE_SETUP.COM;1 EMPLOYEE_INFO_APPL_WSI.ADF;1 WSI_ADD_EMPL_INFO.TDF;1 WSI_EMP_INFO_TASK_GROUP.GDF;1 WSI_GET_EMPL_INFO.TDF;1 WSI_PUT_EMPL_INFO.TDF;1 To run the Web Services Integration Toolkit ACMS
sample program, perform the following steps. Step
1: Execute the WSIT-supplied command
file to set up the ACMS application On the OpenVMS system on which you installed
WSIT, log in using an account with SYSTEM privileges. Create a directory to set up the application.
For example: $ create /dir [.acmsgenerated] Set default to the newly created directory: $ set def [.acmsgenerated] Execute the following command: $
@WSI$ROOT:[samples.acms]acmsexample_setup.com This assumes that the ACMS$EXAMPLES logical is
present and correct on your system. This DCL script does the following: • Creates a local data dictionary for this
application • Defines a CDD (common dictionary data) record
(using the supplied .CDO files) • Defines a CDD entry task • Builds the application, generating a STDL file
(used to import ACMS task and structure • Starts the ACMS application When prompted for a CDD directory, you can press
Enter to accept the default (which will be under the directory you just created
and set default to), or you may choose another name or location. For example: CDD Directory?
DKA100:[USER.ACMSGENERATED.DICTIONARY] : The sample application is set up and started
when you see the following: %ACMSINS-S-ADBINS, Application DISK:[USER.ACMSGENERATED]EMPLOYEE_INFO_APPL_BWX.ADB;
has been installed to ACMS$DIRECTORY Step
2: Generate an interface definition with
STDL2IDL.JAR Use the STDL2IDL.JAR tool to generate an XML
interface definition (IDL file) from the STDL file generated in Step 1. Run the STDL2IDL importer: $ java -classpath
WSI$ROOT:[TOOLS]stdl2idl.jar "com.hp.wsi.Import" -f
EMPLOYEE_INFO_APPL_WSI.STDL Import File was successfully processed. File: ./employee_info_appl_wsi.xml
generated. *** Files for
Application employee_info_appl_wsi successfully generated! *** Step
3: Review and validate the generated XML
file Because STDL files completely describe the ACMS
application, the STDL2IDL tool is able to use the STDL file to create a
complete WSIT interface definition representation of that ACMS application.
However, even if the STDL2IDL tool specifies that the IDL generation was
successful, you should review and validate the generated XML file to ensure
complete accuracy. The XML IDL must accurately describe the interface to
generate correct code in Step 4. For this reason, WSIT includes the validate.jar
tool to allow you to verify that an XML IDL file conforms to the
openvms-integration.xsd schema before it is passed to the IDL2CODE.JAR tool.
(The IDL2CODE.JAR tool does not validate the XML IDL file.) To run the
validate.jar tool, supply two parameters: an XML IDL file and the
openvms-integration schema. For example: $ java -jar wsi$root:[tools]validate.jar
-x
wsi$root:[samples.acms]employee_info_appl_wsi.xml -s wsi$root:[tools]openvms-integration.xsd Step
4: Generate WSIT components with
IDL2CODE.JAR Use the IDL2CODE.JAR tool to create a server
wrapper for the application and a JavaBean client. This tool requires certain
Jar files to be in the Java classpath. A command procedure is supplied to add
these files to the java$classpath logical. $ @WSI$ROOT:[tools]wsi-setenv
- wsi$dev The New JAVA$CLASSPATH is: "JAVA$CLASSPATH" =
"WSI$ROOT:[LIB]WSIRTL.JAR" (LNM$JOB_86F82E00) = "[]" =
"WSI$ROOT:[LIB]VELOCITY-DEP-1_4.JAR" = "WSI$ROOT:[TOOLS]IDL2CODE.JAR" $ To generate files for the ACMS sample, use the
following command. In this case we pass the tool the employee_info_appl_wsi.xml
file (generated above) and we call the application AcmsApp. We also place all
generated files for the application in a subdirectory named generated. $ create/dir [.generated] $ java "com.hp.wsi.Generator"
-i employee_info_appl_wsi.xml -a
AcmsApp -o [.generated] File:
./generated/AcmsAppServer/build-AcmsApp-server.com generated. File:
./generated/AcmsAppServer/methIds.h generated. File: ./generated/AcmsAppServer/structkeys.h
generated. File:
./generated/AcmsAppServer/AcmsApp.wsi generated. File:
./generated/AcmsAppServer/AcmsApp.opt generated. File:
./generated/AcmsAppServer/AcmsApp-server.h generated. File: ./generated/AcmsAppServer/AcmsApp-server.c
generated. File:
./generated/AcmsApp/build-AcmsApp-jb.com generated. File: ./generated/AcmsApp/IAcmsApp.java
generated. File:
./generated/AcmsApp/AcmsAppImpl.java generated. File:
./generated/AcmsApp/CONTROL_WORKSPACE.java generated. File: ./generated/AcmsApp/EMPLOYEE_INFO_WKSP.java
generated. *** Application AcmsApp generated! *** $ Build the
server: The server build procedure links the generated
server files with the user's application, which creates a dynamically loadable
shareable image. $ set def [.generated] $ @BUILD-ACMSAPP-SERVER Begin server build procedure. ..configuring switches and compiler
options ..compiling native server code ..linking shareable image ..installing server image End server build procedure. $ Build the
client: The JavaBean build procedure creates a JAR file
that contains the WSIT Java classes used to call the server created earlier. $ @BUILD-ACMSAPP-JB Begin Java bean build procedure. The New JAVA$CLASSPATH is: "JAVA$CLASSPATH" = "WSI$ROOT:[LIB]WSIRTL.JAR"
(LNM$JOB_86F82E00) = "[]" =
"WSI$ROOT:[LIB]VELOCITY-DEP-1_4.JAR" = "WSI$ROOT:[TOOLS]IDL2CODE.JAR" ..Compiling structure classes ..Compiling acmsapp Interface classes ..Creating acmsapp.JAR file from classes End of JavaBean build procedure. Step
5: Run the ACMS Sample Add the
AcmsApp.jar file to the java$classpath. $ @WSI$ROOT:[tools]wsi-setenv - disk:[directory]acmsapp.jar The new JAVA$CLASSPATH is: "JAVA$CLASSPATH" =
"WSI$ROOT:[LIB]WSIRTL.JAR" (LNM$JOB_86F82E00) = "[]" =
"WSI$ROOT:[LIB]VELOCITY-DEP-1_4.JAR" = "WSI$ROOT:[TOOLS]IDL2CODE.JAR" = "disk:[directory]ACMSAPP.JAR" $ In the normal course of development, you would
now need to write a client to call the AcmsApp JavaBean that was generated
above. However, for the purpose of this sample, a client file named
acmscaller.java is provided in the directory WSI$ROOT:[samples.acms]. Compile
the supplied client: $ set def WSI$ROOT:[samples.acms] $ javac acmscaller.java Run the
supplied client: $ java acmscaller ******* Creating JavaBean & Server
********** ************ Calling AcmsSignIn
*************** ***** Calling add and get empl_info
tasks ****** ************ Calling AcmsSignOut
*************** 123456 John Adams 1 MA 01776 ******** Removing the JavaBean &
Server ********* *********** End ACMS Client ************* $ The output from the Java program shows the code
that the client is executing, as well as the calls that it is making into
ACMS. The data displayed was first
entered into an Rdb database via ACMS, then retrieved using ACMS for display
purposes. The Web Services Integration Toolkit allows you
to quickly and easily generate sample clients that call the WSIT generated
JavaBean. These clients are especially useful when prototyping, testing, or
creating a demo for an integration project. However, these samples are not
intended to be used in a production environment. You can specify the type of client you want the
WSIT generator (IDL2CODE) to generate by using the –C parameter. There are three different sample clients that
IDL2CODE can generate: ·
POJO – a simple java command line tool ·
JSP – a Java Server Page
that can be deployed in Tomcat or other containers. ·
AXIS2 Web Service – a web services that can be deployed in Apache
AXIS2 (available in WSIT V3.0 and higher) Specifying –c S generates only the POJO command
line client. Specifying –c J generates
only the JSP client. Specifying –c W
generates only the AXIS2 web service, and specifying –c SJW generates all. For example, to generate sample clients for the
C math application from Section 1.4, follow the same sequence of
steps from 1 to 4. At step 3, however,
pass in the additional switch shown below. Note: WSIT generated JSP samples require a server
environment that supports the JSP V2.0. Examples include Tomcat 5.5.9 and
WebLogic Server V9.0. $ java
"com.hp.wsi.Generator" -i math.xml -a math -c SJ -o [.generated] File: ./generated/mathServer/build-math-server.com
generated. File: ./generated/mathServer/methIds.h
generated. File:
./generated/mathServer/structkeys.h generated. File: ./generated/mathServer/math.wsi
generated. File: ./generated/mathServer/math.opt
generated. File:
./generated/mathServer/math-server.h generated. File:
./generated/mathServer/math-server.c generated. File: ./generated/math/build-math-jb.com
generated. File: ./generated/math/Imath.java
generated. File: ./generated/math/mathImpl.java
generated. File:
./generated/mathSamples/POJO/mathMain.java generated. File:
./generated/mathSamples/POJO/build-math-PoJoClient.com generated. File:
./generated/mathSamples/JSP/index.html generated. File:
./generated/mathSamples/JSP/mathMethodList.html generated. File:
./generated/mathSamples/JSP/mathPopulate.jsp generated. File:
./generated/mathSamples/JSP/mathDoCall.jsp generated. File:
./generated/mathSamples/JSP/build-math-JspClient.com generated.*** Application
math generated! *** $ Using the generated
POJO client sample: Normally this class will be written to integrate
the WSIT generated JavaBean with the Java technology of your choice. The sample must first be built as shown below. $ @wsi$root:[tools]wsi-setenv -
WSI$ROOT:[samples.c.generated.math]math.jar $ set default
WSI$ROOT:[samples.c.generated.mathSamples.POJO] $ @build-math-PoJoClient Begin client build procedure. ..Compiling mathMain client class End of client build procedure. To run this client, type the following at the
command line: $ java "math.mathMain" The sample client is able to make calls to the
methods of the generated JavaBean. There
is a limitation that only methods with primitive arguments can be called. To see
which methods the sample client can call, use the switch –m as shown below. $ set default
WSI$ROOT:[samples.c.generated.mathSamples.POJO] $ java math.mathMain -m The list of available methods within math are: sum(int P1, int P2) product(int P1, int P2) (Methods that take structures or arrays as
parameters are not callable from this command line interface. These methods are denoted by the * next to
them.) To call the sum and product methods with arguments
of 5 and 2, use the commands as shown below. $ set default
WSI$ROOT:[samples.c.generated.mathSamples.POJO] $ java
math.mathMain -m sum -p1 5 -p2 2 Calling mathImpl.sum: P1 = 5 P2 = 2 Return value = 7 ++ The client was successful ++ $ java math.mathMain -m product -p1 5
-p2 2 Calling mathImpl.product: P1 = 5 P2 = 2 Return value = 10 ++ The client was successful ++ $ Using the
generated JSP client sample: Similar to the POJO sample, the JSP sample
client must first be built as shown below. $ @wsi$root:[tools]wsi-setenv –
WSI$ROOT:[samples.c.generated.math]math.jar $ set default
WSI$ROOT:[samples.c.generated.mathSamples.JSP] $ @build-math-JSPClient Begin JSP client build procedure. Unpacking static files into current
location. Copying math.jar into local
[.WEB-INF.lib] directory Creating mathJsp.war file End of JSP client build procedure. To deploy this client: Copy mathJsp.War into the deployment directory
for your JSP server. To deploy the JSP, copy the mathJsp.war file to
a web server servlet deployment directory. For example, if you have installed
Tomcat (CSWS_JAVA) on OpenVMS, the command is similar to the following: $ copy mathJSP.war
sys$common:[apache.jakarta.tomcat.webapps] After the war file has been copied, you can view
the JSP pages by using a URL similar to the one shown below. (Replace
yourwebserver.hp.com with the actual name of your web server.) By default, Tomcat listens on port 8080. If
the system manger changed the port number, replace 8080 with the new number. $ copy mathJSP.war
sys$common:[apache.jakarta.tomcat.webapps] The POJO client is not supported when the –l
switch is used on IDL2CODE. Note: Web
applications deployed as Java classes are seen and used immediately, but web
applications deployed as JAR files may require a Tomcat restart in order for
them to be seen and used. For
information about restarting Tomcat, see the CSWS_JAVA (Tomcat) for OpenVMS
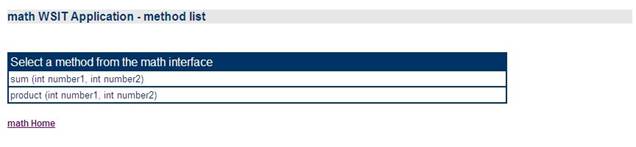
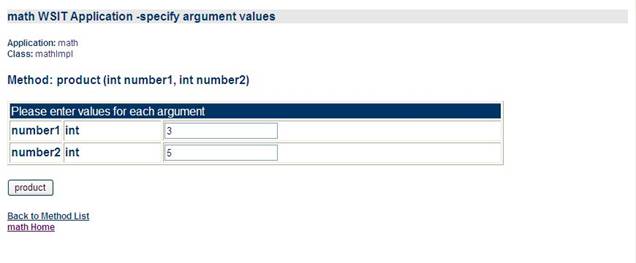
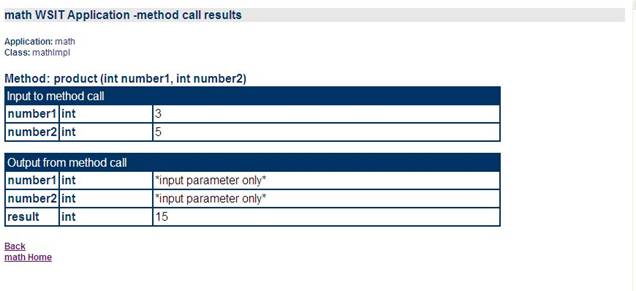
documentation at http://h71000.www7.hp.com/openvms/products/ips/apache/csws_java_relnotes.html The following screen captures illustrate the JSP
sample client calling the C Math application. Example Web
Page 1: The mathJSP Application
Example
Web Page 2: The MathJSP Application
Methods
Example
Web Page 4: The MathJSP Application
Method Product Results
Using the
generated AXIS2 client sample: The AXIS2 web service sample must first be built
as shown below. (This is similar to the
POJO sample.) The generated DCL command procedure that builds
the web service uses the ANT tool. This tool can be downloaded from the OpenVMS
web site. $
@[.generated.mathSamples.Service]build-service Begin web service build procedure. Buildfile: build.xml [echo] Building against WSIT application
jar file = /wsi$root/samples/c/generated/math/math.jar [echo] Building against Axis2 libraries
in directory = /AXIS2$ROOT/lib [echo] Web Service name = mathService [echo] Build directory = build cleanService: prepare: [mkdir] Created dir:
/wsi$root/samples/c/generated/mathSamples/Service/build [mkdir] Created dir:
/wsi$root/samples/c/generated/mathSamples/Service/build/lib [mkdir] Created dir:
/wsi$root/samples/c/generated/mathSamples/Service/build/mathService [mkdir] Created dir:
/wsi$root/samples/c/generated/mathSamples/Service/build/mathService/META-INF [mkdir] Created dir:
/wsi$root/samples/c/generated/mathSamples/Service/build/mathService/lib generate.service: [copy] Copying 1 file to
/wsi$root/samples/c/generated/mathSamples/Service/build/mathService/META-INF [copy] Copying 1 file to
/wsi$root/samples/c/generated/mathSamples/Service/build/mathService/lib [javac] Compiling 2 source files to
/wsi$root/samples/c/generated/mathSamples/Service/build/mathService [javac] Compiling 1 source file to
/wsi$root/samples/c/generated/mathSamples/Service/build/mathService [jar] Building jar:
/wsi$root/samples/c/generated/mathSamples/Service/build/mathService.aar [echo] [echo] To deploy this web service,
verify the build was successful and copy [echo] the archive file to the Axis2
deployment directory [echo] For Example: [echo] $ copy [.build]mathService.aar
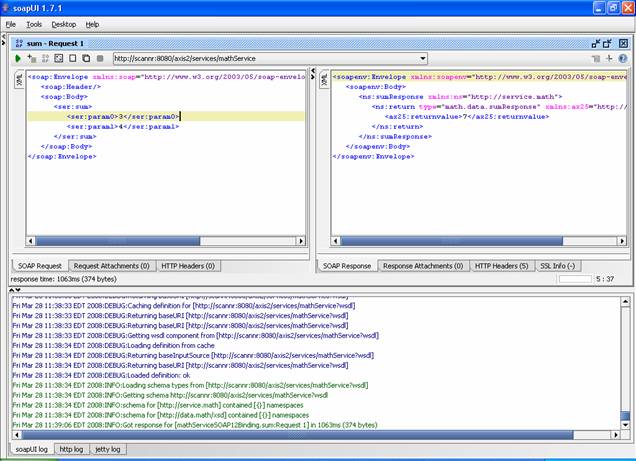
TOMCAT$ROOT:[webapps.axis2.WEB- [echo] BUILD SUCCESSFUL Total time: 26 seconds End of web service build procedure. To test the web service and associated WSIT
application, you can use any web service client and any platform. SOAPUI is a
free and very useful tool. It is the available from http://soapui.com/. The figure below shows the
tool being used to execute the generated web service.
1.7 Using ANT with the Web Services Integration
Toolkit The Web Services Integration Toolkit provides
the capability to use Ant to automate the tasks for exposing your application (described
in Section 1.4). Ant is a powerful
Java-based build tool that is an open source Apache project. Ant is platform independent and highly
extendable. The build scripts are XML files containing
targets and specifying tasks and properties. For more information about Ant, see the web site
for the Apache Ant Project at http://ant.apache.org and the Ant Manual at http://ant.apache.org/manual/index.html. 1.7.1 Ant Setup For WSIT V2.0 and earlier: The Web Services Integration Toolkit includes its own binary distribution of Ant 1.6.5. To set up Ant, establish the foreign command by
entering the following command: $ ant ==
“@WSI$ROOT:[tools.ant]ant.com” 1.7.2 Configuring the wsit-ant-user.properties File Before you run Ant to build your application,
you must configure the wsit-ant-user.properties file by specifying a set of property
values. Perform the following steps to
complete the configuration: 1. Copy the wsit-ant-user.properties file from
WSI$ROOT:[tools.ant] to your local directory
2. Set the application type property to be one
of the following, based on the kind of application 3GL.with.OBJ 3GL.with.IDL ACMS.with.STDL For detailed Ant property descriptions, see
Section 1.7.4. 3. Specify values for all required properties
for the kind of application you are building, in the section marked “BEGIN
properties for …”. 4. Specify values for properties in the section
“BEGIN COMMON properties to customize.” 1.7.3 Using the wsit-ant-userbuild.xml Build File After you have configured the properties, you
can build the full WSIT application and any generated sample clients by copying
the wsit-ant-userbuild.xml file from wsi$root:[tools.ant] to your local
directory and executing the following command: $ ant "-f
wsit-ant-userbuild.xml" validate: buildserver: buildjspclient: To run a specific target only (for example, the
help target), execute the following command in the directory where the build
file is located. (For detailed target descriptions, see Section 1.7.5.) Note: The file wsit-ant-userbuild.xml cannot be
used with versions of WSIT earlier than V1.1. $ ant "-f wsit-ant-userbuild.xml
help" Buildfile: wsit-ant-userbuild.xml help: [echo] obj2idl : Creates IDL file from the 3GL
application's object module [echo] stdl2idl : Creates IDL file from the ACMS
application's STDL file. [echo] validate : Verifies the application's IDL file
conforms to the [echo] idl2code : Creates a WSIT server interface wrapper, a
WSIT Java Bean [echo] buildserver : Builds a shareable image by linking the
WSIT server wrapper [echo] buildjavabean
: Creates a jar file that
contains the WSI Java classes to [echo] buildpojoclient
: Builds the generated POJO client code
to call the [echo] buildjspclient
: Builds the generated JSP client
code to call the
BUILD SUCCESSFUL Total time: 2 seconds $ 1.7.4 Ant Property Descriptions Required: Set the apptype property, which specifies
application type, to one of the following values: 3GL.with.OBJ 3GL.with.IDL ACMS.with.STDL
Properties for applications of type 3GL.with.OBJ. Required
if apptype is set to 3GL.with.OBJ.
Properties for applications of type 3GL.with.IDL. Required
if apptype is set to 3GL.with.IDL.
Properties for applications of type ACMS.with.STDL. Required
if apptype is set to ACMS.with.STDL.
Common properties for all types of
applications. (Required)
Common properties for all types of
applications. (Optional)
1.7.5 Ant Target Descriptions
1.7.6 Custom Ant Tasks WSIT defines custom ant tasks for the IDL2CODE,
OBJ2IDL, and STDL2IDL tools. 1.7.6.1 IDL2CODE
Task Runs the Generator (IDL2CODE) to create a server
wrapper for the application and a JavaBean client. 1.7.6.2 IDL2CODE
Parameters
1.7.6.3 OBJ2IDL
Task Runs the OBJ2IDL tool to generate an XML interface
definition from a 3GL application’s object module (I64 only). 1.7.6.4 OBJ2IDL
Parameters
1.7.6.5 STDL2IDL
Task Runs the STDL2IDL tool to generate an XML
interface definition from an ACMS application’s STDL file. 1.7.6.6 STDL2IDL
Parameters
With the Web Services Integration Toolkit and
Distributed NetBeans for OpenVMS working together, you can do the following: • Edit text files generated by the WSIT tools
using Distributed NetBeans and a remote FTP filesystem • Remotely compile your language source files • Remotely execute DCL command procedures •
Remotely execute Ant scripts For more information about remote operations and
Distributed NetBeans in general, see the Distributed NetBeans online help. The online help is available when you install
Distributed NetBeans on your desktop system, and from
http://h71000.www7.hp.com/openvms/products/ips/netbeans/documents.html 1.8.1 WSIT
Build Templates The WSIT Build Template files are included with
Distributed NetBeans so that you can use the NetBeans template system to create
your WSIT build script and property file from within Distributed NetBeans. To create your WSIT Ant build script and
property file using the template, perform the following steps: 1. Select the remote directory in the filesystem
explorer where you would like to place the build template, 2. Select WSIT Templates/WSIT-Build Ant Script
Files. Click Next. 3. Name your script, and click OK. Two files are created in your directory: an Ant build script that is named according
to the previous step, and a property file named wsit-ant-user.properties. You must now customize the property file for
your application. Follow the
instructions in the property file to customize.
In addition, you can customize the Ant build script if desired. Once you have completed your modifications to the
build script and property file for your application, you should modify the
version of Ant that will used to remote execute your Ant script. 1.8.2 Using the WSIT-Supplied Ant Version Earlier versions of WSIT bundled the ANT
tool. The ANT tool is now available as a
separate PCSI kit. As of V3.0, WSIT will no longer include
The Web Services Integrated Toolkit provides an
easy to use set of utilities that can turn standalone applications into
distributed applications, making them more widely accessible. While this is great, this new found
accessibility may raise security concerns. Because of this, WSIT implements 2
different ways of restricting access to a wrapped application and/or the system
resources that the application accesses. Depending on the environment and the granularity
needed, you can either set a blanket setting within the server process that all
users are restricted to, or you can force all users to login using their own
account. Each is discussed below. 1.9.1 Server
Process Security In an application environment where the
application’s generated JavaBean and server wrapper are run in two different
processes, you can specify under which OpenVMS account the server process is to
run. You do this by modifying the
<Account> attribute within the deployment descriptor (.wsi file)
associated with the application, as shown in the following example. (The deployment descriptors can be found in
the WSI deployment directory, wsi$root:[deploy].) <!-- Server Application Options --> <Account>MyAccount</Account>
<!-- Name of the account the server runs in --> Note: When the <Account></Account >
property is not specified within the application deployment configuration file
(.wsi), WSIT runs the out-of-process servers in the same account that the
wsi$manager is running from. In most
cases, this is the SYSTEM account. This method of restricting access has an
application level granularity. This means
that all of the application’s server processes run under the specified
account. For example, you can set up the
Payroll application to always run under the Payroll account regardless who is
connecting to it. The server process method of restricting access
has both pros and cons, as follows: Reasons to use server process security: • It
is fast and easy to change during and after deployment. • All users of a given application have the same
access to the system. • Requires no change to the client. • Users do not need their own account to use the
application. Potential problems with server process security: • Does not keep users from accessing the
application itself. • Makes no distinction between users. • Specified accounts require minimum privileges.
• Requires the JavaBean and server wrapper to
run in two different processes. 1.9.2 Per
User Security If you need to restrict access to the
application itself, or need a finer granularity in limiting access to system
resources, you can do that by using the optional per user security. You choose this at generation time by
specifying the –L switch on the IDL2CODE command line. When you specify this option, WSIT generates
an application with two additional methods in the interface, as follows: OpenVmsLogin (username, password) OpenVmsLogout() Note: POJO clients are not supported when the -L
switch is used on the IDL2CODE command line. Applications that have these methods in the
interface can only be accessed after OpenVmsLogin() has been successfully
called. (The error “Must login first” is
returned until a successful login occurs.) After the user has successfully
logged into an account, that account’s privileges and quotas are used when
calling into the application. This means
that resources used by the application can be protected on a per user basis. The per user method of restricting access has
both pros and cons, as follows: Reasons to use per user security: • Distinguishes between users, allowing better
access control over resources. • Can block access to the application itself. • Works whether the JavaBean and server wrapper
are in the same process or different processes. Potential problems with per user security: • Decision to use must be made at code
generation time. • Requires client to call Login and Logout
methods. • All users require an OpenVMS account in order
to access the application.
OBJ2IDL Usage: obj2idl <parameters> Required
Parameters: -f Specify the object file name along with its
location Optional
Parameters: -m Specify the map file name along with its
location. Default is -o Specify the output file name along with its
location. -v Version information. VALIDATE Usage: validate <parameters> Required
Parameters: -x xmlfile Location and name of the xml file
to be validated. -s schemafile Location and name of a schema file
(usually .xsd) used to validate the XML. IDL2CODE Usage: idl2code <parameters> Required
Parameters: -i
<IDL filespec> XML IDL file describing the application
to wrap. -a
<Application Name> Name
to be given to the WSIT-generated application. Optional
Parameters: -o
<Output Directory> Directory in which to generate the wrapper
files. -p
<Velocity prop file> Velocity properties file to replace WSIT templates. -l Require
OpenVMS authentication to be used with this interface. POJO clients do not work with the –l
parameter. See Section 1.9.2 for more
information. -j JavaDoc-based documentation for the generated interface. -d
<Tracing Level> Output
tracing information while the generator is running, 1 -> 5. -w Generate the Web Services
interface classes. -c <S|J> Generate sample client(s) for the generated
interface. -v Print
out the version number for this generator. -h or
–help Print this list of
options. 1.10.1
In-Process/Out-of-Process
Parameters
JSP and POJO (Plain Old Java Object) sample
clients call the application in-process by default. To load your application in a separate
process (out-of-process), do the following: • For a JSP sample client: Specify “outproc” as P1 on the command line
when building the JSP sample client. • For a POJO sample client: Specify “-o” when running the POJO client. 1.10.2 POJO or JSP Sample Client Parameters The optional switch –c is provided to tell the
WSIT generator (IDL2CODE) to generate a sample client with a command line
interface (S) or generate a sample client with a JSP interface (J). These samples are provided to make testing
and development with WSIT easier. Specifying –c S generates only the POJO command
line client. Specifying –c J generates only the JSP client, and –c SJ generates both kinds of clients. For your convenience, the WSIT samples directory
contains a command procedure called OBJ2JAVA.COM that can generate a WSIT
application by issuing the various commands for the different WSIT tools. The
procedure has symbols that can be modified to custom build a WSIT
application. These symbols control the
most often used features of the WSIT product, such as sample generation,
tracing and authentication. They are
documented in the procedure. For example: $ @WSI$ROOT:[SAMPLES]OBJ2JAVA.COM *** issuing command: obj2idl -f
WSI$ROOT:[samples.c]math.OBJ;4 *** issuing command: java -jar
wsi$root:[tools]validate.jar -x WSI$ROOT:[samples.c]math.xml -s wsi$root:[tools]openvms-integration.xsd XML file validated sucessfully *** issuing command: java
"com.hp.wsi.Generator" -i WSI$ROOT:[samples.c]math.xml -a
mathSample -o
[.generatedmathSample] -c S The New JAVA$CLASSPATH is: "JAVA$CLASSPATH" =
"WSI$ROOT:[lib]WSIRTL.JAR" (LNM$JOB_894EAAC0) = "[]" =
"WSI$ROOT:[lib]VELOCITY-DEP-1_4.JAR" = "WSI$ROOT:[tools]idl2code.JAR" %WSI-I-GENCREOUT, The specified Samples
directory does not exist, creating
/wsi$root/samples/generatedmathSample/mathSampleSamples File: /wsi$root/samples/generatedmathSample/mathSampleServer/build-mathSample-server.com
generated. File:
/wsi$root/samples/generatedmathSample/mathSampleServer/methIds.h generated. File:
/wsi$root/samples/generatedmathSample/mathSampleServer/structkeys.h generated. File:
/wsi$root/samples/generatedmathSample/mathSampleServer/mathSample.wsi generated. File:
/wsi$root/samples/generatedmathSample/mathSampleServer/mathSample.opt generated. File:
/wsi$root/samples/generatedmathSample/mathSampleServer/mathSample-server.h
generated. File:
/wsi$root/samples/generatedmathSample/mathSampleServer/mathSample-server.c
generated. File:
/wsi$root/samples/generatedmathSample/mathSample/build-mathSample-jb.com
generated. File:
/wsi$root/samples/generatedmathSample/mathSample/ImathSample.java generated. File:
/wsi$root/samples/generatedmathSample/mathSample/mathSampleImpl.java generated. %WSI-I-GENCREOUT, The specified
directory does not exist, creating
/wsi$root/samples/generatedmathSample/mathSampleSamples/POJO File: /wsi$root/samples/generatedmathSample/mathSampleSamples/POJO/mathSampleMain.java
generated. File:
/wsi$root/samples/generatedmathSample/mathSampleSamples/POJO/build-mathSample-PoJoClient.com
generated. *** Application mathSample generated! *** *** issuing command: @[.generatedmathSample.mathSample]BUILD-mathSample-JB Begin java bean build procedure. ..Compiling structure classes ..Compiling mathSample Interface classes ..Creating mathSample.JAR file from
classes End of JavaBean build procedure. *** issuing command:
@[.generatedmathSample.mathSampleserver]BUILD-mathSample-SERVER Begin server build procedure. ..configuring switches and compiler
options ..compiling native server code ..linking shareable image ..installing server image End server build procedure. *** issuing command:
@wsi$root:[tools]wsi-setenv -
WSI$ROOT:[samples.generatedmathSample.mathSample]mathSample.jar The New JAVA$CLASSPATH is: "JAVA$CLASSPATH" =
"WSI$ROOT:[lib]WSIRTL.JAR" (LNM$JOB_894EAAC0) = "[]" =
"WSI$ROOT:[lib]VELOCITY-DEP-1_4.JAR" = "WSI$ROOT:[tools]idl2code.JAR" =
"WSI$ROOT:[SAMPLES.GENERATEDMATHSAMPLE.MATHSAMPLE]MATHSAMPLE.JAR" *** issuing command:
@[.generatedmathSample.mathSampleSamples.POJO]build-mathSample-PoJoClient Begin client build procedure. ..Compiling mathSampleMain client class ..Packaging client class(es) into jar
file, mathSampleClient.jar End of client build procedure. To run this client, type the following
at the command line: $ @wsi$root:[tools]wsi-setenv -
WSI$ROOT:[samples.generatedmathSample.mathSampleSamples.POJO]mathSampleClient.jar $ java "mathSample.mathSampleMain" $ 2 D E P L O Y M E N T C O N S I D E R
A T I O N S 2.1 Types of OpenVMS Applications Applications running on OpenVMS systems can be
roughly divided into two groups, as follows: • Applications designed for a single client
environment • Applications that can be called by multiple
clients The first group, applications designed for a single
client environment, are often older OpenVMS applications that assume a
timesharing runtime environment. The user logs into the OpenVMS system, which
in turn creates a process. The applications are typically executed entirely in
the user’s process. In this design,
there is a single user (the client). There is an assumed one-to-one
relationship between the client and the application. The second group, applications that can be
called by multiple clients, are often newer OpenVMS applications. These applications
are designed to serially process multiple clients (one at a time), or to
concurrently process multiple clients (all at the same time). When the Web Services Integration Toolkit
exposes an OpenVMS application as a JavaBean, the application becomes callable
from the second (newer) design model in which multiple clients can call the
application from multiple processes or threads. You should understand in which
group your wrapped application belongs (the specific design model) and manage
client access to the application accordingly. WSIT provides a number of
features to help in managing this interaction, which are discussed in the
following sections. In the following sections, the term application
is used to represent the original application being exposed. The term client is
used to represent the JavaBean caller which makes calls to the WSIT-generated
JavaBean. There are two ways in which you can deploy your
application using WSIT: in-process deployment
and out-of-process deployment. In-process deployment occurs when the
application and the client are called from the same process, as illustrated in
the following diagram.
There are advantages and disadvantages to using
in-process deployment. Advantages: Fastest return time for client calls to
application. No overhead added by the WSIT runtime. Disadvantages: A crash will bring down all components in the
process (client and application). There are no WSIT deployment settings for
in-process applications -- the interaction between the client and the
application is not managed by the WIST runtime. In-process deployment provides
the fastest execution time, but it requires that the developer ensure that the
client does not establish an environment in which the application will fail. For example, some J2EE application servers may
use multiple threads to call the client. This requires that the developer
determine if the application can successfully operate in this environment. If
the developer determines that the application can only support one client at a
time, then the client must use a mechanism to order the calls before they are sent
to the application (via the WSIT-generated objects). If you do not specify out-of-process deployment
settings (described in the following sections), your application will run
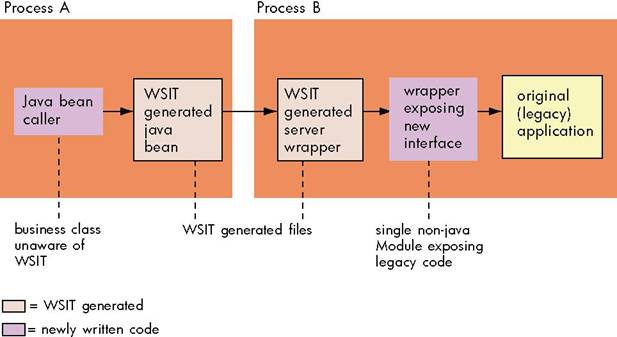
in-process by default. Out-of-process deployment occurs when the client
and application are run in different processes, as illustrated in the following
diagram. The WSIT runtime environment manages the interaction between the two
processes. You can customize this environment by modifying a deployment
descriptor file.
There are advantages and disadvantages to using
out-of-process deployment. Advantages: Typically scales better than in-process
deployments. Allows the use of the WSIT runtime deployment properties. Disadvantages: Adds complexity and overhead to every call. Most older
applications benefit from using an out-of-process deployment to avoid complex issues
that result from mixing older and newer environments. The WSIT deployment
properties, described in the following sections, allow out-of-process
applications to choose from a wide variety of configurations. 2.3.1 Sessions A session is the period of time in which a
client uses an application. A session can last for: • The duration of a single call • The lifetime of the client The type of session you use should mimic the
original design of the application. For example, in older timesharing
applications, a session is often the entire time that the client uses the
application. In newer applications, the client may use a session to perform a
specific task and then declare that it is finished with the session. WSIT allows the developer to specify when a
session with an application begins and when it ends. The WSIT-generated
JavaBean has a constructor named <application-name>Impl. For example, the
stock sample has a constructor named stockImpl. To establish an out-of-process
deployment, call the constructor with an instance of the class WsiIpcContext.
The WsiIpcContext constructor can be called with one of three different session
types. 1. LIFETIME_SESSION: This is the default
session type. The session begins when the applications Impl object is created
and the session ends when the remove method is called. 2. NO_SESSION: The session begins when a
method call is made on the application and the session ends when that call
returns. The lifetime of the session is a single method call. 3. TX_SESSION: The session begins when the
client logs into the application by calling the methods AcmsSignIn or
OpenVMSLogin of the application Impl object. The session ends when the client
calls the methods AcmsSignOut or OpenVMSLogOut. 2.3.2 Application Reusability The default configuration for all WSIT
out-of-process applications is not reusable. An application is not reusable when it can only
be used for one client session. When the session is finished, the application
has created state that prevents it from being called again. The next client
session requires a new instance of the application. An application can also be sequentially
reusable, concurrently reusable, or concurrently reusable with multiple
threads. See Chapter 3 for more
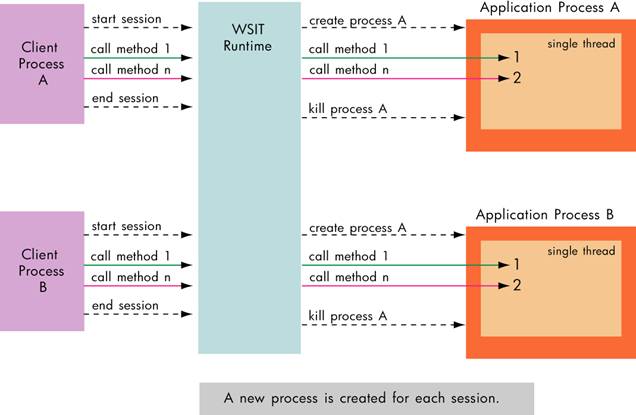
information about these types of applications. 2.3.3 Using Multiple Processes to Scale Applications When deploying an application out-of-process,
WSIT allows the creation of a process pool, which is a collection of processes
for the application that WSIT manages in the background to improve response
time. Each process is running the application. The XML tag
<ProcessPooling> is used to configure the properties of the pool. • Use the tag <MaximumProcesses> to
specify an upper limit for the largest number of processes that WSIT can create
for the application. • Use the tag <MinimumProcesses> to
specify a lower limit for the fewest number of processes that WSIT should
maintain for the application. The number specified will be the number of
processes WSIT starts initially. •
Use the tag <MinimumIdleProcesses> to specify the number of
non-busy processes to keep on an ongoing basis. WSIT creates more processes as
needed to maintain these free processes. WSIT does not create more than
<MaximumProcesses> of processes. •
Use the tag <MaxInactivitySeconds> to specify when a process
should be removed from the pool and run down. Specify the maximum number of
seconds that an application can be idle before it is automatically stopped. 2.3.4 Specifying Out-of-Process
Deployment Options Running your application out-of-process allows
you to specify configuration options. These options are contained in the XML
file wsi$root:[deploy]application-name.wsi. The out-of-process
configuration options are as follows:
2.3.4.1 Out-of-Process
Account Preparation and Requirements If you are specifying an account in which to run
out-of-process servers, you may want the account to have a minimal amount of
privileges. You can specify an account to run out-of-process
servers that has only the NETMBX and TMPMBX privileges. To use an account with these privileges,
perform the following steps: 1. Create an identifier within the system UAF
with the name WSI$SERVER. (Perform this
step one time only.) 2. Grant the WSI$SERVER identifier to each
account used to run a WSIT out-of-process server. If you do not perform these steps, the
privileges required by the account are as follows. These privileges must be
DEFAULT privileges. BYPASS SYSNAM SYSPRV IMPERSONATE DETACH TMPMBX 2.4 Web Services Integration Toolkit Interfaces The primary goal of the Web Services Integration
Toolkit is to take the interface exposed by a user’s application and present it
as a Java based interface. These
interfaces are defined by their set of routine calls, the parameters passed in
and out of these routines, and the mechanisms used to pass those
parameters. The following sections
discuss this in more detail, and provides a background on the actions WSIT
takes to wrap an application and provide it with a new interface. 2.4.1 Application Interfaces (User
Supplied)
The Application’s Programming Interface (API) is
where the work begins for WSIT. The
application’s interface, provided by the user, is parsed by the WSIT tools
OBJ2IDL or STDL2IDL. These tools create
a WSIT-specific Interface Definition Language (IDL) file describing the
application’s interface. This definition
includes the set of routines included within this interface. For each routine, the IDL describes the
parameter list in detail, including the parameter names, the parameter
datatypes, and the passing mechanisms used to pass these parameters. 2.4.2 OpenVMS Datatypes Supported by
WSIT The datatype specified for each parameter must
be one of the following: • a
standard OpenVMS datatype (as defined by the OpenVMS Calling Standard) • an
array of these datatypes • a
structure composed of these datatypes Internally, WSIT uses the Descriptor datatype
definition values, DSC$K_DTYPE_*, to identify all datatypes. However, depending on the language that you
are using, these may more readily be recognized as float, double, short, and so
on. See the Datatype Mapping section for
a table that lists all of the OpenVMS datatypes that WSIT supports, along with
their Java type mappings. 2.4.3 Passing Mechanisms
WSIT supports the three passing mechanisms
described by the OpenVMS Calling Standard. This standard does not dictate which
passing mechanism must be used by a given language compiler. (Note that
language semantics and interoperability considerations might require different
mechanisms in different situations.) WSIT generates the code needed to pass
each parameter using the mechanism specified within the IDL file. The three
passing mechanisms are as follows: • By “Value” An immediate value argument item contains the value
of the data item. The argument item, or the value contained in it, is directly
associated with the parameter. • By “Reference” A reference argument item contains the address
of a data item such as a scalar, string, array, or structure. This data item is
associated with the parameter. • By “Descriptor” A descriptor argument item contains the address
of a descriptor, which contains structural information about the argument's
type (such as string length) and the address of a data item. This data item is
associated with the parameter. An example of a C module whose interface has
been parsed can be found in: wsi$root:[samples.c]math.c The IDL generated from parsing math.c can be
found in the Appendix. 2.4.4 JavaBean Interface (Generated
by WSIT) The previous section discussed what the user’s
application exposes as an interface and how it gets described. This section discusses the Java based
interface that WSIT generates from that description of the user’s API. This includes how the OpenVMS datatypes map
into Java types, as well as how WSIT accommodates the different passing
mechanisms. For each routine that is exposed by the user’s
application, a method is generated in the new Java based interface. Although the generated methods are named the
same as their routine counterparts, the casing may be different to better
accommodate Web Services based clients. The parameters for each method have a
1-to-1 mapping to their user application counterparts. This mapping is discussed in the following
section. 2.4.5 Datatype Mapping
When defining the interface within WSIT, you do
not regularly need to be concerned with most issues related to datatype
conversion. When you specify the OpenVMS datatypes for the parameters, WSIT
converts them to appropriate Java types. WSIT converts primitive types from
OpenVMS to Java as described in the mapping table below. WSIT also maps arrays of these types to Java
arrays, and structures comprising of these types to JavaBean style classes that
encapsulate the mapped types.
¹ 128 bit
floating point datatypes are mapped to doubles within Java, limiting their
range and precision. ² See Section
2.4.5.1 for a detailed description of the String datatype. Note: All unsigned integer types are mapped to
their signed counterparts when converted. This shifts the range of values that
can be represented by a given datatype. For example, an unsigned word, which
has a range of 0 to 65535, is mapped to a short, which has a range of 32767 to
-32768. Be sure to account for this in
your client if the values are expected to exceed those of the signed
counterpart. 2.4.5.1 String Datatype There are three attributes associated with the
string datatype (DSC$K_DTYPE_T) within the IDL, as follows: Size The string size required by the routine
being called. WSIT truncates or pads
as needed to make the passed in string the size specified. (Note that a specified size of 0 means that
the size is dynamic, and that the called routine can handle any size
string. It is assumed that the routine
has some other way of determining the size of the passed in string, such as
another argument, or by using the null terminator.) NullTerminatedFlag This flag specifies that a null
terminator is to be put into the string after the last significant character of
the string. If a size is specified and
padding is required, the padding occurs after the null character. If a size is specified and truncation is
required, then one extra byte is truncated to make room for the null character.
FixedFlag This informational flag specifies how to
interpret the size attribute. If a size
is specified, then this flag should be set to 1 to indicate that the string has
a fixed size. If the size is 0, then
this should be set to 0 to specify that the string has a dynamic size. (Note that this attribute is not used by the
WSIT Generator.) For example: <Primitive Name =
"AutoGen_NullTermString" Size = "0" VMSDataType = "DSC$K_DTYPE_T" NullTerminatedFlag = "1" FixedFlag = "0"/> 2.4.6 Parameter Usages The Application Interface section described how
parameters are passed using specific passing mechanisms. Although Java does not support these
different passing mechanisms for passing parameters, there is one aspect of the
passing mechanism that does apply. The usage of a parameter describes how the
called routine intends to affect that parameter. The variations are as follows: • In Only In Only states that the called routine intends
to only read the parameter and not modify or write to the parameter. This is the
default usage for the by “Value” passing mechanism, but may be used with by
“Reference” or by “Descriptor” if the developer is sure that the routine is not
going to change the parameter value. • In / Out In / Out states that the called routine intends
to both read, and then modify the contents of the specified parameter. The caller of the routine must pick up the
new value for the parameter on return. This is the default usage for both the
by “Reference” and by “Descriptor” passing mechanisms. • Out Only Out Only states that the called routine intends
to only write to the specified parameter and not read it. As with In/Out, the caller of this routine
must pick up the new value for the parameter on return. This is associated with either the by
“Reference” or by “Descriptor” passing mechanisms. If the usage of a parameter is In Only, then the
generated Java method can take the Java type directly, because it does not need
to look for a modified parameter value. However, if the usage is In/Out or Out
Only, then the generated Java method must take a wrapper or “Holder” class for
the mapped Java type. This Holder class
allows the client to retrieve the possibly modified parameter value. Each
OpenVMS to Java type mapping contains an associated Java Holder class for
parameters that have a usage other than In Only. (For more information, see the Mapping table
in the previous section under the “Java
in/out classes” column.) The supplied math sample (found in
wsi$root:[samples.c]) has the following C based routine: unsigned int sum (int number1, int
number2); Based on the mapping above, the Java method
generated for it is: int Sum (int number1, int number2) The Java client code is: int result = myapp.Sum (56, 72); If the above C routine was changed to take an
in/out parameter, the code would be as follows: void sum (int number1, int number2, int
*result); Based on the mapping table above, the Java
method generated is: void Sum (int number1, int number2,
IntHolder result); The Java client code is: IntHolder result = new IntHolder(); myapp.Sum (56, 72, result); int iresult = result.value; 2.5 Design Restrictions for Wrapped Applications The Web Services Integration Toolkit is an API
level wrapping tool. This means that an
appropriate programming interface into the application must be presented to the
Toolkit for it to successfully work. This includes items such as no terminal
input in the exposed routines, using standard OpenVMS calling mechanisms for
passing arguments, and so on. Beyond the standard restrictions mentioned
above, the Web Services Integration Toolkit contains other restrictions that
you must be aware of when wrapping your application. These restrictions are discussed in the
sections below. 2.5.1 Stack
Size Not Automatically Increased Based on Demand
Many legacy applications were designed to be
hosted in a process used by a single user.
This process would have a single thread of execution that would benefit
from the stack size automatically increasing based on demand. In modern multi-threaded environments, each
thread has a separate stack that does not automatically increase based on
demand. After the size of the stack is
set, it will not expand. It is very
important that a WSIT application understand how much stack space it
requires. Note that WSIT itself uses
very little stack space, however, each application is unique. The application can specify a stack size in
the WSI deployment property <StackSize> .
WSIT does not support primitives with the
types DSC$K_DTYPE_V and
DSC$K_DTYPE_VU. This would require the
marshaling code to copy individual bits which is a feature that WSIT does not
currently support. Alternatives include
the following:| ·
Use a BLOB type DSC$K_DTYPE_BLOB.
WSIT will not attempt to marshal the contents of a BLOB so the
application is in full control. ·
Expose the Parameter or Structure Field as one or more bytes. With this approach, the Java client can use
bytes, and the legacy application can still use bits. This impact to the 3GL
code is minimal. When the 3GL routine receives a parameter with byte-based
data, a simple assignment statement can copy the bytes to bits. For Structures, the 3GL code would use a
single call to copy the bytes to bits.
This routine would copy the byte-based structure fields to the bit-based
structure fields. An application can have the WSIT tool IDL2CODE generate
this copy routine by adding a template to the tool. For an example of this
template see the sample in the directory WSI$ROOT:[SAMPLES.TEMPLATES]. 2.5.3 Pointer
Types Not Supported Because of the distributed nature of
WSIT-wrapped applications, pointer types are problematic because their value is
dependent on the process space in which they were created. Although pointers
used within the context of the Pass-by-Reference and Pass-by-Descriptor passing
mechanisms are supported, all other uses of pointers are not supported by WSIT.
The following table lists the common cases in
which pointers are found, and identifies the pointers that are supported and
those that are not supported. (The descriptions are expressed in C syntax but
are relevant for all languages.)
Note: If a structure contains a pointer to a type,
WSIT passes the pointer as an integer without any regard for the type. The
application must handle the memory appropriately. This memory is only valid in
the context of the application being wrapped and is not valid in the generated
Javabean. 2.5.4 Single Instantiated WSIT
JavaBean Cannot Be Shared Among Multiple
Threads The WSIT runtime supports a many-to-one
relationship between clients and backend servers. However, each client must have its own
instance of the JavaBean object (unless you manually add synchronization code
to the generated JavaBean class). The
JavaBean object acts as the client's personal interface into the backend
server. It allows WSIT to make sure that
each client gets the correct context within the server. If a single JavaBean
instantiation is shared among clients, they will also share a single server
context. If concurrent calls are then
made without synchronization code put in place, this could lead to unexpected
results, including incorrect call data and memory management exceptions. See Section 4.4, Modifying an Existing Template,
for information about how to manually add synchronization code. 2.5.5 Languages
Tested with the OBJ2IDL Tool
The Web Services Integration Toolkit was written
to wrap ACMS applications and any 3GL-based applications that are callable
using the defined OpenVMS calling standard.
The WSIT runtime is language neutral and supports all OpenVMS
languages. The OBJ2IDL.EXE tool has only
been tested with the following languages: • ACMS • BASIC • C • COBOL Other languages that adhere to the OpenVMS
calling standard (including FORTRAN) should work, but have had limited testing
only. 2.5.6 Tips and Hints for Supported Languages
2.5.6.1 All
Languages The following issues apply to all WSIT-supported
languages (ACMS, BASIC, C, and COBOL). • The exception java.lang.UnsatisfiedLinkError:
no WSI$JNISHR may be generated: If you have not started WSIT by calling
SYS$STARTUP:WSI$STARTUP, an exception is thrown when you run the generated
JavaBean. 2.5.6.2 BASIC
Language The following issues apply to the BASIC language
only. • For formal parameters, passed by value, with
types other than strings or signed decimal data: OBJ2IDL.EXE defaults to a passing mechanism of
reference and a usage of IN/OUT. Modify
the XML to specify a passing mechanism of value and a usage of IN. • For formal parameters, passed by descriptor: OBJ2IDL.EXE does not recognize the type of the
formal parameter. In such cases, the type defaults to a null terminated
string. Modify the XML to specify the
correct type for the formal parameter. In some cases, you may need to add the
type (primitive or structure) to the XML. • For formal parameters that are arrays, if the
passing mechanism is descriptor: OBJ2IDL.EXE does not recognize the arrays. Modify the XML to specify the array. (See the example of syntax in the C language
section.) 2.5.6.3 C
Language The following issues apply to the C language
only. • When passing a formal parameter of byte (type
char) by reference: If a char is being used to represent a single
byte and is passed by reference as a formal parameter, then the generated XML
will specify the parameter as having a type of type=”AutoGen_NullTermString”.
Modify the XML to specify type=”char” which will properly resolve to a byte
(DSC$K_DTYPE_B). • For C applications, OBJ2IDL.EXE does not
recognize formal parameters that are arrays: For example, if an array of userstruct with size
3 is passed as a parameter, then the XML that is generated will be as follows: <Routine Name =
"incrementArrayOfStructures" ReturnType = "signed int"> <Parameter
Name = "array" Type = "userstruct" PassingMechanism =
"Reference" Usage = "IN/OUT"/> </Routine> Modify
the XML to specify the array as follows: <Routine Name =
"incrementArrayOfStructures" ReturnType = "signed int"> <Parameter
Name = "array" Type = "userstruct" PassingMechanism =
"Reference" Usage = "IN/OUT"
ArrayDimension = "1"> <Array LowerBound =
"0" UpperBound = "2"/> </Parameter> </Routine> 2.5.6.4 COBOL
Language The following issues apply to the COBOL language
only. • For all formal parameters: OBJ2IDL.EXE defaults the usage to IN/OUT. OBJ2IDL.EXE defaults the passing mechanism to
pass by reference. 2.5.7 Tips and Hints
for OpenVMS Alpha Users Using I64
generated XML IDL on Alpha: If you are using
the Web Services Integration Toolkit on an OpenVMS Alpha system, you can
generate your XML file on OpenVMS I64, and in most cases, copy it to OpenVMS
Alpha with few or no modifications. OpenVMS Alpha users who do not have an I64
system can use an OpenVMS I64 system provided by the HP TestDrive Program. This system has WSIT installed. To access
this resource you must register (for free) at http://www.testdrive.hp.com/accounts/register.shtml. When using an I64 generated IDL on OpenVMS
Alpha, be aware that some compilers may have different default values on I64
than on Alpha. These differences need to be addressed. For example, the C compiler uses a different
VMSDataType for primitive types float and double:
An application that uses a float must replace
the following: <Primitive Name = "float” Size =
"4” VMSDataType = "DSC$K_DTYPE_FS"/> with <Primitive Name = "float"
Size = "4" VMSDataType = "DSC$K_DTYPE_F"/> An application that uses a double must replace
the following: <Primitive Name = "float” Size =
"4” VMSDataType = "DSC$K_DTYPE_FT"/> with <Primitive Name = "float" Size =
"4" VMSDataType = "DSC$K_DTYPE_G"/> 2.5.8
Programming with Nested Structures When an application developer instantiates a
WSIT structure, the entire structure object, including all nested structure
objects, are also instantiated. This
allows WSIT to manage all memory associated with a nested structure. To populate the inner structure, you must first
obtain a reference to it. After a
reference is obtained, the get and set methods for its fields can be
called. For example: TopLevelStructure mystruct = new
TopLevelStructure (); InnerStructure inner =
mystruct.getInnerStructure (); inner.setField1(“somevalue”); inner.setField2(“somevalue”); If the Structure InnerStructure has a field that is also
a Structure, you can obtain a reference by calling: OtherStructure other =
inner.getOtherStructure(); 3 A D V A N C E D O U T – O F – P R O
C E S S C O N F I G U R A T I O N This
chapter is intended for experienced Web Services Integration Toolkit users. Before you configure the out-of-process
deployment file, identify your application’s level of reusability. If your
application is reusable, you can significantly reduce the number of processes
needed to service the clients. Next, to determine if a single instance of an
application can handle multiple clients, consider how you maintain state and
manage I/O within your application. Applications are frequently designed to
accumulate state from call to call. For example, the first call opens a file,
the second call reads from the file, and the third call updates and writes back
the modified record. In cases like this,
multiple clients within the same application may “step on” each other trying to
access the same files using the same channels. To help you determine your application’s level
of reusability, the following sections describe four applications, each with a
different level of reusability or combination of reusability and multiple
threads. This is the default
configuration for all WSIT out-of-process applications. An application is not reusable when it can only be used for one client session. When the session is finished, the application has
created state that prevents it from being called again. The next client session
requires a new instance of the application. This situation can exist in older
applications that assume a single long-lived client is their only client. To
identify this situation look for global (or static) variables that are used to
identify stored client-specific data. The following figure shows an application
that is not reusable:
For example, an application may not be reusable
if it has a global variable to hold a client account number and the account
number cannot be modified or reset with a subsequent call or other mechanism.
If a second session requires a different account number to be set, then the
application is not reusable. Deploying an application as not reusable is the
most restrictive case and has the highest runtime overhead, but is also the
safest configuration. When an application is not reusable, WSIT ensures that
the client always receive a new instance of the application. The order of events for a non-reusable
application is as follows: 1. The client instantiates the WSIT-generated
JavaBean. This starts a session with a free application. 2. WSIT
assigns the client the exclusive use of a process that is running the
application. The process may be newly created or may have been previously
created but never used. 3. The
client uses the application as it desires. One or more calls are made as part
of the session. 4. The
client tells the WSIT runtime that it is finished with the session by calling
the remove method of the WSIT-generated JavaBean. This assumes that a session
type of LIFETIME_SESSION is being used. A non-reusable application should not
use a NO_SESSION session because of the extremely high overhead which occurs
from creating and deleting a process for every method call. 5. WSIT
deletes the process. 3.2 CASE B: SEQUENTIALLY REUSABLE An application is sequentially reusable when it is able to process more than one
client session, but requires that exactly
one session be active at a time. The application must initialize its state
before processing the next client session. When an application is sequentially reusable,
WSIT will not delete the application process when the client is finished using
it. WSIT ensures that only one client can have a session outstanding with the
application. The following figure shows an application that
is sequentially reusable. For example, an application is serially reusable
if it has a global variable to hold a client account number and also a method to
initialize (or modify) the account number. In this way, each client can call
the initialize method to erase the state of a previous client’s session. The order of events for a sequentially reusable
application is as follows: 1. The client instantiates the WSIT generated
JavaBean. This starts a session with a free application. 2. WSIT assigns the client the exclusive use of
a process that is running the application. The process may be newly created or
may have been previously created. 3. The client uses the application as it
desires. One or more calls are made as part of the session. 4. The client tells the WSIT runtime it is
finished with the session based on the type of session used. 5. WSIT places the application in a pool so that
it is available for another client to use. To deploy an application as sequentially
reusable, make the following change to the file
wsi$root:[deploy]<application-name>.wsi: • Uncomment the XML tags <Reusable>
</Reusable> 3.3 CASE C: CONCURRENTLY REUSABLE An application is concurrently reusable when it can be called from multiple clients without regard to the
order of the clients’ sessions. This type of application has a mechanism for
keeping the state of each of the clients separated. WSIT uses a single thread
when forwarding the clients’ calls to the application. From the application’s perspective, the
clients’ sessions may be nested. This ensures that the application processes one
client call at a time. The following figure shows an application that
is concurrently reusable.
For example, an application is concurrently reusable
if its interface uses a context block to hold client data. In this way, the
logic in the application is generic in regard to the clients. The order of events for a concurrently reusable application is as follows: 1. The client instantiates the WSIT-generated
JavaBean. This starts a session with a free application. 2. WSIT assigns the client the use of a process
that is running the application. The process may be newly created or may have
been previously created. Other instances of the client may also be using the
same application, but WSIT ensures that all method calls are made one at a time
on the same thread. 3. The client uses the application as it
desires. One or more calls are made as part of the session. 4. The client tells the WSIT runtime it is
finished with the session based on the type of session used. 5. WSIT places the application in a pool so that
it is available for another client to use. To deploy an application as sequentially
reusable make the following changes to the file
wsi$root:[deploy]<application-name>.wsi: 1. Uncomment the XML tags <Reusable>
</Reusable> 2. Uncomment the XML tag <MaximumClients>
and specify a number greater than one for the number of client sessions that
the application can process 3.4 CASE D: CONCURRENTLY REUSABLE WITH MULTIPLE
THREADS An application is concurrently reusable and thread-safe when it can be called from multiple clients, at the same
time, on multiple threads. WSIT allows multiple client sessions to call the
application without any attempt to serialize them. The application was designed
to lock shared data when called by multiple threads. It is also written in a
language that is capable of generating thread-safe code. (For example, COBOL
and BASIC do not generate thread-safe code.) To determine if the application can handle calls
from different clients concurrently, consider the following: • Are all of the application resources that are
shared among clients protected in a thread-safe way? For example, using global symbols can cause
problems unless they are protected by a mutex or equivalent concept. • Is
the language that was used to write the application thread-safe? The following figure shows an application that
is concurrently reusable with multiple
threads. For example, an application is concurrently reusable
and thread safe if its interface uses a context block to hold client data, and
all access to global data, such as a global queue of client context blocks, is
protected by a thread-safe locking mechanism such as a mutex. The order of events for a concurrently reusable
with multiple threads application is as follows: 1. The client instantiates the WSIT-generated
JavaBean. This starts a session with a free application. 2. WSIT assigns the client the use of a process
that is running the application. The process may be newly created or may have
been previously created. Other instances of the client may also be using the
same application. WSIT uses multiple threads to call the application. 3. The client uses the application as it
desires. One or more calls are made as part of the session. 4. The client tells the WSIT runtime it is
finished with the session based on the type of session used. 5. WSIT places the application in a pool so that
it is available for another client to use. To deploy an application as sequentially
reusable make the following changes to the file
wsi$root:[deploy]<application-name>.wsi: • Uncomment the XML tags <Reusable>
</Reusable> • Uncomment the XML tags <MaximumClients>
</MaximumClients> and specify a number greater than one for the number of
client sessions that the application can process. • Uncomment the XML tag <MaximumThreads>
</MaximumThreads> and specify a number greater than one for the number of
threads that WSIT can use to call the application. The number of threads allowed to run
concurrently should be a percentage of the number of clients specified. A good rule of thumb is to look at the
average amount of time that each application call is expected to take. • If
the calls are small and quick, then the number of threads allowed to run
concurrently could be 25% of the number of clients. • If
you expect calls to take longer, then you should use a larger value, such as 50
to 60%. For example, if you specify ten clients per
application, and each application call will take some time, then allow six
threads to run. Note that once a system is in place, this number should be
monitored and adjusted as needed. 3.5 Single
Threaded Applications – Automatic Stack Expansion
Beginning in WSIT V3.0: WSIT creates threads to execute the application
code in out-of-process servers. This requires the developer to edit the WSI
file and specify the maximum thread stack size. It is often difficult for a developer to know
the maximum stack size to specify. As of
WSIT V3.0, a modification has been made for single threaded applications. Single threaded application can have the
stack size automatically extended as needed. To use this feature, specify the value 0 for the
stack size tag <StackSize>0<\StackSize>. You must also indicate that you have a
single threaded application. This can be
done by not specifying the <Reusable> tag. If you do specify the <Reusable> tag then you must
specify 1 as the maximum threads <MaximumThreads>1</MaximumThreads>. Multithreaded applications must still specify
the maximum stack size for each thread. 3.6 Example: Using
the Debugger
A WSIT server process can be debugged just like
any other OpenVMS detached process. (See the OpenVMS Debugger Manual for details.) A summary and an example debugging session
follows. Requirements
for using the Symbolic Debugger with WSIT ·
The application shareable image must have debug records. The
application code must have been compiled and linked debug (or linked to
generate a DSF file). ·
Depending on the version of the debugger you are using, you may
need to use UPPERCASE for the name of the WSIT application in the directory WSI$ROOT:[DEPLOY]
and for the global symbols that you wish to reference in your application. ·
The debugger requires that the client and server processes are
both in the same UIC GROUP. For your
WSIT application, this means that the WSI$STARTUP procedure must have been
executed from the same account (or a least the same SYSUAF GROUP UIC) as
specified in the application .WSI file. For example, if your application WSI
file uses <Account>DEPLOYER</ACCOUNT>, then the WSI$STARTUP must have been started
from the user DEPLOYER or another account in that same UIC group. General
Steps This example uses the following simple code in a
WSIT application. $ type samplewsitdbg.c #include <stdio.h> #include <stdlib.h> unsigned int MYROUTINE ( int number1,
int number2) { printf("\n"); printf("We are inside the
program"); printf("\n"); return number1 + number2; } Step 1: Compile and link your application with debug
records. Deploy to the WSI$ROOT:[DEPLOY] directory. Step 2: Start the application that you want to debug.
This can be done with different techniques: ·
By editing the WSI file and declaring the application reusable.
You can then create the server process by using your java client to trigger
startup. ·
By editing the WSI file to establish pre-started servers. This has
the advantage that the client does not need to execute a method of the routine
to load the application code. After WSIT has created the detached process, use
the $
show process/m command shown below to determine the process name. In this
example, the process name is SAMPLEWSI_0C09. Step 3: In another process, such as a telnet window,
start the debugger and connect to the detached server process. Note that you must set your image and module
names to establish the correct debugger context. This is the point when you should set any
breakpoints or other debugger commands that are of interest to you. $ debug/keep OpenVMS Alpha Debug64 Version V8.2-017 DBG> connect SAMPLEWSI_0C09 %DEBUG-I-NODSTS, no Debugger Symbol
Table: no DSF file found and -DEBUG-I-NODSTIMG, no symbols in
DISK$ALPHAV82:[VMS$COMMON.SYSEXE]WSI$SERVER.EXE;1 %DEBUG-I-NOLOCALS, image does not
contain local symbols %DEBUG-I-NOGLOBALS, some or all global
symbols not accessible DBG> set image SAMPLEWSITDBG DBG> set module SAMPLEWSITDBG DBG> set break MYROUTINE DBG> go %DEBUG-I-DYNLNGSET, setting language C break at routine SAMPLEWSITDBG\MYROUTINE
in THREAD 59 3386:
printf("\n"); DBG> Step 4: In the same window as Step 2, use your Java
client to call the application code. 3.7 Generating Tracing for
Application Interface It is often helpful to trace the data being
passed into and out of your application interface. The IDL2CODE tool is able to generate tracing routines
for the interface defined in the XML IDL file. To use this feature, specify the –t switch when
using the tool. $ java "com.hp.wsi.Generator"
-i wsi$root:[samples.c]math.xml -a
math -o [.generated] -t When this option is used, the generator produces
two extra files: <yourappname>-server-trace.h <yourappname>-server-trace.c For example: File:
/wsi$root/samples/c/generated/mathServer/math-server-trace.h generated. File:
/wsi$root/samples/c/generated/mathServer/math-server-trace.c generated. These files must be compiled and linked into the
applications shareable image. If an
application has its own build environment to create the shareable image, then
you must add these files to it. If you
rely on WSIT to generate the build environment, no action is required as the
tool automatically includes these files. After the tracing routines are built into the
code, they can be turned on and off using a logical. To turn on tracing, define the logical
WSI$APPTRACING. To turn off tracing,
deassign the logical. For example, tracing for the math sample would
look similar to the following: [Tue Apr 1 10:24:42 2008]
WSI$START_SESSION: App = math, SessionID
= 48676952, Dispatch = 50922584 [Tue Apr 1 10:24:42 2008] sum (Input):
SessionID = 48676952 number1 (long by val): 22 number2 (long by val): 33 [Tue Apr 1 10:24:42 2008] sum (Output):
SessionID = 48676952 Return (unsigned long by val): 55 [Tue Apr 1 10:24:42 2008]
WSI$END_SESSION: SessionID = 48676952 This tracing provides the name of the routine
being called (sum) the values of the parameters and their passing usage. It
also provides the return types if any.
The tracing routines can trace simple types, structures, arrays and
BLOBs. When the –t switch is specified, the tracing
will print out the value of every parameter being passed into and out of the
interface routine. When large parameters
are being passes this may have a dramatic effect on the performance of the
code. To indicate that a parameter
should not be traced, modify the IDL for the interface to include the attribute
“NoTrace.” For example: <Parameter Name = "number1" Type = "signed int" PassingMechanism =
"Value" Usage = "IN" NoTrace="1"/> The generated tracing routines are provided as a
debugging aid. They are not intended to be used in production code. This tracing should not be used as a
replacement for an applications own tracing. When a WSIT application is executed
out-of-process it is often valuable to see the results of tracing statements
within the application. If the logical
WSI$LOGFILE is defined, WSIT creates a log file in the default directory of the
user who issued the WSI$STARTUP.COM command. For example, if the SYSTEM account
was used to startup WSIT, then the SYS$SYSROOT:[SYSMGR] directory will have a
log file for each detached process. This
log file can be used to capture print statements in the application code as
well as the tracing controlled by the WSI$APPTRACING logical. The logical is translated at the time the
process is created. If the logical is modified, it will have no effect on
processes that already exist. The name of the log file is based on the node
name and application name. It has the following form: WSI$NODENAME_YOURAPPNAME_SEQUENCENUMBER.LOG For example: WSI$STAR_MATH_00001.LOG |
||||||||||||||||||||||||||||||||||||||||||||||||||||||||||||||||||||||||||||||||||||||||||||||||||||||||||||||||||||||||||||||||||||||||||||||||||||||||||||||||||||||||||||||||||||||||||||||||||||||||||||||||||||||||||||||||||||||||||||||||||||||||||||||||||||||||||||||||||||||||||||||||||||||||||||||||||||||||||||||||||||||||||||||||||||||||||||||||||||||||||||||||||||||||||||||||||||||||||||||||||||||
|
Property Name |
Description |
|
ModuleName |
For
3GL based applications, this is the fully qualified file specification of the
OBJ module that contains the application’s interface. For ACMS based applications, this is the
ACMS application name. |
|
Language |
This
is the language in which the interface module was written in, such as C89,
BASIC, COBOL, and ACMS, … |
The blocks nested within
the <OpenVMSInterface> block (shown above), contain the collection of
definitions corresponding to that component or translation type.
For example, the
<Routines> block contains all of the individual <Routine> blocks
that describe the exposed routines of an application. The <Structures> block contains the
list of <Structure> definitions; the <Primitives> block contains
the list of <Primitive> or OpenVMS datatype translations; the
<Typedefs> block contains the list of <Typedef> definitions; and
the <Enumerations> block contains the list of <Enumeration>
definitions.
All of the individual
definition blocks and tags are described in greater detail in the following
sections.
The collection of
<Enumeration> blocks contains all of the constant definitions that are
defined as enumerations within the application.
An <Enumeration> is made up of a name, an OpenVMS datatype, an
optional size in bytes, and the list of Name/Value pairs. The format of the
block is as follows:
<Enumerations>
<Enumeration Name = “myenums”
VMSDataType =
“DSC$K_DTYPE_L”
ByteSize = “4”>
[…see Enumerator block for more
information…]
</Enumeration>
</Enumerations>
The properties of the
<Enumerations> tag are defined as follows:
|
Property Name |
Description |
|
Name |
The
name given to this collection of enumerators. |
|
VMSDataType |
The
equivalent OpenVMS datatype of the enumeration. The DSC$K_DTYPE_* values are used to specify them in a language &
application independent way. |
|
ByteSize |
The size, in bytes, of the specified datatype. |
6.3 Enumerator
Block
Each Enumerator within
an enumerator collection (an Enumeration) specifies a name/constant value
pair. These pairs make up the set of
valid values for the Enumeration. The
format of an Enumerator is as follows:
<Enumeration
…>
<Enumerator Name = “PIC$SIZE1” ConstantValue = “1”/>
<Enumerator Name =
“PIC$SIZE2” ConstantValue = “2”/>
</Enumeration>
The properties within
the <Enumerator> tag are as follows:
|
Property Name |
Description |
|
Name |
The
name given to the specified constant value. |
|
ConstantValue |
The
constant value associated with the specified name. |
6.4 Typedef
Block
The collection of
<Typedef> blocks contains all of the typedef translations used within the
application. Each <Typedef> tag
describes a user defined mapping of a type name to an equivalent type. In C, this looks similar to the following:
typedef myint unsigned int;
Each <Typedef> tag
has the following format:
<Typedef Name = “myint”
TargetName = “unsigned
int”/>
Where each property is
defined below:
|
Property Name |
Description |
|
Name |
The
user defined name associated with the typedef within the application. |
|
TargetName |
The equivelant datatype that this typedef maps to. This may specify another typedef, a
primitive, or a structure definition. |
6.5 Primitive
Block
The collection of
<Primitive> blocks contains the datatype translations to their OpenVMS
equivalents for all datatypes used within an application. Each
<Primitive> mapping contains the datatype, the OpenVMS datatype
(primitive) that it maps to, and any other information needed to completely
describe that primitive. For example,
the format for a <Primitive> tag that describes a Packed Decimal is as
follows:
<Primitive
Name = "DSC$K_DTYPE_P_5_2"
Size = "5"
Scale = "2"
VMSDataType =
"DSC$K_DTYPE_P" />
The properties of the
<Primitive> tag are described below:
|
Property Name |
Description |
|
Name |
The
application or language specific name for the specified datatype, such as
unsigned int or PIC 9(8). See Note. |
|
VMSDataType |
The
equivalent OpenVMS datatype specification. The DSC$K_DTYPE_* values are used to specify them in a language
neutral way. |
|
Size |
The
size in bytes of the primitive being defined. This is ignored for datatypes
whose size is constant, such as DSC$K_DTYPE_L. If the datatype is a string, and the size
is 0, then the string is considered dynamically sized. |
|
Scale |
Only
used with scaled numeric datatypes, this property specifies the scale factor
for the primitive being defined. Note
that a positive scale factor specifies that the decimal point moves to the
left. (The example above would
represent a number with the format of 123.45.) |
|
FixedFlag |
Only
used with string datatypes, this informational property specifies that the
string being defined is of fixed size. A value of 1 specifies fixed size,
while a 0 specifies that the string is dynamically sized. |
|
NullTerminatedFlag |
Only
used with string datatypes, this property specifies if a null terminator
should be appended to the end of the string. For fixed length strings, the
string will be truncated if needed in order to append the null terminator. A value of 1 says to append a null, while a
value of 0 specifies no null. |
Note For datatypes that
are the same but differ in size and/or scale, the Primitive Name must be
unique. One way to do this is to embed the size and scale values into the
Primitive Name itself. (See Packed
Decimal example above.)
6.6 Structure
Block
The collection of
<Structure> blocks contains all of the user defined structure (record)
definitions. Each <Structure> block
represents a single user defined structure (record) definition. All parameters and fields must eventually
map to an OpenVMS primitive, or one of these structure definitions. The format of the <Structure> block is
as follows:
<Structures>
<Structure Name = "MyStruct"
TotalPaddedSize
= "128">
[…See Field Block below for more
information…]
</Structure>
</Structure>
The properties of the
<Structure> tag are as follows:
|
Property Name |
Description |
|
Name |
The
user specified name given to this structure (record, workspace, …) definition. |
|
TotalPaddedSize |
The
size of the structure, including any padding added for alignment purposes. |
6.7 Field Block
Each <Field>…</Field>
block describes a single field within a structure. The format of a
<Field> block is as follows:
<Structure … >
<Field Name = "Fld1"
Type = "signed int"
Offset = "0"/>
<Field Name = "Fld2"
Type = "FixedString16"
Offset = "4"/>
<Field Name = "AryFld3"
Type = "signed int"
Offset = "20"
ArrayDimension = "1"
RowByColumn = "0">
<Array LowerBound =
"0"
UpperBound =
"9"/>
</Field>
</Structure>
The properties of the
<Field> tag are as follows:
|
Property Name |
Description |
|
Name |
The user
specified name given to this field |
|
Type |
The
language dependant or application specific datatype associated with this
field. |
|
Offset |
The
offset (within the structure) to the start of this field. |
|
ArrayDimension |
If this
field is an array of elements, this property specifies the number of
dimensions within the array. |
|
RowByColumn |
If
this field is a multi-dimensional array of elements, this property specifies
the ordering of the dimensions within memory. All languages, besides Fortran, use a
RowByColumn layout. Use a “1” to
specify RowByColumn, and a “0” to specify ColumnByRow (Fortran). |
|
<Array>
Tag |
See
below. |
6.7 1 Field Array Tag
For fields and
parameters that are arrays, the <Array> tag is used to specify dimension
information for a single dimension. The
number of <Array> tags must match the number specified in the
ArrayDimension Field property above.
The format of the Array tag is shown above.
The properties of the
<Array> are as follows:
|
Property Name |
Description |
|
LowerBound |
The
user specified lower bound of this dimension. |
|
UpperBound |
The
user specified upper bound of this dimension. Note that the upper bound must
be larger than the lower bound. |
6.8 Routine
Block
The collection of
<Routine> blocks contains all of the definitions for the routines being
exposed by the application. Each
<Routine> block contains the complete description of a single exposed
routine call, including all parameter & return information. The format for the <Routines> block is
as follows:
<Routines>
<Routine Name
= “MyRoutine”
ReturnType = “unsigned
int”
Description = “This is
the description for my routine”>
[…Refer to the Parameter
block section below for more information…]
<\Routine>
<\Routines>
The properties of the
<Routine> tag are as follows:
|
Property Name |
Description |
|
Name |
The
user specified name for this exposed routine. |
|
ReturnType |
The language
dependant or application specific datatype associated with this routine’s
return type. |
|
Description |
A
user specified description to be associated with this routine definition. |
|
MethodID |
Species
a value to use as the internal method ID instead of the one automatically
generated for this routine. This is
only useful in rare cases for backwards compatibility within the generated
interface. |
|
<Parameter>
Tag |
See
below for more information. |
6.9 Parameter
Block
The <Parameter>
Block is used to describe a single parameter within a routine’s parameter
list. There will be one
<Parameter> tag for each parameter passed in or out of the routine. The <Parameter> block has the
following formats:
<Routine …>
<Parameter Name =
"Param1"
Type =
"unsigned int"
PassingMechanism
= "Value"
Usage =
"IN"/>
<Parameter Name = "AryParam2"
Type =
"__int16"
PassingMechanism
= "Reference"
Usage =
"IN/OUT"
ArrayDimension =
"1"
RowByColumn =
"1"
ArrayDescriptorType = "DSC$K_CLASS_A">
<Array
LowerBound = "0"
UpperBound =
"10"/>
</Parameter>
<Parameter Name =
"AryParam3"
Type = "__int16"
PassingMechanism
= "Descriptor"
Usage =
"IN/OUT"
ArrayDimension =
"1"
RowByColumn =
"1"
ArrayDescriptorType =
"DSC$K_CLASS_A">
</Parameter>
</Routine>
The <Parameter>
tag has the following properties:
|
Property Name |
Description |
|
Name |
The
user specified name for this parameter. |
|
Type |
The language
dependant or application specific datatype associated with this parameter
type. |
|
PassingMechanism |
The
OpenVMS based passing mechanism used to pass this parameter. It can be “Value”, “Reference”, or
“Descriptor”. |
|
Usage |
This
property specifies how this parameter will be effected by the called
routine. It is either “IN”, which
specifies that it doesn’t modify the value, or “IN/OUT” which specifies that
it does modify this value. |
|
ArrayDimension |
If this
parameter is an array of elements, this property specifies the number of
dimensions within the array. |
|
RowByColumn |
If
this parameter is a multi-dimensional array of elements, this property
specifies the ordering of the dimensions within memory. All languages, besides Fortran, use a
RowByColumn layout. Use a “1” to
specify RowByColumn, and a “0” to specify ColumnByRow (Fortran). |
|
ArrayDescriptorType |
If
this parameter is an array passed by descriptor, this property specifies the
descriptor class that should be used when passing this array. The valid values for this property are,
“DSC$K_CLASS_A”, “DSC$K_CLASS_NCA”, DSC$K_CLASS_VSA. |
|
Resizable |
Special
case only: If this parameter is specified as a single dimensional byte array,
passed by descriptor, with a usage of “IN/OUT”, then setting this property to
“1” defines this parameter as a resizable byte array. |
|
FreeMemory |
Special
case only: If this parameter is defined as a resizable byte array, then
setting this property to “1” will specify that a freeing of the array memory
needs to take place after the call. |
|
<Array>
Tag |
See
below for more information. |
6.9.1 Parameter Array Tag
For field arrays, and
parameter arrays that are passed by reference, the <Array> tag is used to
specify dimension information for a single dimension. For Parameter arrays that are passed by
reference, the number of <Array> tags must match the number specified in
the ArrayDimension Parameter property above.
The format of the Array tag is shown above.
The properties of the
<Array> are as follows:
|
Property Name |
Description |
|
LowerBound |
The
user specified lower bound of this dimension. |
|
UpperBound |
The
user specified upper bound of this dimension. Note that the upper bound must
be larger than the lower bound. |
<?xml
version="1.0" encoding="UTF-8"?>
<OpenVMSInterface
xmlns="hp/openvms/integration"
xmlns:xsi="http://www.w3.org/2001/XMLSchema-instance"
xsi:schemaLocation="hp/openvms/integration
openvms-integration.xsd"
ModuleName="disk$:[workshop.lab1]math.obj"
Language="C89">
<Primitives>
<Primitive
Name = "unsigned int"
Size = "4"
VMSDataType =
"DSC$K_DTYPE_LU"/>
<Primitive
Name = "signed int"
Size = "4"
VMSDataType =
"DSC$K_DTYPE_L"/>
</Primitives>
<Routines>
<Routine Name = "sum"
ReturnType = "unsigned
int">
<Parameter Name =
"number1"
Type =
"signed int"
PassingMechanism
= "Value"
Usage =
"IN"/>
<Parameter Name =
"number2"
Type =
"signed int"
PassingMechanism =
"Value"
Usage =
"IN"/>
</Routine>
<Routine Name = "product"
ReturnType = "unsigned
int">
<Parameter Name =
"number1"
Type = "signed int"
PassingMechanism
= "Value"
Usage =
"IN"/>
<Parameter Name =
"number2"
Type =
"signed int"
PassingMechanism
= "Value"
Usage =
"IN"/>
</Routine>
</Routines>
</OpenVMSInterface>
This appendix contains
program listings for the C sample program.
Other sample programs can be found in WSI$ROOT:[SAMPLES.ACMS],
WSI$ROOT:[SAMPLES.COBOL], and WSI$ROOT:[SAMPLES.FORTRAN].
$ ty stock.c
//
// This is a
sample file intended to be used to demonstrate the WSIT product.
// It defines 2
routines: (buy and sell). Each routine accepts 3 structures:
// buyerData,
sellerData, tickerData.
//
// This code is
intended only to illustrate the WSIT product and is not intended provide
// a usefull
stock trading application.
//
//
#include
<string.h>
#include
<stdlib.h>
#include
<stdio.h>
const MAX_STRING
= 20;
typedef struct
_buyerData {
char
buyer_name[MAX_STRING];
unsigned int
member_number;
unsigned int
balance_dollars;
unsigned int
number_shares_desired;
} buyerData;
typedef struct
_sellerData {
char
owner_name[MAX_STRING];
unsigned int member_number;
unsigned int
balance_dollars;
unsigned int
number_shares_available;
} sellerData;
typedef struct
_tickerData {
char
symbol[MAX_STRING];
char
company_name[MAX_STRING];
} tickerData;
unsigned int buy
(unsigned int max_price, tickerData *symbol, sellerData *pSeller, buyerData
*pBuyer) {
//
// Sell as many
shares as possible
//
unsigned int
shares_purchased = 0;
if (
pSeller->number_shares_available >= pBuyer->number_shares_desired) {
shares_purchased =
pBuyer->number_shares_desired;
} else {
shares_purchased =
pSeller->number_shares_available;
}
pSeller->number_shares_available
= pSeller->number_shares_available -
shares_purchased;
return
shares_purchased;
}
unsigned int sell
(unsigned int min_price, tickerData *symbol, sellerData *pSeller, buyerData
*pBuyer) {
//
// Sell as many
shares as possible
//
unsigned int
shares_sold = 0;
if (
pSeller->number_shares_available >= pBuyer->number_shares_desired) {
shares_sold =
pBuyer->number_shares_desired;
} else {
shares_sold =
pSeller->number_shares_available;
}
pSeller->number_shares_available =
pSeller->number_shares_available -
shares_sold;
return
shares_sold;
}
$
<?xml
version="1.0" encoding="UTF-8"?>
<OpenVMSInterface
xmlns="hp/openvms/integration"
xmlns:xsi="http://www.w3.org/2001/XMLSchema-instance"
xsi:schemaLocation="hp/openvms/integration
openvms-integration.xsd"
ModuleName="wsi$root:[samples.c]stock.obj"
Language="C89">
<Primitives>
<Primitive
Name = "unsigned int"
Size = "4"
VMSDataType =
"DSC$K_DTYPE_LU"/>
<Primitive
Name = "AutoGen_FixedString19"
Size = "19"
VMSDataType = "DSC$K_DTYPE_T"
NullTerminatedFlag = "0"
FixedFlag = "1"/>
</Primitives>
<Typedefs>
<Typedef Name = "tickerData"
TargetName = "_tickerData"/>
<Typedef Name = "sellerData"
TargetName =
"_sellerData"/>
<Typedef Name = "buyerData"
TargetName =
"_buyerData"/>
</Typedefs>
<Structures>
<Structure
Name = "_tickerData"
TotalPaddedSize =
"40">
<Field Name = "symbol"
Type =
"AutoGen_FixedString19"
Offset =
"0"/>
<Field Name = "company_name"
Type = "AutoGen_FixedString19"
Offset =
"20"/>
</Structure>
<Structure
Name = "_sellerData"
TotalPaddedSize =
"32">
<Field Name = "owner_name"
Type =
"AutoGen_FixedString19"
Offset =
"0"/>
<Field Name = "member_number"
Type =
"unsigned int"
Offset =
"20"/>
<Field Name = "balance_dollars"
Type = "unsigned int"
Offset =
"24"/>
<Field Name = "number_shares_available"
Type =
"unsigned int"
Offset =
"28"/>
</Structure>
TotalPaddedSize =
"32">
<Field Name = "buyer_name"
Type =
"AutoGen_FixedString19"
Offset =
"0"/>
<Field Name = "member_number"
Type =
"unsigned int"
Offset =
"20"/>
<Field Name = "balance_dollars"
Type =
"unsigned int"
Offset =
"24"/>
<Field Name = "number_shares_desired"
Type =
"unsigned int"
Offset =
"28"/>
</Structure>
</Structures>
<Routines>
<Routine Name = "buy"
ReturnType = "unsigned
int">
<Parameter Name =
"max_price"
Type =
"unsigned int"
PassingMechanism
= "Value"
Usage =
"IN"/>
<Parameter Name = "symbol"
Type =
"tickerData"
PassingMechanism
= "Reference"
Usage =
"IN/OUT"/>
<Parameter Name =
"pSeller"
Type = "sellerData"
PassingMechanism
= "Reference"
Usage =
"IN/OUT"/>
<Parameter Name =
"pBuyer"
Type =
"buyerData"
PassingMechanism =
"Reference"
Usage =
"IN/OUT"/>
</Routine>
<Routine Name = "sell"
ReturnType = "unsigned
int">
<Parameter Name =
"min_price"
Type = "unsigned
int"
PassingMechanism = "Value"
Usage =
"IN"/>
<Parameter Name =
"symbol"
Type =
"tickerData"
PassingMechanism
= "Reference"
Usage = "IN/OUT"/>
<Parameter Name =
"pSeller"
Type =
"sellerData"
PassingMechanism
= "Reference"
Usage =
"IN/OUT"/>
<Parameter Name =
"pBuyer"
Type =
"buyerData"
PassingMechanism
= "Reference"
Usage =
"IN/OUT"/>
</Routine>
</Routines>
</OpenVMSInterface>
$
C Program Listing - StockCaller.Java
$ type
stockcaller.java
import stock.*;
import java.io.*;
import
javax.xml.rpc.holders.StringHolder;
import
javax.xml.rpc.holders.StructureHolder;
public class
stockcaller {
/** Creates a new
instance of
public
stockcaller() {
}
public static
void main(String[] args) {
try {
stockImpl stock =
new stockImpl();
// create a
seller object and place in holder
_sellerData
sellerData = new _sellerData("Mr Seller", 12345, 1000000, 1000);
ObjectHolder
seller = new ObjectHolder (sellerData);
// create a buyer
object and place in holder
_buyerData
buyerData = new _buyerData("Mr Buyer", 67890, 5000, 995);
ObjectHolder buyer = new ObjectHolder (buyerData);
// create a
ticker object and place in holder
_tickerData
tickerData = new _tickerData("HPQ", "Hewitt Packard");
ObjectHolder
ticker = new ObjectHolder (tickerData);
System.out.println("The
sellers number_shares_available: " +
sellerData.getNumber_shares_available());
stock.buy(27,
ticker, seller, buyer);
System.out.println("The
sellers number_shares_available: " +
sellerData.getNumber_shares_available());
} catch
(Exception e) {
System.out.println("Exception
thrown");
}
}
}
$
unsigned int sum
( int number1, int number2) {
return number1 +
number2;
}
unsigned int
product ( int number1, int number2) {
return number1 *
number2;
}
<?xml
version="1.0" encoding="UTF-8"?>
<OpenVMSInterface
xmlns="hp/openvms/integration"
xmlns:xsi=http://www.w3.org/2001/XMLSchema-instance
xsi:schemaLocation="hp/openvms/integration
openvms-integration.xsd"
ModuleName="DISK$ODS5:[aaa.wsit.math]math.OBJ"
Language="C89">
<Primitives>
<Primitive
Name = "unsigned int"
Size = "4"
VMSDataType =
"DSC$K_DTYPE_LU"/>
<Primitive
Name = "signed int"
Size = "4"
VMSDataType =
"DSC$K_DTYPE_L"/>
</Primitives>
<Routines>
<Routine Name = "sum"
ReturnType = "unsigned
int">
<Parameter Name =
"number1"
Type =
"signed int"
PassingMechanism = "Value"
Usage =
"IN"/>
<Parameter Name =
"number2"
Type =
"signed int"
PassingMechanism
= "Value"
Usage = "IN"/>
</Routine>
<Routine Name = "product"
ReturnType = "unsigned
int">
<Parameter Name =
"number1"
Type =
"signed int"
PassingMechanism
= "Value"
Usage =
"IN"/>
<Parameter Name =
"number2"
Type =
"signed int"
PassingMechanism
= "Value"
Usage =
"IN"/>
</Routine>
</Routines>
</OpenVMSInterface>
F Program Listing – mathcaller.java
import math.*;
import java.io.*;
public class
mathcaller {
public
mathcaller() {
}
try {
mathImpl math = new
mathImpl();
int num1 = 10;
int
num2 = 15;
int
result;
result = math.sum(num1, num2);
System.out.println("Sum
of " + num1 + " and " + num2 + " is " + result);
result = math.product(num1,
num2);
System.out.println("Product
of " + num1 + " and " + num2 + " is " +
result);
} catch
(Exception e) {
System.out.println("Exception
thrown");
e.printStackTrace();
}
}
}