Software > OpenVMS Systems > Documentation > 731final > 4477 HP OpenVMS Systems Documentation |
OpenVMS Cluster Systems
4.5.7 Starting DECnetIf you are using DECnet--Plus, a separate step is not required to start the network. DECnet--Plus starts automatically on the next reboot after the node has been configured using the NET$CONFIGURE.COM procedure. If you are using DECnet for OpenVMS, at the system prompt, enter the following command to start the network:
To ensure that the network is started each time an OpenVMS Cluster computer boots, add that command line to the appropriate startup command file or files. (Startup command files are discussed in Section 5.6.) 4.5.8 What is the Cluster Alias?The cluster alias acts as a single network node identifier for an OpenVMS Cluster system. When enabled, the cluster alias makes all the OpenVMS Cluster nodes appear to be one node from the point of view of the rest of the network. Computers in the cluster can use the alias for communications with other computers in a DECnet network. For example, networked applications that use the services of an OpenVMS Cluster should use an alias name. Doing so ensures that the remote access will be successful when at least one OpenVMS Cluster member is available to process the client program's requests. Rules:
4.5.9 Enabling Alias OperationsIf you have defined a cluster alias and have enabled routing as shown in Section 4.5.6, you can enable alias operations for other computers after the computers are up and running in the cluster. To enable such operations (that is, to allow a computer to accept incoming connect requests directed toward the alias), follow these steps:
Note: Compaq does not recommend enabling alias operations for satellite nodes. Reference: For more details about DECnet for OpenVMS networking and cluster alias, see the DECnet for OpenVMS Networking Manual and DECnet for OpenVMS Network Management Utilities. For equivalent information about DECnet--Plus, see the DECnet--Plus documentation.
Chapter 5
|
||||||||||||||||||||||||||||||||||||||||||||||||||||||||||||||||||||||||
| Shareable Resources | Description |
|---|---|
| System disks | All members of the same architecture 1 can share a single system disk, each member can have its own system disk, or members can use a combination of both methods. |
| Data disks | All members can share any data disks. For local disks, access is limited to the local node unless you explicitly set up the disks to be cluster accessible by means of the MSCP server. |
| Tape drives | All members can share tape drives. (Note that this does not imply that all members can have simultaneous access.) For local tape drives, access is limited to the local node unless you explicitly set up the tapes to be cluster accessible by means of the TMSCP server. Only DSA tapes can be served to all OpenVMS Cluster members. |
| Batch and print queues | Users can submit batch jobs to any queue in the OpenVMS Cluster, regardless of the processor on which the job will actually execute. Generic queues can balance the load among the available processors. |
| Applications | Most applications work in an OpenVMS Cluster just as they do on a single system. Application designers can also create applications that run simultaneously on multiple OpenVMS Cluster nodes, which share data in a file. |
| User authorization files | All nodes can use either a common user authorization file (UAF) for the same access on all systems or multiple UAFs to enable node-specific quotas. If a common UAF is used, all user passwords, directories, limits, quotas, and privileges are the same on all systems. |
| Nonshareable Resources | Description |
|---|---|
| Memory | Each OpenVMS Cluster member maintains its own memory. |
| User processes | When a user process is created on an OpenVMS Cluster member, the process must complete on that computer, using local memory. |
| Printers | A printer that does not accept input through queues is used only by the OpenVMS Cluster member to which it is attached. A printer that accepts input through queues is accessible by any OpenVMS Cluster member. |
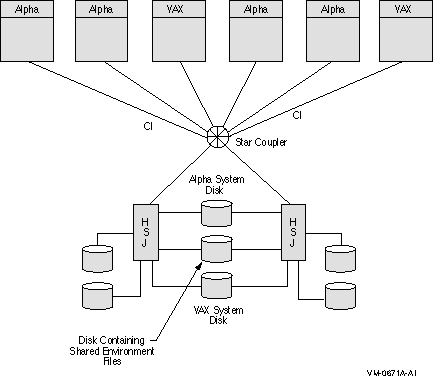
Figure 5-1 shows an example of an OpenVMS Cluster system that has both an Alpha system disk and a VAX system disk, and a dual-ported disk that is set up so the environmental files can be shared between the Alpha and VAX systems.
Figure 5-1 Resource Sharing in Mixed-Architecture Cluster System

Depending on your processing needs, you can prepare either an environment in which all environmental files are shared clusterwide or an environment in which some files are shared clusterwide while others are accessible only by certain computers.
The following table describes the characteristics of common- and multiple-environment clusters.
| Cluster Type | Characteristics | Advantages |
|---|---|---|
| Common environment | ||
| Operating environment is identical on all nodes in the OpenVMS Cluster. |
The environment is set up so that:
|
Easier to manage because you use a common version of each system file. |
| Multiple environment | ||
| Operating environment can vary from node to node. |
An individual processor or a subset of processors are set up to:
|
Effective when you want to share some data among computers but you also want certain computers to serve specialized needs. |
The installation or upgrade procedure for your operating system generates a common system disk, on which most operating system and optional product files are stored in a common root directory.
The system disk directory structure is the same on both Alpha and VAX systems. Whether the system disk is for Alpha or VAX, the entire directory structure---that is, the common root plus each computer's local root---is stored on the same disk. After the installation or upgrade completes, you use the CLUSTER_CONFIG.COM command procedure described in Chapter 8 to create a local root for each new computer to use when booting into the cluster.
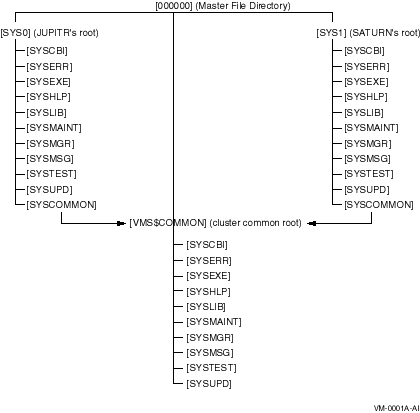
In addition to the usual system directories, each local root contains a [SYSn.SYSCOMMON] directory that is a directory alias for [VMS$COMMON], the cluster common root directory in which cluster common files actually reside. When you add a computer to the cluster, CLUSTER_CONFIG.COM defines the common root directory alias.
Figure 5-2 illustrates the directory structure set up for computers JUPITR and SATURN, which are run from a common system disk. The disk's master file directory (MFD) contains the local roots (SYS0 for JUPITR, SYS1 for SATURN) and the cluster common root directory, [VMS$COMMON].
Figure 5-2 Directory Structure on a Common System Disk

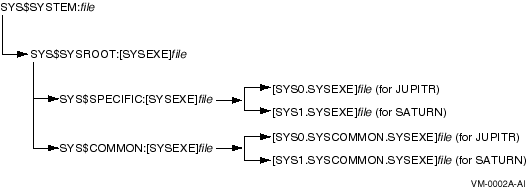
The logical name SYS$SYSROOT is defined as a search list that points first to a local root (SYS$SYSDEVICE:[SYS0.SYSEXE]) and then to the common root (SYS$COMMON:[SYSEXE]). Thus, the logical names for the system directories (SYS$SYSTEM, SYS$LIBRARY, SYS$MANAGER, and so forth) point to two directories.
Figure 5-3 shows how directories on a common system disk are searched when the logical name SYS$SYSTEM is used in file specifications.
Figure 5-3 File Search Order on Common System Disk

Important: Keep this search order in mind when you manipulate system files on a common system disk. Computer-specific files must always reside and be updated in the appropriate computer's system subdirectory.
Examples
$ EDIT SYS$SPECIFIC:[SYSEXE]MODPARAMS.DAT |
$ EDIT SYS$SYSTEM:MODPARAMS.DAT |
$ EDIT SYS$SYSDEVICE:[SYS0.SYSEXE]MODPARAMS.DAT |
$ SET DEFAULT SYS$COMMON:[SYSEXE] $ RUN SYS$SYSTEM:AUTHORIZE |
$ SET DEFAULT SYS$SYSDEVICE:[SYS0.SYSEXE] $ RUN SYS$SYSTEM:AUTHORIZE |
Clusterwide logical names were introduced in OpenVMS Version 7.2 for both OpenVMS Alpha and OpenVMS VAX. Clusterwide logical names extend the convenience and ease-of-use features of shareable logical names to OpenVMS Cluster systems.
Existing applications can take advantage of clusterwide logical names without any changes to the application code. Only a minor modification to the logical name tables referenced by the application (directly or indirectly) is required.
New logical names are local by default. Clusterwide is an attribute of a logical name table. In order for a new logical name to be clusterwide, it must be created in a clusterwide logical name table.
Some of the most important features of clusterwide logical names are:
To support clusterwide logical names, the operating system creates two clusterwide logical name tables and their logical names at system startup, as shown in Table 5-1. These logical name tables and logical names are in addition to the ones supplied for the process, job, group, and system logical name tables. The names of the clusterwide logical name tables are contained in the system logical name directory, LNM$SYSTEM_DIRECTORY.
| Name | Purpose |
|---|---|
| LNM$SYSCLUSTER_TABLE | The default table for clusterwide system logical names. It is empty when shipped. This table is provided for system managers who want to use clusterwide logical names to customize their environments. The names in this table are available to anyone translating a logical name using SHOW LOGICAL/SYSTEM, specifying a table name of LNM$SYSTEM, or LNM$DCL_LOGICAL (DCL's default table search list), or LNM$FILE_DEV (system and RMS default). |
| LNM$SYSCLUSTER | The logical name for LNM$SYSCLUSTER_TABLE. It is provided for convenience in referencing LNM$SYSCLUSTER_TABLE. It is consistent in format with LNM$SYSTEM_TABLE and its logical name, LNM$SYSTEM. |
| LNM$CLUSTER_TABLE | The parent table for all clusterwide logical name tables, including LNM$SYSCLUSTER_TABLE. When you create a new table using LNM$CLUSTER_TABLE as the parent table, the new table will be available clusterwide. |
| LNM$CLUSTER | The logical name for LNM$CLUSTER_TABLE. It is provided for convenience in referencing LNM$CLUSTER_TABLE. |
The definition of LNM$SYSTEM has been expanded to include LNM$SYSCLUSTER. When a system logical name is translated, the search order is LNM$SYSTEM_TABLE, LNM$SYSCLUSTER_TABLE. Because the definitions for the system default table names, LNM$FILE_DEV and LNM$DCL_LOGICALS, include LNM$SYSTEM, translations using those default tables include definitions in LNM$SYSCLUSTER.
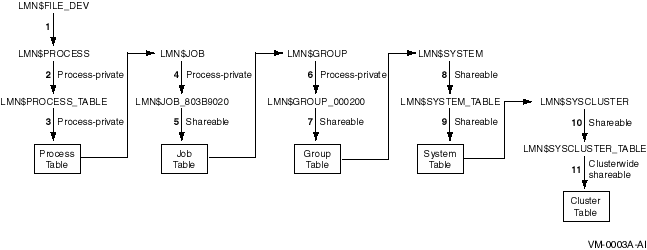
The current precedence order for resolving logical names is preserved. Clusterwide logical names that are translated against LNM$FILE_DEV are resolved last, after system logical names. The precedence order, from first to last, is process --> job --> group --> system --> cluster, as shown in Figure 5-4.
Figure 5-4 Translation Order Specified by LNM$FILE_DEV

You might want to create additional clusterwide logical name tables for the following purposes:
To create a clusterwide logical name table, you must have create (C) access to the parent table and write (W) access to LNM$SYSTEM_DIRECTORY, or the SYSPRV (system) privilege.
A shareable logical name table has UIC-based protection. Each class of user (system (S), owner (O), group (G), and world (W)) can be granted four types of access: read (R), write (W), create (C), or delete (D).
You can create additional clusterwide logical name tables in the same way that you can create additional process, job, and group logical name tables---with the CREATE/NAME_TABLE command or with the $CRELNT system service. When creating a clusterwide logical name table, you must specify the /PARENT_TABLE qualifier and provide a value for the qualifier that is a clusterwide table name. Any existing clusterwide table used as the parent table will make the new table clusterwide.
The following example shows how to create a clusterwide logical name table:
$ CREATE/NAME_TABLE/PARENT_TABLE=LNM$CLUSTER_TABLE - _$ new-clusterwide-logical-name-table |
Alias collisions involving clusterwide logical name tables are treated differently from alias collisions of other types of logical name tables. Table 5-2 describes the types of collisions and their outcomes.
| Collision Type | Outcome |
|---|---|
| Creating a local table with same name and access mode as an existing clusterwide table | New local table is not created. The condition value SS$_NORMAL is returned, which means that the service completed successfully but the logical name table already exists. The existing clusterwide table and its names on all nodes remain in effect. |
| Creating a clusterwide table with same name and access mode as an existing local table |
New clusterwide table is created. The condition value
SS$_LNMCREATED
is returned, which means that the logical name table was created. The
local table and its names are deleted. If the clusterwide table was
created with the DCL command DEFINE, a message is displayed:
DCL-I-TABSUPER, previous table table_name has been superseded If the clusterwide table was created with the $CRELNT system service, $CRELNT returns the condition value: SS$_SUPERSEDE . |
| Creating a clusterwide table with same name and access mode as an existing clusterwide table | New clusterwide table is not created. The condition value SS$_NORMAL is returned, which means that the service completed successfully but the logical name table already exists. The existing table and all its names remain in effect, regardless of the setting of the $CRELNT system service's CREATE-IF attribute. This prevents surprise implicit deletions of existing table names from other nodes. |
| Previous | Next | Contents | Index |