Software > OpenVMS Systems > Documentation > 731final > 6489 HP OpenVMS Systems Documentation |
OpenVMS User's Manual
3.8.7.1 Invoking WWPPSThe system manager may have already set up the foreign command for WWPPS, but if not, you can do so by adding the following line to your LOGIN.COM:
To invoke the WWPPS utility from the DCL prompt, enter the following:
3.8.7.2 WWPPS Utility CommandsThe following list contains descriptions of the commands, parameters, and qualifiers available in the WWPPS utility. Examples follow each description. Exits from the WWPPS session and returns to the DCL command level. You can also exit the WWPPS session by pressing Ctrl/Z or Ctrl/C.
Enables you to obtain information about the World-Wide PostScript Printing Subsystem (WWPPS).
To obtain information about individual commands or topics, enter the HELP command followed by the command or topic name.
Converts one text file at a time into a printable PostScript file and then submits it to the printer queue. Characters can be printed in the standard font or in bold.
The /QUEUE qualifier is required on all PRINT commands to specify the name of the queue to which the text file specified by file-spec should be sent. For example, the following command submits file REPORT.TXT to the PRT_QUEUE printer queue to be printed in American English (as designated by the /LOCALE qualifier):
The optional qualifiers for the PRINT command are:
Chapter 4
|
Throughout this chapter, examples that specify a node name do not always include an access control string. This is because proxy accounts enable users to perform operations on the remote systems in these examples. |
If you are working in an environment with extended file specifications, directory structures and syntax may differ from the traditional structures described here. For information about working with directories in such an environment, refer to Chapter 5.
1 Files can also be stored on magnetic tapes, but magnetic tapes do not have directory structures. To access a file stored on tape, use a file specification that contains only file information. |
Figure 4-1 shows a sample directory hierarchy. At the top of the structure is the master file directory (MFD). Its directory name is [000000]. The MFD shown contains entries for user file directories including MARTINO.DIR, PUBLIC.DIR, and JONES.DIR. The top-level directory [JONES] is a user file directory named JONES.DIR;1 in [000000].
The sample directory structure in Figure 4-1 is the basis for many of the examples in this chapter.
Figure 4-1 Directory Structure
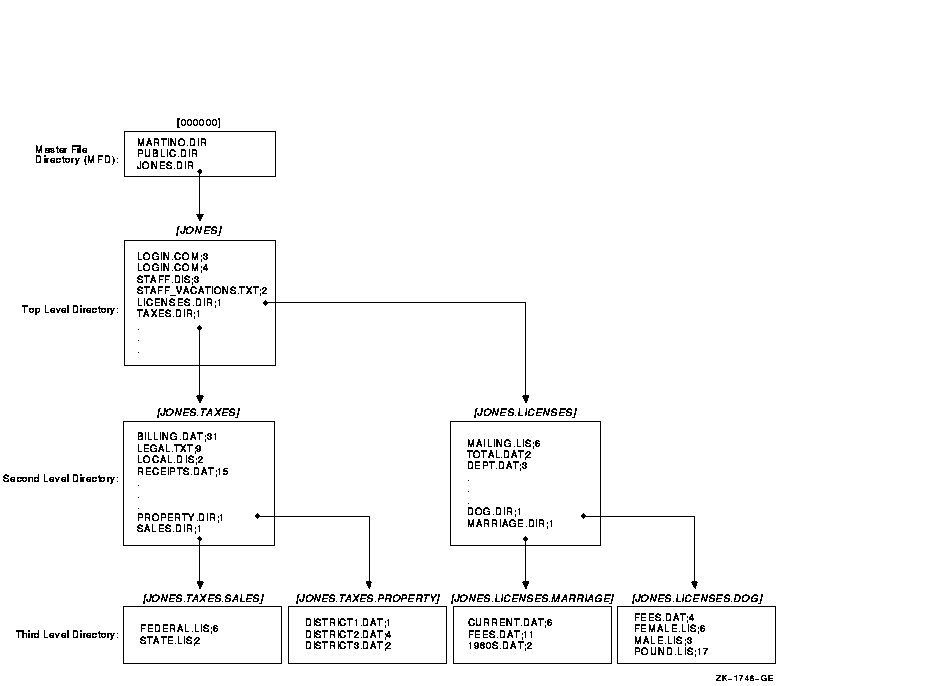
Note the following about this directory structure:
LOGIN.COM;3
LOGIN.COM;4
STAFF.DIS;3
STAFF_VACATIONS.TXT;2
LICENSES.DIR;1
TAXES.DIR;1
The directory component of a file specification consists of a top-level directory name (such as a UFD) that can be followed by a number of subdirectory names. Subdirectory names are separated by periods (.).
Versions of OpenVMS Alpha prior to Version 7.2 and all versions of OpenVMS VAX support directory components that contain the UFD and no more than seven subdirectory names. OpenVMS Alpha Version 7.2 or later supports 255 names (UFD plus subdirectories) in a directory component.
A directory specification has the following format:
|
[directory.subdirectory] |
To add one or more levels of subdirectories, add a period and another subdirectory name for each subdirectory (up to the limit). A subdirectory of another subdirectory is specified by concatenating the subdirectory name (with the preceding period) to the name of the subdirectory one level above it in the hierarchy.
On versions prior to OpenVMS Alpha Version 7.2, on any version of OpenVMS VAX, and on OpenVMS Alpha systems using ODS-2 disks, a subdirectory name can contain no more than 39 characters.
On OpenVMS Alpha Version 7.2 or later with ODS-5 disks, subdirectory names are limited by the filename limit since subdirectory files are stored as <subdirectory-name>.DIR;1. The total number of characters within the directory and root components of a file specification (excluding delimiter brackets and periods) should not exceed 512.
To create a directory, enter the CREATE/DIRECTORY command. If you want to create a subdirectory under your current directory, you do not have to specify the current directory name; you can enter the subdirectory name preceded by a period.
In the following example, the directory [JONES.TAXES] is created:
$ CREATE/DIRECTORY [JONES.TAXES] |
In the following example, the current default directory is [JONES], and the subdirectory [JONES.LICENSES] is created:
$ CREATE/DIRECTORY [.LICENSES] |
To display the names of files in a directory, enter DIRECTORY at the DCL prompt. To list the files in a subdirectory, enter the DIRECTORY command and the subdirectory name preceded by a period.
When you include certain command qualifiers along with the DIRECTORY command, you can retrieve information in addition to the names of the files. For more information on DIRECTORY command qualifiers, refer to the OpenVMS DCL Dictionary or online help.
In the following example, the files in the directory [JONES] are listed. The example shows that [JONES] contains two subdirectories, [JONES.LICENSES] and [JONES.TAXES], four nondirectory files, STAFF.DIS, STAFF_VACATIONS.TXT, and two versions of LOGIN.COM:
$ DIRECTORY |
Directory DISK1:[JONES] LICENSES.DIR;1 LOGIN.COM;3 LOGIN.COM;4 STAFF.DIS;3 STAFF_VACATIONS.TXT;2 TAXES.DIR;1 Total of 6 files. |
In the following example, the default directory remains [JONES] and the contents of the subdirectory [JONES.LICENSES] are displayed:
$ DIRECTORY [.LICENSES] |
Directory DISK1:[JONES.LICENSES] DEPT.DAT;3 DOG.DIR;1 MAILING.LIS;6 MARRIAGE.DIR;1 TOTAL.DAT;2 Total of 5 files. |
To delete a directory, use the following procedure:
| Step | Task |
|---|---|
| 1 |
Make sure that the directory contains no files. To find out if the
directory contains files, enter the DIRECTORY command.
When there are no files in the directory, the system displays the following message: %DIRECT-W-NOFILES, no files found |
| 2 | If the directory contains files, copy them to another directory to save them or delete them if you do not want to save them. If the directory contains subdirectories, examine those subdirectories, copy or delete their files, and delete the subdirectories. |
| 3 | Move to the directory one level above the directory you want to delete. Remember that subdirectories exist as files in directories. When you delete a directory, you delete the file that points to that directory. |
| 4 | Change the file protection of a directory to allow delete access to the file. Directory files in master file directories require SYSPRV privilege to delete. (See Chapter 3 for more information about file protection.) |
| 5 | Delete the directory file using the DELETE command. |
The following example shows how to delete the subdirectory [JONES.LICENSES]:
$ SET DEFAULT [JONES.LICENSES] $ DIRECTORY %DIRECT-W-NOFILES, no files found $ SET DEFAULT [JONES] $ SET SECURITY/PROTECTION=OWNER:D LICENSES.DIR $ DELETE LICENSES.DIR;1 |
To change your default directory, use the SET DEFAULT command. The new default remains in effect until you enter another SET DEFAULT command or log out. To set default to a subdirectory, append the subdirectory name to the name of the directory one level above it.
In the following example, default is set to the directory [JONES] and then the file [JONES]STAFF_VACATIONS.TXT is displayed:
$ SET DEFAULT [JONES] $ TYPE STAFF_VACATIONS.TXT |
In the following example, the file BILLING.DAT, which is located in the subdirectory [JONES.TAXES], is displayed:
$ SET DEFAULT [JONES.TAXES] $ TYPE BILLING.DAT |
| Previous | Next | Contents | Index |