 |
HP OpenVMS System Management Utilities Reference
Manual
SYS_LOADABLE REMOVE
Removes an entry in the system images file
SYS$UPDATE:VMS$SYSTEM_IMAGES.IDX.
Caution
The SYS_LOADABLE REMOVE command is not intended for general use. Only
advanced system programmers should use this command.
|
Format
SYS_LOADABLE REMOVE product
image
Parameters
product
A 1- to 8-character product mnemonic that uniquely identifies a
loadable image. For user-written images this should typically contain
the string _LOCAL_.
image
The file name of the system loadable image you want to remove. A file
name is the only value you can specify for this parameter. Do not
specify a device, directory, file type, or wildcard characters.
Qualifier
/LOG
/NOLOG (default)
Controls whether the SYS_LOADABLE REMOVE command displays a
notification after the entry has been removed.
Description
The SYS_LOADABLE REMOVE command removes an entry from the system images
file SYS$UPDATE:VMS$SYSTEM_IMAGES.IDX. You can then process this file
using the command procedure SYS$UPDATE:VMS$SYSTEM_IMAGES.COM.
Processing the file with VMS$SYSTEM_IMAGES.COM generates a new system
images data file that the system uses when it boots.
If the file SYS$UPDATE:VMS$SYSTEM_IMAGES.IDX does not exist, the
SYS_LOADABLE REMOVE command creates a new, empty one.
21.4 RAD Example
The following example procedure shows how to use SYSMAN resource
affinity domain (RAD) qualifiers and options.
- Show that no reserved memory registry exists:
SYSMAN> reserved_memory list
%SYSMAN-I-NODERR, error returned from node PIPERI
-RMS-E-FNF, file not found
|
- Add a reservation for a group global section and display the new
reservation:
SYSMAN> reserved_memory add ak_sec/gr=4711 /size=16 /zero /page_tables
SYSMAN> reserved_memory list

%SYSMAN-I-OUTPUT, command execution on node PIPERI
Reservation Name             Group    RAD  Size (MB)  Pages  Attributes
AK_SEC                       4711     ANY         16   2048  Allocated Zeroed
AK_SEC                       4711                         2  PageTables Allocated
|
- Modify the reservation to have memory assigned from each of four
RADs; display the result:
SYSMAN> reserved_memory modify ak_sec/gr=4711 /new_rad=0 /size=4
SYSMAN> reserved_memory extend ak_sec/gr=4711 /rad=1 /size=4
SYSMAN> reserved_memory extend ak_sec/gr=4711 /rad=2 /size=4
SYSMAN> reserved_memory extend ak_sec/gr=4711 /rad=3 /size=4
SYSMAN> reserved_memory list

%SYSMAN-I-OUTPUT, command execution on node PIPERI
Reservation Name             Group    RAD  Size (MB)      Pages  Attributes
AK_SEC                       4711       0          4        512  Allocated Zeroed
AK_SEC                       4711       1          4        512  Allocated Zeroed
AK_SEC                       4711       2          4        512  Allocated Zeroed
AK_SEC                       4711       3          4        512  Allocated Zeroed
AK_SEC                       4711                             2  PageTables Allocated
|
- Modify the reservation to no longer zero allocated pages at boot
time. Note that you can change properties such as /ZERO, /ALLOCATE,
/PAGE_TABLES only for the reservation as a whole, not for a specific
RAD.
SYSMAN> reserved_memory modify ak_sec/gr=4711 /nozero
SYSMAN> reserved_memory list

%SYSMAN-I-OUTPUT, command execution on node PIPERI
Reservation Name              Group    RAD  Size (MB)      Pages  Attributes
AK_SEC                        4711       0          4        512  Allocated
AK_SEC                        4711       1          4        512  Allocated
AK_SEC                        4711       2          4        512  Allocated
AK_SEC                        4711       3          4        512  Allocated
AK_SEC                        4711                             2  PageTables Allocated
|
- Modify the reservation to no longer request memory from specific
RADs. Note that the overall size remains unchanged.
SYSMAN> reserved_memory modify ak_sec/gr=4711 /norad
SYSMAN> reserved_memory list

%SYSMAN-I-OUTPUT, command execution on node PIPERI
Reservation Name           Group    RAD  Size (MB)      Pages  Attributes
AK_SEC                     4711     ANY         16       2048  Allocated
AK_SEC                     4711                             2  PageTables Allocated
|
- Starting with a reservation allocated across multiple RADs, request
that memory no longer be allocated at boot time. Note that this implies
that memory is no longer allocated from specific RADs.
Reservation
prior to change:
SYSMAN> reserved_memory list

%SYSMAN-I-OUTPUT, command execution on node PIPERI
Reservation Name   Group    RAD  Size (MB)      Pages  Attributes
AK_SEC             4711       0         4        512  Allocated
AK_SEC             4711       1         4        512  Allocated
AK_SEC             4711       2         4        512  Allocated
AK_SEC             4711       3         4        512  Allocated
AK_SEC             4711                            2  PageTables Allocated
|
Command to no longer allocate at boot time:
SYSMAN> reserved_memory modify ak_sec/gr=4711 /noalloc
|
New state of reservation:
SYSMAN> reserved_memory list

%SYSMAN-I-OUTPUT, command execution on node PIPERI
Reservation Name           Group    RAD  Size (MB)      Pages  Attributes
AK_SEC                     4711     ANY         16       2048
AK_SEC                     4711                             2  PageTables
|
- To change the size of a reservation with an assigned RAD, or to
change the reservation to use a different RAD, you must specify the
current RAD.
Reservation prior to change:
SYSMAN> reserved_memory list

%SYSMAN-I-OUTPUT, command execution on node PIPERI
Reservation Name           Group    RAD  Size (MB)      Pages  Attributes
AK_SEC                     4711       2         16       2048  Allocated
AK_SEC                     4711                             2  PageTables Allocated
|
Attempt to change reservation size:
SYSMAN> reserved_memory mod ak_sec/gr=4711 /size=20
%SYSMAN-I-NODERR, error returned from node PIPERI
-SMI-E-RMRNOMATCH, no records matched search criteria

    Correct command:
 SYSMAN> reserved_memory mod ak_sec/gr=4711 /rad=2 /size=20
|
New state of reservation:
SYSMAN> reserved_memory list

%SYSMAN-I-OUTPUT, command execution on node PIPERI
Reservation Name           Group    RAD  Size (MB)  Pages  Attributes
AK_SEC                      4711     2         20    2560  Allocated
AK_SEC                      4711                        3  PageTables Allocated
|
Chapter 22
USB Configuration Manager (UCM)
22.1 UCM Description
The USB (Universal Serial Bus) Configuration Manager (UCM) utility
allows you to connect a computer to a variety of devices using a single
four-wire cable. More specifically, UCM does the following:
- Records events such as plugging or unplugging devices and errors
that occur on a USB bus. This is the USB event-logging function of UCM.
- Maps physical devices to persistent device names (based on either
serial number or bus location).
- Manages additions, deletions, and modifications to devices
configured on the system.
22.2 USB and UCM Concepts
The following sections introduce and explain USB and UCM.
22.2.1 Introduction to USB
Universal Serial Bus (USB) is a communications architecture that
enables a computer to interconnect a variety of devices using a single
four-wire cable. The purpose of USB is to provide a user-friendly way
to connect low- and medium-speed devices to host computers.
The USB connects USB devices to the USB host, which, in turn, connects
with a host computer system. Each USB has only one host, labeled USB
Host in Figure 22-1. (A host, however, can have multiple USBs.)
Figure 22-1 USB Configuration
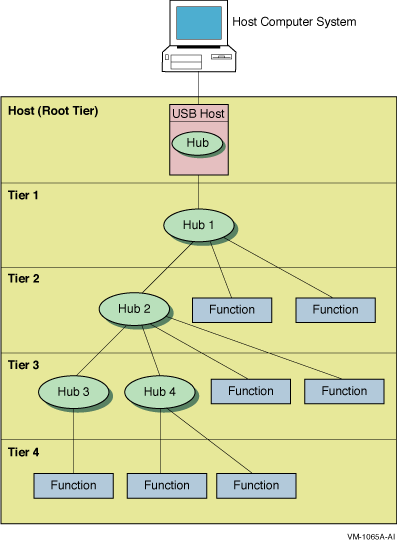
The USB host is integrated with a root hub, which provides one or more
attachment points for devices. The USB physical interconnections from
each hub form a star, with a hub at the center of each star.
Point-to-point wire connections link the USB host to a hub or a
function, or a hub to another hub or function. Hubs and functions are
USB devices that do the following:
- Hubs provide additional attachment points to the
USB.
- Functions provide capabilities to the system, such
as a mouse or a keyboard.
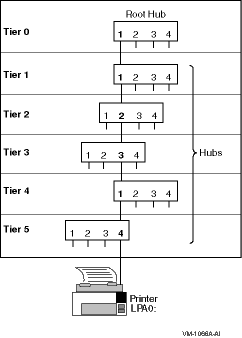
Figure 22-2 shows that up to six hubs can be chained to create a
tiered configuration. The path of a device is determined by its
location in the structure; for example, the path to the printer LPA0:
in Figure 22-2 is 1.1.2.3.1.4. (Note, however, that the numbers
printed on the physical hub might not match the numbers that UCM
displays.)
Figure 22-2 Hub Tiers
The OpenVMS device names of USB devices are as follows:
| Device Name |
Description |
|
KBD
n
1
|
Keyboard
|
|
MOU
n
1
|
Mouse
|
|
TXA
n
1
|
Modem
|
|
LPA
n
1
|
Printer driver
|
|
HID0
|
Special-case driver that users cannot access
|
|
UCM0
|
Hub driver (one per system)
|
1The value of n can be between 0 and 9999.
The UCM works with the hub driver to configure USB-supported devices.
22.2.2 UCM Concepts and Operation
The UCM is made up of client and server layers. The user interacts with
the client layer, and the client layer interacts with the server layer.
It is the server layer that interacts with the USB. Figure 22-3 shows
the interaction of these layers.
Figure 22-3 UCM Architecture
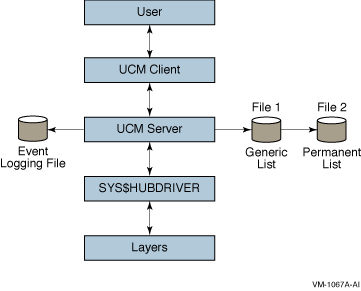
As the figure indicates, the UCM server maintains the event-logging
file and the generic and permanent list files. These files are passed
to the UCM client, which can display the files to the user. (The types
of lists that the UCM server uses are explained in Section 22.2.2.1.) The
UCM server is in contact with the UCM driver, SYS$HUBDRIVER, which
maintains connections with other layers of the architecture.
22.2.2.1 Types of UCM Lists
The UCM server has the following three types of lists:
- Generic list
This list contains descriptions of devices that
UCM supports. The generic list is part of the file-based device
configuration information that is maintained on the system. (Refer to
Chapter 8 of the HP OpenVMS System Manager's Manual.)
The installation process creates
this list. A device that has no matching entry in the generic list is
an unknown device type and cannot be configured.
- Tentative list
This is a list of devices that UCM will
configure if you tell it to. The tentative list, which is in memory,
disappears when the server is restarted or when the system reboots.
- Permanent list
This list contains devices that UCM configures
if the device is connected to the bus. The permanent list supplies a
persistent name for a USB device; that is, the name is maintained
across reboots and server restarts.
Persistent names work somewhat
differently on devices that have or do not have serial numbers:
- On a device with a serial number, a persistent name always works.
- On a device without a serial number, a name is persistent only if
you attach the device in the same place on the hub each time you attach
it.
A running system has only one permanent list, which UCM reads from
SYS$SYSTEM:USB$UCM_DEVICES.DAT. For most customers, this is the minimal
file that OpenVMS provides in SYS$COMMON:[SYSEXE].
Caution
Never delete USB$UCM_DEVICES.DAT. Deleting this file might result in
the inability to use your USB attached devices.
|
22.2.2.2 How UCM Configures Devices
At system startup time, the following steps occur:
- OpenVMS starts the UCM server, which does the following:
- Reads the generic list of supported devices.
- Reads the permanent list for descriptions of devices.
- UCM initializes an empty tentative list.
- UCM turns on the USB bus; a device on the bus announces itself.
- UCM checks for device data on the permanent list. If device data is
on the permanent list, UCM loads it and makes it available.
If
device data is not on the list, UCM performs the next step.
- UCM checks for data on the generic list. If device data is on this
list, UCM uses it to make an entry in the tentative list.
The data
stays on the tentative list until the user either adds the device to or
deletes the device from the permanent list.
Notes
In configuring devices, keep in mind the following:
- Unplugging a device does not delete a tentative item.
- Each replugging of a device creates a new tentative item.
- A device added to the permanent list following UCM startup is not
configured (that is, it is not available for use) until the device is
subsequently disconnected and reconnected (unplugged and replugged).
- Any modification to the permanent list creates a new version of the
file.
|
- Steps 3 through 5 repeat until all devices on all buses are
processed.
- UCM waits for a user request or until a device is plugged in or
unplugged.
Log Files
UCM uses the following log file to record disconnections, connections,
and errors:
SYS$MANAGER:USB$UCM_EVENTS.LOG
|
You do not need special permission to access the event log. However,
you do need OPER privilege to use the UCM command SET LOG/NEW command
to create a new log file. ( Section 22.5 contains a table listing UCM
commands and the privileges required to issue each command.)
22.3 Using UCM to Manage Devices and View Events
You can use UCM commands to select the devices you want to configure
and to view USB events such as connections, disconnections, and errors.
The following sections explain how to configure USB devices and how to
view USB device information.
22.3.1 Configuring Devices
Before the system can configure a USB device, the device must have a
corresponding entry on the permanent list. Although a few entries are
included as part of USB installation, these entries provide only
minimal support for a mouse and a keyboard. For most devices, you need
to take certain steps to add an entry to the permanent list.
When you connect a USB device of a known type that has no entry on the
permanent list, UCM uses information in the read-only generic list to
create an entry in the tentative list. You must approve the entry
before UCM creates an entry in the permanent list.
The following section explains how to create an entry in the permanent
list.
Creating an Entry in the Permanent List
To set up a device to be configured, add the device as an entry in the
permanent list. Once you do this, UCM recognizes the device each time
you connect it.
In the following example, you connect a printer to the USB. The printer
is a known device type; in other words, it has an entry in the generic
list. However, it does not yet have an entry in the permanent list.
Follow these steps to configure the device:
- Physically connect the printer.
- Enter the UCM command to enter the UCM environment and to display a
message about configured and unconfigured devices on your system:
- To display more information about the unconfigured device, enter
the following command:
$ UCM
Universal Serial Bus Configuration Manager, Version V1.0

UCM> SHOW DEVICE /UNCONFIGURED

DEVICE
DEVICE_TYPE                     TENTATIVE
DEVICE_NAME_ROOT                LP
UNIT_NUMBER                     0
BUS                             1
PATH                            1.0.0.0.0.0
END_DEVICE

UCM>
|
Note that the display on your screen might be somewhat different
from the one you see here.
- Next, you must approve the entry by entering the ADD command. For
example:
UCM> ADD DEVICE LPA0:

UCM> EXIT
|
This command places the device information in the permanent list.
- The last step before using the printer is to unplug the printer and
reconnect it. This makes the device available for use. (If a device has
no serial number, you must either plug it into the same port, or use
the MODIFY command to indicate its new location.)
When you
reconnect the printer, its serial number and vendor ID identify it as
LPA0:. UCM configures the device and makes it available for use.
Note that this step is not necessary if the UCM server is restarted
or if the system is rebooted.
22.3.2 Viewing Events
The UCM event logger records events such as device connections and
disconnections and certain types of errors. To see this information,
you use the UCM utility SHOW EVENTS command. You can also use
qualifiers to limit the display of various types of events.
Events stored in the event log include the following:
- A device was configured or deconfigured.
- A known device was connected but not configured.
- An unknown device was connected.
- Text messages were sent by USB drivers.
The following sections explain how to display information about unknown
devices and configuration failures.
22.3.2.1 Information About Unknown Devices
The UCM records unknown device connections in its event log. You can
view this information by adding the /TYPE=UNKNOWN qualifier to the SHOW
EVENT command.
The information in the following example includes the vendor ID, the
product ID, and other optional device-supplied information. If an
unknown device is connected to the USB, you might want to view only
events showing the activity of unknown devices for today; for example:
UCM> SHOW EVENTS /TYPE=UNKNOWN /SINCE=TODAY

Date        Time        Type         Priority Component
--------------------------------------------------------------------------------
22-AUG-2002 13:04:23.26 UNKNOWN      NORMAL   UCM UNKNOWN DEVICE
     Message: VENDOR_ID = 1118.PRODUCT_ID = 8.RELEASE_NUMBER = 256.BUS_NUMBER
     = 1.PATH = 1.0.0.0.0.0.DEVICE_CLASS = 0.DEVICE_SUB_CLASS =
     0.DEVICE_PROTOCOL = 0.NUMBER_OF_INTERFACES = 1.NUMBER_OF_CONFIGURATIONS
     = 1.MANUFACTURER_STRING = Microsoft.PRODUCT_STRING =
     Microsoft SideWinder Precision Pro (USB).CONFIGURATION_NUMBER = 0.

UCM>
|
Note that the display on your screen might be somewhat different from
the one you see here.
22.3.2.2 Information about Configuration Failures
When UCM does not configure a device---because UCM cannot find an entry
in the permanent list or because of a driver error---it stores this
information in the event log. You can view such information using the
SHOW EVENTS command and a qualifier that limits the display. For
example:
UCM> SHOW EVENTS /SINCE=YESTERDAY

Date        Time        Type         Priority Component
-------------------------------------------------------------------------
28-AUG-2002 17:43:47.09 DRIVER       NORMAL   HUBDRIVER
        Message: Find a driver for DeviceClass/DeviceSubClass = 0x2/0x0

28-AUG-2002 17:43:47.09 UNKNOWN      NORMAL   UCM UNKNOWN DEVICE
        Message: VENDOR_ID = 4483.PRODUCT_ID = 16392.RELEASE_NUMBER =
        256.BUS_NUMBER = 3.PATH = 1.1.4.4.0.0.DEVICE_CLASS =
        2.DEVICE_SUB_CLASS = 0.DEVICE_PROTOCOL = 0.NUMBER_OF_INTERFACES =
        2.NUMBER_OF_CONFIGURATIONS = 2.MANUFACTURER_STRING
        = HP Computer Corp., Inc..PRODUCT_STRING = HP USB
        Modem.CONFIGURATION_NUMBER = 0.

28-AUG-2002 17:43:47.24 DRIVER       NORMAL   HUBDRIVER
        Message: hub_configure_device Unable to find Interface Driver


28-AUG-2002 17:43:47.24 DRIVER       NORMAL   HUBDRIVER
        Message: Find a driver for InterfaceClass/InterfaceSubClass/
        Protocol = 0xff/0xff/0xff

28-AUG-2002 17:43:49.17 UCM          CRITICAL ucm_config_request
        Message: %SYSTEM-W-DEVEXISTS, device unit already exists

28-AUG-2002 17:43:50.17 DRIVER       NORMAL   HUBDRIVER
        Message: Configured device TXA3 using driver SYS$YCDRIVER:

28-AUG-2002 17:43:56.11 DRIVER       NORMAL   HUBDRIVER         Message: Device on bus 3 at port 1 bus tier 4 can exceed the         bus power available

UCM> exit
|
Note that the display on your screen might be somewhat different from
the one you see here.
The last message in this example, which is in bold type, indicates that
there is insufficient power in the hub to supply the device. Therefore,
UCM will not configure the device.
If no entry for the device is in the generic list, the log displays
what is known about the device. If an error caused the failure, the
error code is listed in the log.
|