HP OpenVMS Systems Documentation |
HP OpenVMS System Analysis Tools Manual
11.3.2 Interactions Between XDELTA and the Target Kernel/System Code DebuggerXDELTA and the target kernel are integrated into the same system. Normally, you choose to use one or the other. However, XDELTA and the target kernel can be used together. This section explains how they interoperate. The XDELTA boot flag controls which debugger (XDELTA or the SCD target kernel) gets control first. If it is not set, the target kernel gets control first, and it is not possible to use XDELTA without rebooting. If it is set, XDELTA gets control first, but you can use XDELTA commands to switch to the target kernel and to switch INI$BRK behavior such that the target kernel gets control when INI$BRK is called. Breakpoints always stick to the debugger that set them; for example, if you set a breakpoint at location "A" with XDELTA, and then you enter the commands 1;K (switch INI$BRK to the system code debugger) and ;R (start using the system code debugger) then, from SCD, you can set a breakpoint at location "B". If the system executes the breakpoint at A, XDELTA reports a breakpoint, and SCD will see nothing (though you could switch to SCD by issuing the XDELTA ;R command). If the system executes the breakpoint at B, SCD will get control and report a breakpoint (you cannot switch to XDELTA from SCD). Notice that if you examine location A with SCD, or location B with XDELTA, you will see a BPT instruction, not the instruction that was originally there. This is because neither debugger has any information about the breakpoints set by the other debugger. One useful way to use both debuggers together is when you have a system that exhibits a failure only after hours or days of heavy use. In this case, you can boot the system with SCD enabled (8000), but with XDELTA the default (0002) and with initial breakpoints enabled (0004). When you reach the initial breakpoint, set an XDELTA breakpoint at a location that will only be reached when the error occurs. Then proceed. When the error breakpoint is reached, possibly days later, then you can set up a remote system to debug it and enter the ;R command to XDELTA to switch control to SCD.
Here is another technique to use on Alpha when you do not know where to
put an error breakpoint as previously mentioned. Boot the system with
only the SCD boot flag set. When you see that the error has occurred,
halt the system and initiate an IPL 14 interrupt, as you would to start
XDELTA. The target kernel will get control and wait for a connection
for SCD.
To set up the host system, you need access to all system images and drivers that are loaded (or can be loaded) on the target system. You should have access to a source listings kit or a copy of the following directories: SYS$LOADABLE_IMAGES: You need all the .EXE files in those directories. The .DSF files are available with the OpenVMS Alpha source listings kit. Optionally, you need access to the source files for the images to be debugged. SCD will look for the source files in the directory where they were compiled. If your build system and host system are different, you must use the SET SOURCE command to point SCD to the location of the source code files. For an example of the SET SOURCE command, see Section 11.12. Before making a connection to the target system, you must set up the logical name DBGHK$IMAGE_PATH, which must be set up as a search list to the area where the system images or .DSF files are kept. For example, if the copies are in the following directories:
This works well for debugging using all the images normally loaded on a given system. However, you might be using the debugger to test new code in an execlet or a new driver. Because that image is most likely in your default directory, you must define the logical name as follows:
If SCD cannot find one of the images through this search path, a warning message is displayed. SCD will continue initialization as long as it finds at least two images. If SCD cannot find the SYS$BASE_IMAGE and SYS$PUBLIC_VECTORS files, which are the OpenVMS operating system's main image files, an error message is displayed and the debugger exits.
If and when this happens, check the directory for the image files and
compare it to what is loaded on the target system.
To start SCD on the host side, enter the following command:
SCD displays the DBG> prompt. With the DBGHK$IMAGE_PATH logical name defined, you can invoke the CONNECT command and the optional qualifiers /PASSWORD and /IMAGE_PATH. To use the CONNECT command and the optional qualifiers (/PASSWORD and /IMAGE_PATH) to connect to the node with name nodename, enter the following command:
If a password has been set up on the target system, you must use the /PASSWORD qualifier. If a password is not specified, a zero length string is passed to the target system as the password. The /IMAGE_PATH qualifier is also optional. If you do not use this qualifier, SCD uses the DBGHK$IMAGE_PATH logical name as the default. The /IMAGE_PATH qualifier is a quick way to change the logical name. However, when you use it, you cannot specify a search list. You can use only a logical name or a device and directory, although the logical name can be a search list.
Usually, SCD obtains the source file name from the object file. This is
put there by the compiler when the source is compiled with the /DEBUG
qualifier. The SET SOURCE command can take a list of paths as a
parameter. It treats them as a search list.
In general, any OpenVMS debugger command can be used in SCD. For a complete list, refer to the HP OpenVMS Debugger Manual. The following are a few examples:
You can also use the OpenVMS debugger command SDA to examine the target
system with System Dump Analyzer semantics. This command, which is not
available when debugging user programs, is described in the next
section.
Once a connection has been established to the target system, you can use the commands listed in the previous section to examine the target system. You can also use some System Dump Analyzer (SDA) commands, such as SHOW SUMMARY and SHOW DEVICE. This feature allows the system programmer to take advantage of the strengths of both the OpenVMS Debugger and SDA to examine the state of the target system and to debug system programs such as device drivers. To obtain access to SDA commands, you simply type "SDA" at the OpenVMS Debugger prompt ("DBG>") at any time after a connection has been established to the target system. SDA initializes itself and then outputs the "SDA>" prompt. Enter SDA commands as required. (See Chapter 4 for more information.) To return to the OpenVMS Debugger, you enter "EXIT" at the "SDA>" prompt. Optionally, you may invoke SDA to perform a single command and then return immediately to the OpenVMS Debugger, as in the following example:
You may reenter SDA at any time, with or without the optional SDA command. Once SDA has been initialized, the SDA> prompt is output more quickly on subsequent occasions. Note that there are some limitations on the use of SDA from within SCD.
11.8 System Code Debugger Network InformationThe SCD host and the target kernel use a private Ethernet protocol to communicate. The best way to ensure that the two systems can see each other is for them both to be on the same Ethernet segment. Otherwise, your network and its bridges must be set up to pass through the packets with the protocol 08-00-2B-80-4B and multicast address 09-00-2B-02-01-0F.
The network portion of the target system uses the specified Ethernet
device and communicates through it. The network portion of the host
system finds the first Ethernet device and communicates through it. If
the host SCD picks the wrong device for your needs, then you can force
it to use the correct device by defining the logical DBGHK$ADAPTOR as
the template device name for the appropriate adaptor.
If you have trouble starting a connection, perform the following tasks to correct the problem:
11.10 Troubleshooting Network FailuresThere are three possible network errors:
The netfail error message has a status code that can be one of the following values:
11.11 Access to Symbols in OpenVMS Executive Images
Accessing OpenVMS executive images' symbols is not always
straightforward with SCD. Only a subset of the symbols may be
accessible at one time and in some cases, the symbol value the debugger
currently has may be stale. To understand these problems and their
solutions, you must understand how the debugger maintains its symbol
tables and what symbols exist in the OpenVMS executive images. The
following sections briefly summarize these topics.
The debugger can access symbols from any image in the OpenVMS loaded system image list by reading in either the .DSF or .EXE file for that particular image. The .EXE file contains information only about symbols that are part of the symbol vector for that image. The current image symbols for any set module are defined. (You can tell if you have the .DSF or .EXE file by doing a SHOW MODULE. If there are no modules, you have the .EXE file.) This includes any symbols in the SYS$BASE_IMAGE.EXE symbol vector for which the code or data resides in the current image. However, you cannot access a symbol that is part of the SYS$BASE_IMAGE.EXE symbol vector that resides in another image. In general, at any one point in time, the debugger can access only the symbols from one image. It does this to reduce the time it takes to search for a symbol in a table. To load the symbols for a particular image, use the SET IMAGE command. When you set an image, the debugger loads all the symbols from the new image and makes that image the current image. The symbols from the previous image are in memory, but the debugger will not look through them to translate symbols. To remove symbols from memory for an image, use the CANCEL IMAGE command (which does not work on the main image, SYS$BASE_IMAGE). There is a set of modules for each image the debugger accesses. The symbol tables in the image that are part of these modules are not loaded with the SET IMAGE command. Instead they can be loaded with the SET MODULE <module-name> or SET MODULE/ALL commands. As they are loaded, a new symbol table is created in memory under the symbol table for the image. Figure 11-1 shows what this looks like. Figure 11-1 Maintaining Symbols 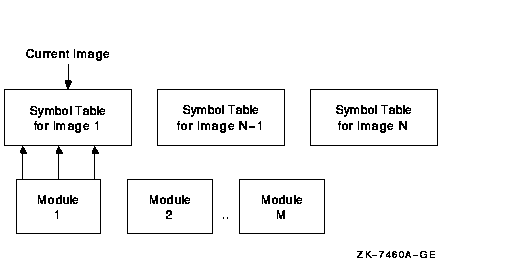
When the debugger needs to look up a symbol name, it first looks at the current image to find the information. If it does not find it there, it then looks into the appropriate module. It determines which module is appropriate by looking at the module range symbols which are part of the image symbol table.
To see the symbols that are currently loaded, use the debugger's SHOW
SYMBOL command. This command has a few options to obtain more than just
the symbol name and value. (See the HP OpenVMS Debugger Manual for more details.)
Depending on whether the debugger has access to the .DSF or .EXE file, different kinds of symbols could be loaded. Most users will have the .EXE file for the OpenVMS executive images and a .DSF file for their private images---that is, the images they are debugging. The OpenVMS executive consists of two base images, SYS$BASE_IMAGE.EXE and SYS$PUBLIC_VECTORS.EXE, and a number of separately loadable executive images. The two base images contain symbol vectors. For SYS$BASE_IMAGE.EXE, the symbol vector is used to define symbols accessible by all the separately loadable images. This allows these images to communicate with each other through cross-image routine calls and memory references. For SYS$PUBLIC_VECTORS.EXE, the symbol vector is used to define the OpenVMS system services. Because these symbol vectors are in the .EXE and the .DSF files, the debugger can load these symbols no matter which one you have.
All images in the OpenVMS executive also contain global and local
symbols. However, none of these symbols ever gets into the .EXE file
for the image. These symbols are put in the specific module's section
of the .DSF file if that module was compiled using /DEBUG and the image
was linked using /DSF.
To reproduce this sample session, the host system needs access to the SYSTEM_DEBUG.DSF matching the SYSTEM_DEBUG.EXE file on your target system, and to the source file C_TEST_ROUTINES.C, which is available in SYS$EXAMPLES. The target system is booted with the boot flags 0, 8004, so it stops at an initial breakpoint. The system disk is DKB200, and the network device is ESA0 in the Alpha examples and EIA0 in the I64 examples.
A sample I64 Boot Menu follows (long lines wrapped for clarity).
Use the utilities in \efi\vms. Use vms_show to list the devices and vms_set to set ethernet device (debug_dev), if necessary. Note that this set is sticky so it only needs to be done once. Then load the operating system with the desired flags. Note that Alpha and I64 use the same flags with the same meanings.
Set the debug_dev to one of the connected ethernet devices:
Boot up the OS. In this example, the boot is with the SCD and initial (early) breakpoint flags, using root 2 (SYS2), that will vary with system setups:
|