 HP OpenVMS Version 8.2 Upgrade and Installation...
 |
 Setting Up, Booting, and Shutting Down HP Integrity...
 |
|
|
| |
Using the Management Processor (MP) Interface
Setting
MP as the Console Interface (Optional) ![]()
MP provides additional features and functionality to what
is provided by the EFI and BMC tools. For a brief description and
comparison of these tools, see
Configuration/Management Tools on HP Integrity Server Systems. For more information, refer to the hardware documentation.
If you intend to set up LAN or remote access for an MP console interface, you must initially use the serial port for console operations when setting up your server for the first time. You can use the LAN connectivity immediately, even before the operating system is installed.
This section assumes you have just powered up your system. You will be prompted to log in to MP when you power up your system. To set up MP as your console device, follow these steps:
 | To get the login user name and password prompts,
you might need to press Return one or more times on your console
keyboard. If this does not work, then try pressing Ctrl/B. If you only see the MP password prompt, press Return to get to the MP login prompt. If the login prompt still fails to appear, the system might be powered off. (When you powered on the system, you might have pressed the power button twice, which turns it on and then off again.) If you see a message similar to the following, another user has the console (only one user can write to the console although multiple users can view it). To gain control of the console from the other user, press Ctrl/E, release the key combination, and then immediately type the letters "cf." Alternatively, you can have the other user log off. [Read only - use Ctrl-Ecf for console write access] The system will be inoperative if it has MP firmware older than version E02.22. For information about updating the MP firmware, see Updating MP Firmware. |
The following is a sample display including the MP main menu:HP Management Processor Firmware Revision E.02.29 Jul 1 2004,11:10:23 (c) Copyright Hewlett-Packard Company 1999-2004. All Rights Reserved. MP login:AdminMP Password:*****
             Hewlett-Packard Management Processor

(c) Copyright Hewlett-Packard Company 1999-2003. All Rights Reserved.

                MP Host Name: myhost

                 Revision E.02.29

   ******************************************************************
              MP ACCESS IS NOT SECURE

    Default MP users are currently configured and remote access is enabled.
    Modify default users passwords or delete default users (see UC command)
                  OR
         Disable all types of remote access (see SA command)
   ******************************************************************

     MP MAIN MENU:

        CO: Console
        VFP: Virtual Front Panel
        CM: Command Menu
        CL: Console Log
        SL: Show Event Logs
        CSP:Connect to Service Processor
        SE: Enter OS Session
        HE: Main Help Menu
        X: Exit Connection

   [uninitialized] MP>
| The "[uninitialized]" text appears
before the MP prompt until you assign a name to the MP host, after
which you will see the host name appear in the brackets. You can use the MP Main menu later, entering MP Main menu selections (CO, VFP, CM, CL, CSP, SE, SL, HE, and X) at the MP> prompt. You can use command mode (CM) to access commands not displayed
in the MP Main menu. (Enter command mode by entering the |
co command brings you to the EFI Boot Manager screen; if you do
not enter a command within 10 seconds, the EFI Shell> prompt
appears. (When the operating system is running, the co command brings you to the console port of the operating
system.)[uninitialized] MP> co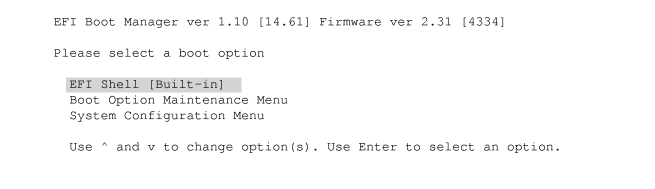 If the CO command results with a screen that is unexpected
or difficult to interpret, pressing Return might help. If you end
up at the EFI Shell prompt, enter
If the CO command results with a screen that is unexpected
or difficult to interpret, pressing Return might help. If you end
up at the EFI Shell prompt, enter exit at the prompt to get to the EFI Boot Manager screen.
| The system pauses for 10 seconds to give you
time to select a Boot Manager option. (You can change the default
timeout period by using the EFI Boot Option Maintenance menu.) If you
do not select an option within that time, the system takes you to
the EFI Shell prompt. To exit the EFI shell and return to the Boot
Manager menu, enter the exit command at the EFI Shell prompt. If lines from the preceding screen linger to obscure the EFI Shell prompt, press Return to bring the EFI Shell prompt into view. |
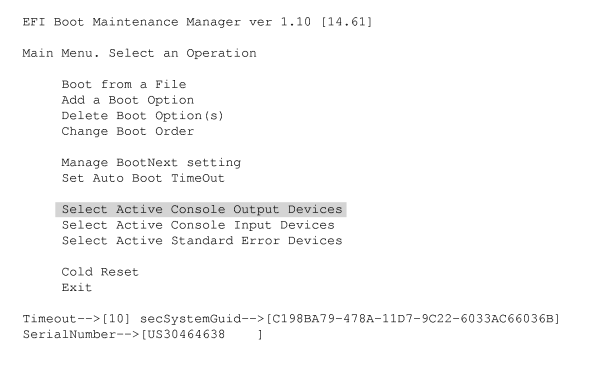
| The console devices must point to a serial line console, and they must all be the same serial device. OpenVMS does not support booting using a USB keyboard or a VGA graphics display device. The system might boot with these devices but you would not receive any visible indication that the system is booting. You might receive a warning when the system begins to boot. You might also see other errors in later stages of the boot. Additionally, you might lose output that you would normally expect to see when booting. |
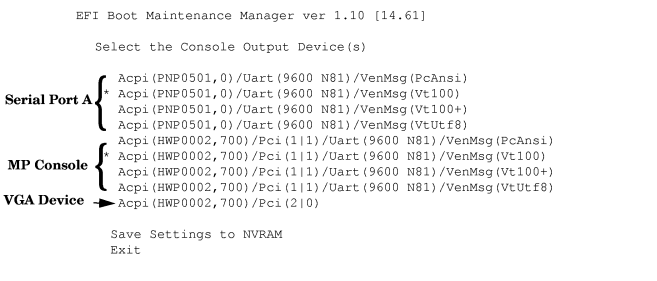
| Serial Port A | These first four lines (the "PNP" lines) indicate any of the valid devices that you can define for the console connected to the serial port. | |
| MP Console | The next four lines (the "HWP" lines) appear only if your system includes the MP port (provided with an MP card, which is available on some systems such as the rx2600). They define devices for the MP console interface. | |
| Graphics Device | This is the graphic console device, which is unsupported. Do not select this. OpenVMS does not support VGA graphics as a console output device for booting. |
MP is now set up as your console interface. Later, you can set up a LAN or remote console interface, or use any of the other features provided by MP. However, at this point, your next step is to boot the OpenVMS I64 DVD to install the operating system onto a system disk. Follow the instructions given in Installing the OpenVMS Operating System. Specific instructions for booting the Operating Environment DVD are also included in Booting the OpenVMS I64 Operating Environment DVD.
Using
MP Features (Optional) ![]()
This section describes how to use various features provided
by MP. This section assumes the following:
For more information, refer to your Integrity server hardware documentation.
| If you are at the EFI console, switch to MP by pressing Ctrl/B. To enter EFI console mode from MP, enter CO at the MP prompt. |
Configuring a Network
Console Interface on MP ![]()
You can use MP to establish remote console access, such as
through the Telnet utility provided with HP TCP/IP Services for
OpenVMS.
| To ensure system security, HP recommends that a private
network be used for console connections. In addition, you should
change the default MP password (Admin) to a private password. To
change passwords, use the MP so command or the dc command (and for the latter, select the "Reset Security
Configuration" option). |
cm to get to the command mode prompt (MP:CM>):MP> cm
MP:CM>lc to configure the local area network (LAN). The LAN Configuration screen
appears, displaying your current LAN settings. The screen is similar
to the one shown in the following example:MP:CM>lcLC At each prompt you may type DEFAULT to set default configuration or Q to Quit Current LAN configuration: - - MAC Address : 0x00306e1ee0dd I - IP address : 127.0.0.0 H - MP Host Name : hostname S - Subnet Mask : 255.255.255.0 G - Gateway Address : L - Link State : Auto Negotiate W - Web Console Port Number : 2023 Enter parameters(s) to change, A to modify All, or [Q] to Quit:
xd at the prompt to reset MP.r at the prompt to restart MP. Accessing
the MP Console Interface Over the Web ![]()
Alternatively to accessing the MP console interface through
a TELNET connection, you can access the MP console interface through
the Internet using an Internet browser:
Powering
the Integrity Server On or Off from the MP Console Interface ![]()
To power the Integrity server system on or off using the MP
console interface, follow these steps:
																													                 .
                 .
.MP>cm(Use CTRL-B to return to MP main menu.)MP:CM>
pc -on -nc command at the MP:CM> prompt, as shown in the following
example. The -nc argument tells the system not to prompt you to confirm
your request.MP:CM> pc -on -nc
PC -on -nc
System will be powered on
-> System is being powered on
-> Command successful.
MP:CM>pc -off -nc command at the MP:CM> prompt, as in the following example.
Make sure you have shut down the operating system prior to issuing
this command.MP:CM> PC -off -nc
PC -off -nc
System will be powered off
You must shut down the OS manually before this command is executed.
Failure to do this can cause problems when the OS is restarted.
-> System is being powered off
-> Command successful.
MP:CM> | You can view the status of the front panel of your Integrity
server by using MP's Virtual Front Panel (enter the vfp command at the MP prompt). This is especially advantageous
when powering the system on or off from a remote location and you
want to verify that the process has completed. For large systems
with multiple partitions, which take longer to power on, the Virtual
Front Panel displays the current status of the boot process. Under
certain circumstances, the boot might be blocked, and if you are
at a remote location the Virtual Front Panel would help you determine
this (in which case, you would need to reset the system).Integrity server systems are sometimes mounted in a cabinet with other systems. To determine which physical system you are interacting with, enter the following command at the MP:CM> prompt. This command turns on a blinking blude LEFD on the front and rear of the panel. |
|
|

