 HP OpenVMS Version 8.2 Upgrade and Installation...
 |
 Setting Up, Booting, and Shutting Down HP Integrity...
 |
|
|
| |
 | Note that HP Integrity servers maintain a System Event
Log (SEL) within system console storage, and OpenVMS I64 automatically
transfers the contents of the SEL into the OpenVMS error log. During
a successful boot operation while using a console, you might see
a message indicating that the Baseboard Management Controller (BMC)
SEL is full. You can safely continue when the BMC SEL is full by
following the prompts; OpenVMS will process the contents of the
SEL. If you want to clear the SEL manually, enter the clearlogs SEL command at the EFI Shell prompt as in the following example:This command deletes the contents of the SEL. The command is available with current system firmware versions. If your Integrity server is configured with a Management Processor (MP) and you see a BMC event log warning while connected to the MP console, you can also clear the BMC event log by using MP. Press Ctrl/B to revert to the MP> prompt. At the MP> prompt, enter SL (from the main menu) and use the C option to clear the log. HP recommends that you load and use the most current system firmware. For more information about updating the system firmware, see Firmware on Integrity Server Systems. |
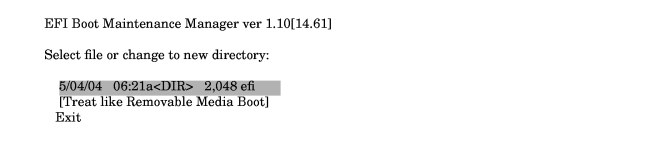
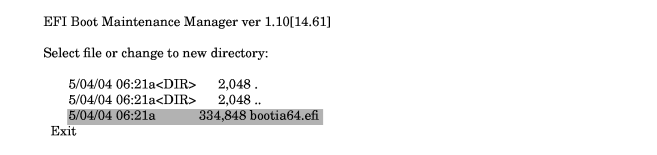
Booting the OpenVMS I64 Operating Environment
DVD ![]()
After powering on your system and performing any other tasks
to set up the system, you can boot the OpenVMS I64 Operating Environment
DVD.
Shell> map -rShell>fs0:\efi\boot\bootia64.efi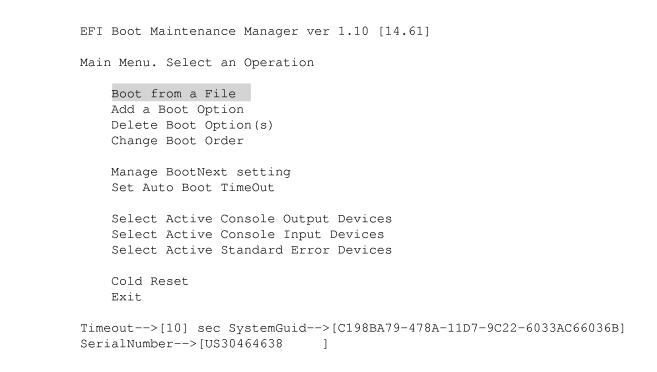


You can now install your OpenVMS I64 operating system onto the target disk; see Installing the OpenVMS Operating System onto a System Disk.
Booting
Manually from the System Disk ![]()
Boot the OpenVMS I64 operating system disk manually as follows:
| IF ... | THEN GO TO... |
|---|---|
|
The OpenVMS I64 operating system is running
|
Step
1.
|
|
The
OpenVMS I64 operating system is not running
|
Step 4.
|
| On Integrity server systems, HP recommends setting up your system with a boot option for your system disk (preferrably, so that it boots automatically on powering on or reboot). Add your system disk as a boot option in the EFI Boot Manager menu by using the OpenVMS I64 Boot Manager (BOOT_OPTIONS.COM) utility, as explained in Setting Automatic Booting and Boot Flags for Your System Disk. Another method for setting up your system disk to boot automatically is described in Manually Setting Automatic Booting of Your System Disk. |
$@SYS$SYSTEM:SHUTDOWN
SYSTEM SHUTDOWN COMPLETE
Shell>fsn:\efi\vms\vms_loader.efi
Performing
a Conversational (Interactive) Boot ![]()
A conversational boot is most commonly used in research and
development environments and during software upgrades. Perform a
conversational boot to stop the boot process before it completes.
The boot process stops after it loads SYS$SYSTEM:SYSBOOT.EXE and
displays the SYSBOOT> prompt. At the SYSBOOT> prompt,
you can enter specific OpenVMS System Generation utility (SYSGEN)
commands to do the following:
There are several ways to perform a conversational boot. The following procedure is the most direct:
| IF ... | THEN GO TO... |
|---|---|
|
The OpenVMS I64 operating system is running
|
Step
1.
|
|
The
OpenVMS I64 operating system is not running,
|
Step 4.
|
$@SYS$SYSTEM:SHUTDOWN
SYSTEM SHUTDOWN COMPLETE
Shell>fsn:\efi\vms\vms_loader.efi -flags 0,1
For examples of using conversational booting, see Booting with Minimum Startup and Booting in an Emergency.
Booting
with Minimum Startup ![]()
In certain cases, you might want to boot your system without
performing the full sequence of startup events. For example, if
a startup event prevents you from logging in, you might want to
boot the system without executing the startup so that you can log
in and fix the problem. You can use the conversational boot to specify
a minimum startup.
| Because this procedure bypasses specific startup operations, it does not autoconfigure the system's peripheral devices. |
Shell>fsn:\efi\vms\vms_loader.efi -flags 0,1
SYSBOOT>SET STARTUP_P1 "MIN"
SYSBOOT>SET WRITESYSPARAMS 0
SYSBOOT>CONTINUE
Booting
with the XDelta Utility (XDELTA) ![]()
The XDelta utility (XDELTA) is a debugging tool that system
programmers use. The procedure for booting all Integrity servers
with XDELTA is the same.
The following table describes the valid values you can specify when booting with XDELTA:
| Value | System Response |
|---|---|
|
0
|
Normal,
nonstop boot (default).
|
|
1
|
Begins
a conversational boot and then displays the SYSBOOT prompt.
|
|
2
|
Includes
XDELTA but does not take the initial breakpoint.
|
|
3
|
Displays
the SYSBOOT prompt and includes XDELTA but does not take the initial breakpoint.
|
|
6
|
Includes
XDELTA and takes the initial breakpoint.
|
|
7
|
Includes
XDELTA, displays the SYSBOOT prompt, and takes the initial breakpoint
at system initialization.
|
The following is an example of booting with XDELTA from fs1: at the EFI> prompt:
For more information about using XDELTA, refer to the HP OpenVMS Delta/XDelta Debugger Manual.EFI>fs1:\efi\vms\vms_loader.efi -flags 0,7
Booting
from a Different Root Directory ![]()
By default, the OpenVMS I64 operating system is installed
in the system root directory [SYS0]. However, if you have created
a cluster system disk, you can use the SYS$MANAGER:CLUSTER_CONFIG.COM procedure
to add a copy of the operating system to a different root directory.
(Refer to the HP OpenVMS System Manager's Manual for more information about using the SYS$MANAGER:CLUSTER_CONFIG.COM procedure.)
To boot from a different root (for example, [SYS3]), enter the following command at the EFI Shell prompt, where fsn: (such as fs1:) is the device associated with the system disk:
Shell>fsn:\efi\vms\vms_loader.efi -flags 3,0
Booting
in an Emergency ![]()
If a system problem prevents your system from booting, you
might need to perform an emergency boot operation.
Emergency Boot Procedures summarizes these emergency boot
operations, and the sections that follow describe each boot operation
in more detail.
Booting
with Default System Parameters ![]()
If the current values stored in the parameter file have been
incorrectly modified, these incorrect values might cause the system
to become unbootable. With a conversational boot operation, you
can reset the active values for all system parameters to the default
value. (In most cases, HP recommends that you use AUTOGEN to modify
system parameters. In certain cases, however, you can use a conversational
boot to modify a parameter value temporarily.
To change a parameter value permanently, you
must edit MODPARAMS.DAT and run AUTOGEN. For instructions, refer
to the HP OpenVMS System Manager's Manual, Volume 2: Tuning, Monitoring, and Complex Systems.) The default values allow you to boot the system
temporarily so you can correct the problem.
Shell>fsn:\efi\vms\vms_loader.efi -flags 0,1
The USE DEFAULT command specifies that default values should be used for all parameters.SYSBOOT>USE DEFAULT
SYSBOOT>SET STARTUP_P1 "MIN"
SYSBOOT>SET WRITESYSPARAMS 0
SYSBOOT>CONTINUE
SYSBOOT>USE DEFAULTSYSBOOT>SET STARTUP_P1 "MIN"SYSBOOT>SET WRITESYSPARAMS 0SYSBOOT>CONTINUEUsername:SYSTEMPassword:$EDIT SYS$SYSTEM:MODPARAMS.DAT. . . [Insert line(s) to reset parameter value(s)] . . .$@SYS$UPDATE:AUTOGEN SAVPARAMS REBOOT
Booting without
Startup and Login Procedures ![]()
If the system does not complete the startup procedures or
does not allow you to log in, you might need to bypass the startup
and login procedures. The startup and login procedures provided
by HP should always work. However, if you introduce an error when
modifying the startup or login procedure, it is possible to accidentally
lock yourself out of the system.
Shell>fsn:\efi\vms\vms_loader.efi -flags 0,1
SYSBOOT>SET/STARTUP OPA0:
SYSBOOT>SET WRITESYSPARAMS 0
SYSBOOT>CONTINUE
This command directs the operating system to ignore any errors that might occur. If you do not enter this command and you invoke an error, the system logs you out.$SET NOON
$@SYS$SYSTEM:STARTUP
SYSBOOT>SET/STARTUP OPA0:SYSBOOT>SET WRITESYSPARAMS 0SYSBOOT>CONTINUE$SET NOON$SET DEFAULT SYS$SYSROOT:[SYSEXE]$@SYS$SYSTEM:STARTUP
Booting
without a User Authorization File ![]()
Ordinarily, the startup and login procedures provided by HP
always work; however, certain conditions can cause them to fail.
A simple way to lock yourself out of the system is to set passwords
to login accounts and forget them. Another way to be locked out
is if one or more core system Product Authorization Key (PAK) software
licenses are unavailable or expired. In such emergencies, perform
a conversational emergency boot by following the steps given in
this section.
Shell>fsn:\efi\vms\vms_loader.efi -flags 0,1
The first three commands request that:SYSBOOT>SET/STARTUP OPA0:SYSBOOT>SET WINDOW_SYSTEM 0SYSBOOT>SET WRITESYSPARAMS 0SYSBOOT>CONTINUE
$SPAWN$@SYS$SYSTEM:STARTUP
| Instead of using the SET/STARTUP OPA0: command, an alternative method
of booting under these emergency conditions is to set the UAFALTERNATE
system parameter to use the alternate authorization file rather
than the standard user authorization file. Setting the system parameter
UAFALTERNATE defines the logical name SYSUAF to refer to the file SYS$SYSTEM:SYSUAFALT.DAT.
If this file is found during a normal login, the system uses it to
validate the account and prompts you for the user name and password. HP does not recommend this method. If an alternate SYSUAFALT.DAT file has been configured on your system, the UAFALTERNATE method will likely fail (assuming you do not know the password for the privileged account stored within the SYSUAFALT.DAT file). In addition, the OPA0: system console is critical to system operations and system security and allows access when the SYSUAF system authorization database is unavailable or corrupted; when core product license PAKs are not registered, are expired, or are disabled; and in various system failures. |
SYSBOOT>SET/STARTUP OPA0:SYSBOOT>SET WINDOW_SYSTEM 0SYSBOOT>SET WRITESYSPARAMS 0SYSBOOT>CONTINUE$SPAWN$@SYS$SYSTEM:STARTUP$
|
|

