Software > OpenVMS Systems > Documentation > 83final > 6526 HP OpenVMS Systems Documentation |
HP TCP/IP Services for OpenVMS
|
| Previous | Contents | Index |
The logical name TCPIP$TELNETSYM_STREAMS defines the number of execution queues handled by each TELNETSYM process. The value you enter (a number from 1 through 32) when defining this logical name is passed to the PSM$PRINT system routine. The default is a maximum of 32 queues per symbiont process.
Use this logical to turn TELNETSYM into a single-threaded symbiont (value=1) in which each queue runs its own process. This makes diagnosing problems easier and lessens the consequences of a failure.
If you are defining this logical name, define it once. Do not define it differently for each TELNETSYM print queue.
To avoid potential problems with TELNET printing, be aware of the following guidelines and considerations.
If you use the public domain TELNET symbiont and want to switch to the TCP/IP Services TELNET symbiont, you must change the value of the /PROCESSOR qualifier on the TELNET symbiont queues. When you do this, include any command procedures that start up the queues. Change:
/PROCESSOR=TELNETSYM |
to:
/PROCESSOR=TCPIP$TELNETSYM |
When you print to a terminal server system, ensure that:
> CHANGE PORT port INPUT FLOW DISABLED |
> CHANGE PORT port TELNET SERVER NEWLINE TO HOST |
When you print a job to a TELNETSYM queue, a link must be established between the queue and the printer. If there is high contention for the printer, it might be busy, causing the first attempt to fail.
TELNETSYM continues to try to establish the link, according to the retry interval logical name TCPIP$TELNETSYM_RETRY_INTERVAL. Until the link is established, the execution queue stalls. When the link comes up, the job prints. A stalled TELNETSYM queue is not necessarily an error.
If the queue stalls while printing a job, the printer probably requires human intervention; that is, the printer is out of paper or jammed.
To track down problems with improper formatting on the printed page (for example, "garbage" for a graphics file or unwanted blank pages), use bit 2 of the TELNETSYM logical name TCPIP$TELNETSYM_DEBUG. Defining this logical helps determine whether the source of the problem is TELNETSYM. Follow these steps:
$ DEFINE /SYSTEM TCPIP$TELNETSYM_DEBUG 4 $ STOP /QUEUE /RESET TELNETSYM_queue-name $ START /QUEUE TELNETSYM_queue-name |
Use the TCPIP$TELNETSYM_SUPPRESS_FORMFEEDS logical to control the suppression of form feeds. The bit settings you specify in the value control the time of the operation and the type of form feed suppression to perform:
The following examples show how to calculate the value for the logical name:
Figure 25-1 TCPIP$TELNETSYM_SUPPRESS_FORMFEEDS Level 2 Setting
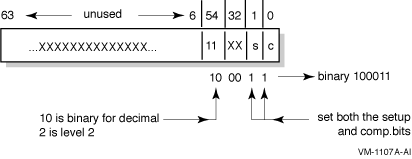
$ DEFINE/SYSTEM TCPIP$TELNETSYM_SUPPRESS_FORMFEEDS 35 |
Figure 25-2 TCPIP$TELNETSYM_SUPPRESS_FORMFEEDS Level 1 Setting
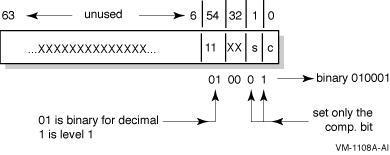
$ DEFINE/SYSTEM TCPIP$TELNETSYM_SUPPRESS_FORMFEEDS 17 |
TELNETSYM logs control characters and nonprinting characters by preceding the hexadecimal value of the byte with a backslash. For example, the following sequence:
Carriage Control Form Feed Carriage Control Line Feed Tab the text "Use Your Screen Saver to Conserve Energy." Carriage Return Line Feed |
is logged as:
\0D\0C\0D\0A\09Use Your Screen Saver to Conserve Energy.\0D\0A |
The "do binary, will binary" sequence starting off a /PASSALL job appears as:
\FF\FD\00\FF\FB\00 |
The PC-NFS server provides authentication and print services for personal computers running PC-NFS. Users on a PC client can associate the name of the PC printer with an OpenVMS print queue and print files to the associated queue. To access the PC-NFS server, PC users must have an entry in the proxy database and have corresponding OpenVMS accounts on the server.
This chapter describes:
For information about setting up NFS proxy identities for PC-NFS client users, see Chapter 22.
The PC-NFS server can be shut down and started up independently of TCP/IP Services. This is useful when you change parameters or logical names that require the service to be restarted.
The following files are provided:
To preserve site-specific parameter settings and commands, create the following files. These files are not overwritten when you reinstall TCP/IP Services:
To configure PC-NFS print services, you must create and export a spool directory and define two system logical names. Follow these steps when configuring your print server for printing by PC-NFS clients:
TCPIP> MAP "/PC_PRINT/WORK" DSA31: |
TCPIP> ADD EXPORT "/PC_PRINT/WORK" /HOST=* /OPTIONS=TYPELESS_DIRECTORIES |
DEFINE /SYSTEM TCPIP$PCNFSD_SPOOLDEV DSA31: DEFINE /SYSTEM TCPIP$PCNFSD_SPOOLEXPORT "/PC_PRINT/WORK" |
PC users can associate the name of the DOS printer you are configuring with an OpenVMS print queue and print files to the associated queue. PC clients cannot, however, manage NFS print queues from their PC. To manage print queues, you must log in to either a privileged account or the PC's proxy account on the NFS server host, and enter DCL commands to:
When accessing files on an NFS server, a PC user obtains authentication once from any host running PC-NFS. The user can also access NFS files on that host or other hosts, even if the user's UID/GID has proxy mappings to a different OpenVMS account on each TCP/IP host.
However, with PC-NFS printing, if the PC user obtains authentication from one host, the user can only print successfully on other TCP/IP Services hosts that have a valid OpenVMS account for the same user name.
Part 7 contains the following appendixes:
This appendix describes how to configure the Gateway Routing Daemon (GATED).
You must configure the GATED protocols before starting GATED routing by editing the configuration file TCPIP$GATED.CONF, located in SYS$SYSDEVICE:[TCPIP$GATED]. A template file TCPIP$GATED.TEMPLATE is also available in this directory.
The file TCPIP$GATED.CONF contains statements that select routing protocols, manage routing information, manage independent system routing and control tracing options.
After editing the configuration, enter the TCP/IP management command TCPIP START ROUTING/GATED to start the GATED process. If the configuration file is not formatted correctly, GATED will not be able to parse the file and GATED will terminate.
If you make changes to the GATED configuration file after the GATED process is already running, you must stop GATED by entering the command TCPIP STOP ROUTING/GATED. Then restart the GATED process to make the changes take affect.
See HP TCP/IP Services for OpenVMS Management Command Reference for detailed descriptions of the SET GATED and START ROUTING/GATED commands.
Parameters shown in brackets ([]) show optional keywords and parameters. The vertical bar (|) indicates a choice of optional parameters. Parentheses (()) group keywords and parameters, when necessary. For example:
[backbone | (area area)] |
In this example, the brackets indicate that either parameter is optional. The keywords are backbone and area . The vertical bar indicates that either backbone or area area can be specified. Because area is in italics, it is a parameter that you provide.
The following comment styles are valid in a GATED configuration file. (Comments may appear anywhere in the file.)
In a GATED configuration file, statements end with a semicolon (;). Do not use a semicolon as a comment character in your configuration file. Anything following a semicolon is interpreted as the start of the next statement. |
The configuration file consists of statements grouped in the following order:
Entering a statement out of order causes an error when parsing the configuration file. |
The following statements do not fit in the above categories:
These statements provide instructions to the parser, and control tracing from the configuration file. They do not control the configuration of any protocol and may occur anywhere in the configuration file.
Table A-1 describes each TCPIP$GATED.CONF configuration statement.
| Command | Type | Description |
|---|---|---|
| %directory | directive | Sets the directory for include files. |
| %include | directive | Includes a file into TCPIP$GATED.CONF. |
| traceoptions | trace | Specifies which events are traced. |
| options | definition | Defines GATED options. |
| interfaces | definition | Defines GATED interfaces. |
| autonomoussystem | definition | Defines the autonomous system (AS) number. |
| routerid | definition | Defines the originating router (BGP, OSPF). |
| martians | definition | Defines invalid destination addresses. |
| rip | protocol | Enables the RIP protocol. |
| kernel | protocol | Configures kernel interface options. |
| ospf | protocol | Enables the OSPF protocol. |
| egp | protocol | Enables the EGP protocol. |
| bgp | protocol | Enables the BGP protocol. |
| redirect | protocol | Configures the processing of ICMP redirects. |
| icmp | protocol | Configures the processing of general ICMP packets. |
| snmp | protocol | Enables reporting to SNMP. |
| static | static | Defines static routes. |
| import | control | Defines which routes to import. |
| export | control | Defines which routes to export. |
| aggregate | control | Defines which routes to aggregate. |
| generate | control | Defines which routes to generate. |
To create a configuration file for your local host, edit a copy of the sample file TCPIP$GATED.TEMPLATE (located in the SYS$SYSDEVICE:[TCPIP$GATED] directory),then save the file to SYS$SYSDEVICE:TCPIP$GATED.CONF.
The following shows the template configuration file:
#
# File name:      TCPIP$GATED.CONF
# Product:        HP TCP/IP Services for OpenVMS
# Version:        V5.4
#
# © Copyright 1976, 2003 Hewlett-Packard Development Company, L.P.
#

#
# GATED server configuration file
#

interfaces {
 interface all passive ;
 };

#
# Protocols:
#

rip on {
 broadcast;
 interface all ripin ripout version 1;
 };

redirect on;
routerdiscovery server off;
hello off;
ospf off;
egp off;
bgp off;
snmp off;

#
# Static routes:
#

#static {
# 10.1.2.0 mask 255.255.255.0 gateway 10.1.1.1;
# default gateway 10.1.2.3;
# };

#
# Policy:
#

#export proto rip {
# proto static { all metric 1; };
# proto direct { all; };
# proto rip { all; };
# };
|
The configuration file can define routes from one protocol or peer to another, assigning each route a value, called a preference.
The preference value determines the order of routes to the same destination in a single routing database. The active route is chosen by the lowest preference value. Some protocols implement a second preference ( preference2 ), sometimes referred to as a "tie breaker."
Preferences have the following characteristics:
The GATED daemon selects a route based on the following preference criteria:
| Previous | Next | Contents | Index |