B.2 Selecting Your OpenVMS Console for the Integrity servers System
You must set up the firmware console as described
in the hardware or firmware documentation provided with your Integrity
servers. When first powered on, Integrity servers interact with the
firmware interface and accept input from one or more console devices.
These devices include the Integrity iLO MP (or simply MP on some servers;
for simplicity, this section refers to MP for both firmware interfaces),
serial ports, and if present, local graphics monitor and keyboard.
The default console devices enabled for use by the firmware depend
on the Integrity server hardware model and associated firmware (see
your hardware documentation). The MP port is typically used by the
OpenVMS operating system on Integrity servers (recommended by HP).
This port provides serial access as well as networked access to the
firmware console. If using the serial port, use a VT100–capable
terminal or emulator device. On Integrity servers that do not have
an MP port, the console serial port (generally on the back of the
server) is enabled.
With the exception of some older Integrity server
models, such as the HP Integrity rx2600 server, the current firmware
available for Integrity servers provides a text menu-based interface
by default. The current firmware also includes the concept of console
interfaces that are “Primary,”“Secondary,”and “Not Configured.” The Primary console is the console
enabled for interacting with the operating system as well as with
the firmware. Although the firmware can interact with multiple console
devices, OpenVMS uses only one of these devices as its console and
requires that one device be selected. You select one device to serve
as the Primary console, as explained in Section B.2.1 where more details are also given about
the Primary, Secondary, and Not Configured console selections.
When an Integrity server is powered up, the firmware
displays information to the Primary and Secondary console devices.
If you do not see output within a few seconds of powering up, your
console device is probably not selected as a Primary or Secondary
device; you will need to connect your console terminal cable to the
appropriate device. When connected to the correct device, the firmware
displays the EFI Boot Manager screen, from where you can begin to
navigate to select the Primary console for use by OpenVMS, as explained
later in this section. When using the firmware to boot OpenVMS, if
you do not see OpenVMS console output and the system appears hung,
your console terminal device might be connected to a Secondary console
device instead of the Primary console device.
If you are already using the system console,
you can disregard the remainder of this section. If you have ordered
a machine with OpenVMS preinstalled, your console selections have
been chosen for you, but you might want to change these default console
selections. If you have changed your system configuration, or if
you are installing OpenVMS on new (uninstalled) Integrity servers,
or if you are reinstalling OpenVMS using the INITIALIZE option (removing
all the software and data files that were previously installed on
the target system disk), you might need to select the correct console.
If the correct console is not selected, OpenVMS might use an unexpected
device as the console, causing your system to appear to be hanging;
or OpenVMS either will fail to boot or will boot with output sent
to the wrong location.
You can use MP to establish remote console
access, such as through the TELNET utility provided with HP TCP/IP
Services for OpenVMS. Alternatively, you can access the MP console
interface through the Internet using an Internet browser.If you intend to set up LAN or remote access for an MP console interface,
you must initially use the serial port for console operations when
you set up the Integrity servers for the first time. (See your hardware
documentation for instructions on setting LAN or remote access for
the MP console interface.)
Your first step is to decide what console to use.
Depending on your hardware/firmware configuration, OpenVMS can use
one of the following types of consoles:
System serial port
MP (or iLO MP) serial port
The MP interface
is not visible to OpenVMS unless the MP serial port is selected as
the Primary console.
Graphics (VGA) device
Graphics console
support allows you to use a monitor and a USB keyboard and mouse connected
directly to the Integrity server ports available for such purposes.
Certain older (legacy) Integrity servers, such as the rx2600, do not
support a graphics console because they lack the required firmware
capabilities. On some Integrity servers, a VGA device might not be
built into the system, in which case a graphics option card is required
for VGA console support.
Most Integrity servers support multiple graphics options; the exceptions
are the rx1600 and rx1620 servers. A graphics option consists of a
graphics card and a graphics display interface (monitor). When multiple
graphics devices are present, you can select only one device for use
by the firmware as a console device. The other graphics devices must
be set to Not Configured (NC). When DECwindows is used on a system
booted using the VGA as the OpenVMS console, DECwindows selects the
VGA console as the default screen. When enabling multihead DECwindows
graphics operation, the VGA console defaults to screen 0. If no VGA
device is configured as a console, DECwindows selects a default screen
based on the Integrity server model and device bus ordering. For details
about enabling multihead DECwindows graphics operation, see Section 7.8.3.
Note the following restrictions:
OpenVMS supports up to four add-on graphics devices
plus any built-in graphics, depending on the Integrity servers and
available slots. The firmware available on some Integrity servers
might limit which devices can be used as a VGA console device. For
information about your specific configuration's platform and
graphics configuration rules, see your hardware documentation .
For correct operation of the VGA console, OpenVMS
requires that at least one other non-VGA device be configured as the
Secondary console.
XDELTA is not available when using the VGA console;
it is disabled when requested.
Conversational (interactive) boot (SYSBOOT>) is not
supported with the VGA console. To change SYSGEN parameters, use SYSGEN
from OpenVMS, or boot OpenVMS from a non-VGA console for conversational
boot.
When using a VGA console
and installing from vMedia or a USB DVD drive with the keyboard plugged
into a USB hub, the keyboard might not be operational initially. To
enable keyboard operation, simply unplug the hub and plug it back
in.
For more information, platform-specific details,
and the firmware required for VGA support, see the HP OpenVMS
Version 8.4 Release Notes and the hardware documentation
for your Integrity servers.
The procedure for selecting the correct console
varies according to the Integrity server model and firmware. For Integrity
servers other than the rx2600, follow the steps in Section B.2.1. For rx2600 Integrity
servers and servers for which you cannot obtain the required firmware,
follow the steps in Section B.2.2.
On systems which support iLO firmware, OpenVMS Version 8.4 enables
the Integrated Console which provides a virtual keyboard, video and
mouse (vKVM) to operate from the remote iLO browser window. The Integrated
Console functionality allows both pre-boot (EFI), OpenVMS boot, and
runtime (both text console and DECwindows) to be displayed and interacted
with from the iLO browser window. By default, the maximum resolution
of the graphics display in DECwindows is 1024x768 and is a restriction
of the iLO firmware. To use the Integrated Console, the system must
be set up with VGA as the primary console. Both the local keyboard,
video and mouse can be used in addition to (or at the same time) with
the remote iLO Integrated Console. Performance of DECwindows graphics
using the iLO Integrated Console will vary depending on the speed
of the LAN, and in general is only recommended for doing occasional
system management functions that do not require performance sensitive
graphics.
NOTE: Make sure your Integrity servers has the latest firmware updates
installed.
B.2.1 Selecting Your OpenVMS Console (Not Applicable to rx2600 Integrity
servers)
On Integrity servers other than the rx2600 (or
on servers with outdated firmware), console devices can be configured
as one of the following three types:
Primary console—The device enabled as a console
for the firmware interface and used as the OpenVMS console (OPA0).
If a VGA device (device path) is selected as the Primary console,
at least one serial device path must be set as a Secondary console
in order to use the VGA device to boot OpenVMS.
Secondary console—A device enabled as a console
for the firmware but not used as the OpenVMS console during or after
booting. The device is configured as a normal serial port device.
If you specify an MP port as the Secondary console, it will not be
visible to OpenVMS. The MP port is visible to OpenVMS only when selected
as a Primary console. If multiple serial ports are available as a
console on your Integrity servers and you select one for a Secondary
console, do not use that console for transmission of binary data.
Not Configured—A device that is not enabled
as a console for the firmware or operating system.
Your system can be booted from any Primary or Secondary
console but OpenVMS output displays only on the primary console. For
information about serial devices that can be selected as the console
and the serial device port enumeration, see the HP OpenVMS
Version 8.4 Release Notes.
The examples in the following two subsections
show how to select a VGA device for the OpenVMS console.
B.2.1.1 Using the EFI Boot Manager to Select the OpenVMS Console
To select the device for your OpenVMS console
using the EFI Boot Manager, follow these steps. Depending on the firmware
version and configuration, menu selections displayed on your screen
might differ from those seen in the examples . With this EFI firmware,
you no longer have to select a console input device, console output
device, and console error device. The firmware automatically sets
the Primary console device to be the console input, console output,
and console error device.
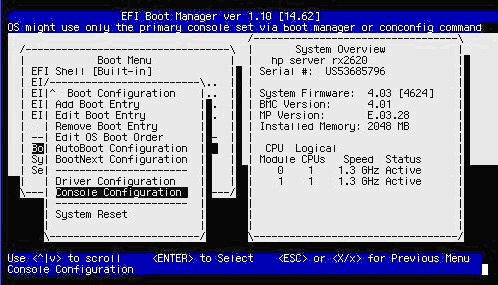
From the EFI Boot Manager
screen, use the up or down arrow key to select the Boot Configuration
menu and press Enter:
From the Boot Configuration
menu, select the Console Configuration menu and press Enter:
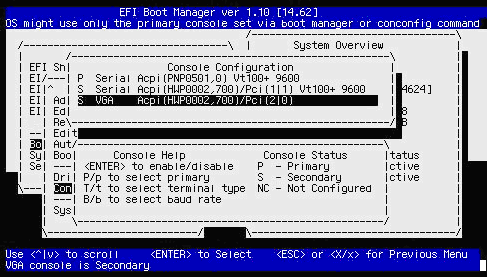
If the Console Configuration
menu shows that your preferred device is already configured as the
Primary console, you need not continue; otherwise, select the device
that you want as the OpenVMS Primary console. In the following screen,
the VGA device is selected:
Enter P to
configure the selected device as the Primary console. You then see
the selected device as the Primary console:
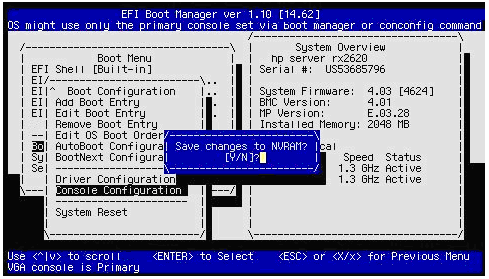
Press the Esc key to return to the previous menu. When prompted whether to save
changes to NVRAM, enter Y:
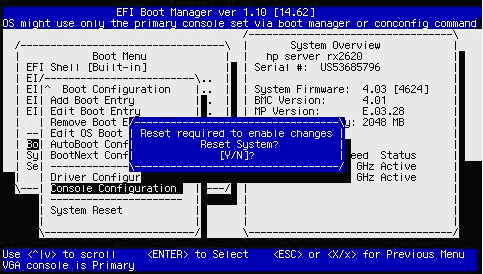
When prompted whether to reset
the system, enter Y to make the changes take effect:
B.2.1.2 Using the EFI Shell to Select the OpenVMS Console
To select the device for your OpenVMS console
using the EFI shell, follow these steps:
At the EFI Shell prompt, enter
the conconfig command to view the index number
for the available console devices, as in the following example (the
column titled “Primary” displays how the device is configured
(P for Primary, S for Secondary, NC for Not Configured):
Shell>conconfigCONSOLE CONFIGURATION
Index Primary Type Device Path
----- ------- ----- ----------
1 P Serial Acpi (PNP0501,0)
2 S Serial Acpi (HWP0002,700)/Pci (1|1)
3 S VGA Acpi (HWP0002,700)/Pci (2|0)
If your preferred device is
already configured as the Primary console, you need not continue.
If your preferred device is not currently configured as the Primary
console, enter the conconfig command in the following
format:
conconfig index primary
where index is the
index number of the device preferred for the OpenVMS console. In the
following example, the VGA device is selected as the Primary console,
and the resulting display reflects the configuration change:
Shell>conconfig 3 primaryCONSOLE CONFIGURATION
Index Primary Type Device Path
----- ------- ----- ----------
1 S Serial Acpi (PNP0501,0)
2 S Serial Acpi (HWP0002,700)/Pci (1|1)
3 P VGA Acpi (HWP0002,700)/Pci (2|0)
Enter the reset command to
make the changes active, as in the following example:
Shell>reset
B.2.2 Selecting Your OpenVMS Console on rx2600 Integrity servers
This section describes how to select a console
on rx2600 Integrity servers or other servers with outdated firmware.
On such servers, you must configure a Console Input, Console Output,
and Console Error Device for your OpenVMS console. There is no concept
of the Primary console that automatically configures these devices
for the OpenVMS console. In addition, on such servers OpenVMS does
not support graphics consoles.
NOTE: The following instructions assume that OpenVMS
is not installed on your Integrity servers and that boot options are
not defined.
Decide what console you want to use.
Power on the system. If using an MP serial port, log in
to MP and access EFI. If you are setting the system serial
port as your system console, go to the next step now. If you are
setting the MP serial port as your system console and you have just
powered on your Integrity servers, the MP console interface prompts
you to log in. (By default, both user name and password are set to
Admin. For security purposes, change the password immediately. See
your hardware documentation for more information.)
NOTE: To see the MP login user name and password prompts, you might
need to press Enter one or more times on your console
keyboard. If this does not work, try pressing Ctrl/B.
If you see only the MP password prompt, press Enter to get to the MP login prompt.
If the login prompt still fails to appear, the system might
be powered off. (When you powered on the system, you might have pressed
the power button twice, which turns it on and then off.)
If you see a message similar to the following, another user
has the console (only one user can write to the console, although
multiple users can view it).
[Read only - use Ctrl-Ecf for console write access]
To gain control of the console from the other user, press Ctrl/E, release the key combination, and
then immediately type the letters cf. Alternatively,
you can have the other user log off.
The system does not work if it is running MP firmware older
than version E02.22. For information about updating the MP firmware,
see Section 1.3.6.
When the MP> prompt is displayed,
move to the EFI interface by entering the co (console
mode) command. If the power or initialization sequence has not completed,
you will see that and must wait until the menu reappears, at which
point reenter the co command to get to the EFI
Boot Manager menu. At the EFI Boot Manager menu, select the EFI Shell
interface.
On Integrity servers without nPartitions, the co command brings you directly to the EFI Boot Manager
screen. If you do not enter a command before the EFI countdown timer
expires, the EFI Shell prompt is displayed. (On some servers, the
countdown timer is 10 seconds by default; on others, such as Server
Blade products, it might be even less.) When the operating system
is running, the co command brings you to the console
port of the operating system.
On cell-based servers, unless you are using a
single-partition user account, the co command
first brings you to a console menu that lists the available nPartitions.
Select the appropriate nPartition to access the EFI Boot Manager
console for that nPartition. The following example shows a console
menu (menus and displays such as this might vary from system to system):
If the co command results in
a screen that is unexpected or difficult to interpret, pressing Enter might help. If you are at an EFI submenu instead
of the main menu, navigate to the main menu by exiting from the submenu
and any subsequent submenus until you return to the EFI main menu.
For more information about determining which nPartition
to access, see the nPartition Administrator's Guide (previously titled HP System Partitions Guide: Administration
for nPartitions) or the appropriate hardware documentation.
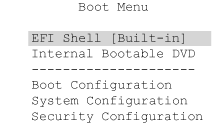
Access the EFI Boot Configuration menu. The
EFI Boot Manager screen includes a boot menu. The default menu option
is highlighted, as shown in the following example:
NOTE: The appearance of EFI Boot Manager screens and menus differs
from version to version of the firmware.
From the EFI
boot menu, select the Boot Configuration option (or, in some versions
of EFI, the Boot Option Maintenance Menu). To move to an option,
use the up or down arrow key. (With some terminal emulators, you might
have to use the letter v to scroll down or the caret (^) to scroll
up.) Press Enter to toggle the selection. If
you do not select an option within the countdown period, EFI moves
to the default option—the EFI Shell in the boot menu example,
in which case the EFI Shell prompt is displayed. Exit the EFI Shell
to return to the Boot Configuration menu. If lines from the preceding
screen linger and obscure the EFI Shell prompt, press Enter to bring the EFI Shell prompt into view.
Configure the Console Input, Console Output, and Console
Error Devices. If you have the latest EFI firmware, select
the Console Configuration option from the Boot Configuration menu
to list the console input, console output, and console error device
options. Some versions of EFI list the three console device options
directly in the Boot Option Maintenance Menu. Configure each console
option one at a time, as follows:
NOTE: With OpenVMS systems, the input, output, and error
console all must point to the same serial-line console device. New
systems might be shipped with multiple devices selected for each of
the console types, so make sure only one device is selected for each.
If you see an error message that mentions multiple device-path instances
for the console input or output device, perform the following steps
to select a single console only.
On rx2600 Integrity servers and certain other
servers with firmware that is not up to date, OpenVMS might not boot
using a USB keyboard or a VGA graphics display device. The system
might boot with these devices but does not display any indication
that the system is booting. You might receive a warning when the
system begins to boot. You might also see other errors in later stages
of the boot. Additionally, you might lose output that you normally
see during booting.
Select the console input device. EFI displays
a list of devices (device paths) available for console input. Select
only one device from this list, and deselect any unused devices.
The following is a sample list of devices, annotated with explanatory
text below the list. This example shows the devices for an entry-class
Integrity servers; the procedure and display differ on cell-based
servers. For more information about the EFI paths used for console
selection, see the Intel Extensible Firmware Interface (EFI) documents
available from the Intel website.
System Serial Port
These four lines indicate any of the valid devices
that you can define for the console using the system serial port.
Any line that has the notation Uart but not the notation Pci is
one of the system serial ports. Notice that the lines are almost
identical except for the text following the VenMsg portion indicating
the terminal emulation protocol such as VT100. Thus, each of the
four entries is the same device with different emulation protocols.
MP Console
These four lines appear only on systems that have
an MP port. Any lines that include both Uart and Pci are MP serial
port devices. As with the serial port devices, these four lines refer
to the same device with different emulation protocols.
VGA Device
This is the graphic console device. Do not select
this. OpenVMS does not support VGA graphics as a console output device
for booting on rx2600 Integrity servers.
Select a device using the protocol appropriate
for your terminal emulator (in most cases, VT100+ is the best choice).
Select only one device line. OpenVMS does not operate if more than
one device is selected.
Save your settings to NVRAM.
Select the console output device. Repeat steps
a and b to configure the console output device. Select the same device
you selected for the console input device.
Select the console error device. Repeat steps
a and b to configure the console error device (also referred to as
the standard error device). Select the same device you selected for
the console input and output devices.
Perform a cold reset if required. Your system
might require a cold reset. Newer versions of EFI do not require
a cold reset. For more information, see your hardware documentation.
At this point, you can boot the OpenVMS Integrity
servers DVD to install the operating system onto a system disk. Follow
the instructions in Chapter 3 (specifics for booting are provided in this appendix).
NOTE: Any time new potential console devices are added to a system,
or anytime NVRAM on a system is cleared, review your console selections.
When you change serial devices, you must also make changes to the
input, output, and error console device options to ensure proper operation.