Software > OpenVMS Systems > OpenVMS > Products > dcom HP OpenVMS Systems |
COM, Registry, and Events for
|
| Previous | Contents | Index |
On a Windows system, an event is any significant occurrence in the system or an application---for example, a service starting or stopping, a user logging on or off, or accessing resources. When the system encounters an event, the Event Log service writes the event (or audit entry) in the form of a record that contains date and time, source, category, event number, user, and computer information to a system, security, or application log, creating an audit trail. On Windows systems, you display these logs and their recorded events using the Event Viewer.
With COM Version 1.1-B and higher for OpenVMS, OpenVMS supports both Windows logging and HP Advanced Server for OpenVMS logging of COM for OpenVMS events, and writes all COM for OpenVMS events to the DCOM$EVENTLOG.RPT text file. You can log a COM for OpenVMS event (such as the starting of a COM server on OpenVMS), and review these OpenVMS events from a Windows system or an OpenVMS system.
For a detailed review of OpenVMS Events dependencies and a description of how OpenVMS Events interacts with other parts of the OpenVMS infrastructure, see Section 4.10.
The following sources can provide you with more information on Events and related topics:
The system logs OpenVMS Events to a Windows event log, to the HP Advanced Server for OpenVMS event log, and to a log file on the OpenVMS system.
You can use the following techniques to view OpenVMS Events:
Use the following procedure to view OpenVMS Events through the Windows event viewer:
Use the following procedure to view the COM for OpenVMS events:
$ ADMIN SHOW EVENTS/TYPE=SYSTEM/SOURCE=DCOM/FULL |
In some cases, you might want to write and view COM for OpenVMS events only on an OpenVMS system. In place of the Windows log, HP has included an alternate event logger that writes COM event information to an OpenVMS file. You can find this file in the following location:
SYS$MANAGER:DCOM$EVENTLOG.RPT |
COM for OpenVMS creates this event logging report automatically when the COM server ( DCOM$RPCSS ) encounters an error. The event logger appends new events at the bottom (end) of the file. A logged event has the following format:
event type : ddd mmm dd hh:mm:ss yyyy First event message event type : ddd mmm dd hh:mm:ss yyyy Second event message . . . |
Example 15-1 shows the contents of an event log.
| Example 15-1 Sample OpenVMS Event Log |
|---|
$ Type SYS$MANAGER:DCOM$EVENTLOG.RPT (1) ERROR : Tue Sep 15 11:18:54 1998 Unable to start a DCOM Server: {5E9DDEC7-5767-11CF-BEAB-00AA006C3606} Runas (null)/SMITH The Windows error: 1326 Happened while starting: device:[account]SSERVER.EXE (2) ERROR : Tue Sep 15 19:14:45 1998 The server {0C092C21-882C-11CF-A6BB-0080C7B2D682} did not register with DCOM within the required timeout. |
Allows an application to record information in the event log files.The NTA$EVENTW routine completes all operations synchronously.
NTA$EVENTW [nullarg], func, itmlst, evsb
nullarg
OpenVMS usage: reserved type: longword (unsigned) access: read only mechanism: by value
Reserved for HP use.func
OpenVMS usage: function_code type: longword (unsigned) access: read only mechanism: by value
Function code specifying the function NTA$EVENTW is to perform. The func argument is a longword containing this function code. The $EVENTDEF macro defines the names of each function code.itmlst
OpenVMS usage: address of item list type: 64-bit address access: read only mechanism: by value
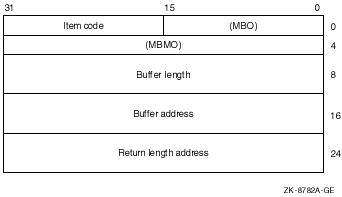
Item list specifying information about the event source or the event. The itmlst argument is the 64-bit address of a list of item descriptors, each of which describes an item of information. An item list in 64-bit format is terminated by a quadword of 0.The following diagram shows the 64-bit format of a single item descriptor.
| OpenVMS usage: | address of status block |
| type: | 64-bit address |
| access: | write only |
| mechanism: | by reference |
NTA$EVENTW sets the status block to 0 upon request initiation. Upon request completion, the EVT$L_VMS_STATUS field contains the primary (OpenVMS) completion status for the operation.
If an error occurs, EVT$L_NT_STATUS (if non-zero) is the secondary error status to further define the error condition. Function Codes
Item CodesEVT$_FC_REGISTER_EVENT_SOURCE
Open an association with an event log.
Item code Required Parameter Data type EVT$_SERVER_NAME No Input String (4-byte Unicode) EVT$_SOURCE No Input String (4-byte Unicode) EVT$_HANDLE Yes Output Unsigned longword
- EVT$_SERVER_NAME
The universal naming convention (UNC) name of the server on which this operation is to be performed.
UNC names have the form \\server\share\path\file. This item must be zero or unspecified. This performs the operation on an available HP Advanced Server for OpenVMS server in the cluster.- EVT$_SOURCE
The name of the application that logs the event. This field associates an application message file that contains descriptive text with the application's event log entries.
If specified, the source must be a subkey of the Eventlog\System key, the Eventlog\Security key, or the Eventlog\Application registry key. For example, a source name of Myapp indicates a registry entry in the following:
HKEY_LOCAL_MACHINE\System\CurrentControlSet\
   Services\Eventlog\Application\Myapp)
The Myapp registry value EventMessageFile names the path and message file to be used to translate this application's events.
The source can be unspecified or specified as NULL. In this case, the system logs events to the Application log file but the application logs no message file (and, as a result, no replacement text) for the associated events.- EVT$_HANDLE
Returns a handle to the Application event log. This handle is required input for other $EVENT functions.
On failure, a handle of 0 is returned. This handle is outside the responsibility of the CloseHandle API.EVT$_FC_REPORT_EVENT
Generate an event log entry.
Item code Required Parameter Data type EVT$_HANDLE Yes Input Unsigned longword EVT$_EVENT_TYPE Yes Input Word mask EVT$_EVENT_CATEGORY No Input Word EVT$_EVENT_ID Yes Input Longword EVT$_USER_SID No Input NT Security ID EVT$_NUMSTRINGS No Input Word EVT$_DATASIZE No Input Longword EVT$_STRING_ARRAY No Input Array of varying-length descriptors. (4-byte Unicode) EVT$_RAW_DATA No Input Binary data
- EVT$_HANDLE
Value returned by a previous EVT$_FC_REGISTER_EVENT_SOURCE call.- EVT$_EVENT_TYPE
Indicates the severity of the event. The type is one of the following:EVT$_SUCCESS
EVT$_ERROR
EVT$_WARNING
EVT$_INFO
EVT$_AUDIT_SUCCESS
EVT$_AUDIT_FAILURE
The severity type maps to its Windows equivalent, defined in WINNT.H.- EVT$_EVENT_CATEGORY
An integer value from 1 to 65535. EVT$_EVENT_CATEGORY is unique to a particular source.
EVT$_EVENT_CATEGORY allows an application to divide its message file into sections, each indexed by event ID. If you do not specify a category, the system defaults to a category of zero.- EVT$_EVENT_ID
An unlimited integer value. This value indexes the category in an application message file that locates the text string displayed for this event message. The event ID is unique to a particular source.- EVT$_USER_SID
The optional Windows Security ID of the thread logging the event. An application that has acquired Windows credentials through the $PERSONA system service can obtain its SID through calls to the OpenProcessToken and GetTokenInformation Win32 APIs. The format is opaque to this service.- EVT$_NUMSTRINGS
A count of the strings specified in the EVT$_STRING_ARRAY item code.- EVT$_DATASIZE
Length in bytes of the buffer indicated by the EVT$_RAW_DATA item code.- EVT$_STRING_ARRAY
An array of string pointers. Each entry points to a null terminated string. A description string in a message file can contain string placeholders in the form %n, where %1 indicates the first placeholder. Strings specified in this array replace these placeholders when the system displays the event message.- EVT$_RAW_DATA
Allows you to include binary data in an event message.
For example, you might use this to dump a data structure from a failing component.EVT$_DEREGISTER_EVENT_SOURCE
Close an association with an event log.
Item code Required Parameter Data type EVT$_HANDLE Yes Input Unsigned longword
- EVT$_HANDLE
Value returned by a previous EVT$_FC_REGISTER_EVENT_SOURCE call.
| Item Code | Parameter Type | Data Type |
|---|---|---|
| EVT$_SERVER_NAME | Input | String |
| EVT$_SOURCE | Input | String |
| EVT$_HANDLE | Input/Output | Unsigned longword |
| EVT$_EVENT_TYPE | Input | Word mask |
| EVT$_EVENT_CATEGORY | Input | Word |
| EVT$_EVENT_ID | Input | Longword |
| EVT$_USER_SID | Input | NT security ID |
| EVT$_NUMSTRINGS | Input | Word |
| EVT$_DATASIZE | Input | Longword |
| EVT$_STRING_ARRAY | Input | Array of string pointers |
| EVT$_RAW_DATA | Input | Binary data |
The NTA$EVENTW routine completes synchronously; that is, control is returned to the caller only after the request completes.
Use the following process to write event data:
SS$_NORMAL Service completed successfully. SS$_ACCVIO One of the arguments cannot be read/written. SS$_BADPARAM Bad parameter. SS$_NOPRIV Insufficient privilege to access the specified event log. SS$_TIMEOUT Request timed out. SS$_UNREACHABLE Events service unavailable. SS$_REJECT The Windows LAN Manager server encountered an error. See the Win32 status for more information.
The COM for OpenVMS kit includes sample code that shows how to generate an application event using Win32 APIs. You can use this example as is on a Windows system. The example also builds correctly using the instructions for building COM for OpenVMS applications on OpenVMS (to get the required header files from DCOM$LIBRARY). See Chapter 7 for these instructions. The example also includes the linking instructions to build the example using Wind/U.
Errors that occur during event reporting can be difficult to trace because of the number of intervening software layers through which the event passes. The following list describes how OpenVMS Events pass through other software layers until they are recorded in the Windows log.
Checking the contents of the event status block help you determine where the failure might have happened. Table 15-1 lists (in order of importance) the checks you should perform.
| R0 Status | Status Field Value | Component to Check |
|---|---|---|
| Failure (bit 0 clear) | EVT$L_NT_STATUS field is nonzero. | Error most likely occurred within HP Advanced Server for OpenVMS. |
| Failure | EVT$L_VMS_STATUS field is nonzero and the EVT$L_NT_STATUS is zero. | Error most likely occurred within the SYS$ACM system service or the NT ACME. |
| Failure | EVT$L_VMS_STATUS is zero and EVT$L_NT_STATUS is zero. | Error most likely occurred within the SYS$ACM system service. |
The Win32 API usually converts the error status to an appropriate NT error status code and makes it available through the GetLastError Win32 API. (The status returned by the event API simply indicates a generic failure.) |
The appendixes provide information about the MIDL compiler, troubleshooting tips, COM sample code, running COM for OpenVMS in an unauthenticated environment, and APIs and interfaces.
This part also includes a glossary and a list of acronyms.
| Switch | Use |
|---|---|
| /ms_ext | Microsoft extensions to the IDL language (default) |
| /c_ext | Allow Microsoft C extensions in the IDL file (default) |
| /osf | OSF mode - disables /ms_ext and /c_ext options |
| /app_config | Allow selected ACF attributes in the IDL file |
| /mktyplib203 | MKTYPLIB Version 2.03 compatibility mode |
| Switch | Use |
|---|---|
| /acf filename | Specify the attribute configuration file |
| /I directory-list | Specify one or more directories for include path |
| /no_def_idir | Ignore the current and the INCLUDE directories |
| Switch | Use |
|---|---|
| /client none | Do not generate client files |
| /client stub | Generate client stub file only |
| /out directory | Specify destination directory for output files |
| /server none | Generate no server files |
| /server stub | Generate server stub file only |
| /syntax_check | Check syntax only; do not generate output files |
| /Zs | Check syntax only; do not generate output files |
| /old | Generate old format type libraries |
| /new | Generate new format type libraries |
| Switch | Use |
|---|---|
| /cstub filename | Specify client stub file name |
| /dlldata filename | Specify dlldata file name |
| /h filename | Specify header file name |
| /header filename | Specify header file name |
| /iid filename | Specify interface UUID file name |
| /proxy filename | Specify proxy file name |
| /sstub filename | Specify server stub file name |
| /tlb filename | Specify type library file name |
| Switch | Use |
|---|---|
| /cpp_cmd cmd_line | Specify name of C++ preprocessor |
| /cpp_opt options | Specify additional C++ preprocessor options |
| /D name[=def] | Pass #define name, optional value to C++ preprocessor |
| /no_cpp | Turn off the C++ preprocessing option |
| /nocpp | Turn off the C++ preprocessing option |
| /U name | Remove any previous definition (undefine) |
| Switch | Use |
|---|---|
| /char signed | C++ compiler default char type is signed |
| /char unsigned | C++ compiler default char type is unsigned |
| /char ascii7 | Char values limited to 0-127 |
| /dos | Target environment is MS-DOS client |
| /env dos | Target environment is MS-DOS client |
| /env mac | Target environment is Apple Macintosh |
| /env powermac | Target environment is Apple PowerMac |
| /env win16 | Target environment is Microsoft Windows 16-bit (Win 3.x) |
| /env win32 | Target environment is Microsoft Windows 32-bit (NT) |
| /mac | Target environment is Apple Macintosh |
| /ms_union | Use Midl 1.0 non-DCE wire layout for non-encapsulated unions |
| /oldnames | Do not mangle version number into names |
| /powermac | Target environment is Apple PowerMac |
| /rpcss | Automatically activate rpc_sm_enable_allocate |
| /use_epv | Generate server side application calls via entry-pt vector |
| /no_default_epv | Do not generate a default entry-point vector |
| /prefix client str | Add "str" prefix to client-side entry points |
| /prefix server str | Add "str" prefix to server-side manager routines |
| /prefix switch str | Add "str" prefix to switch routine prototypes |
| /prefix all str | Add "str" prefix to all routines |
| /win16 | Target environment is Microsoft Windows 16-bit (Win 3.x) |
| /win32 | Target environment is Microsoft Windows 32-bit (NT) |
| Switch | Use |
|---|---|
| /error none | Turn off all error checking options |
| /error allocation | Check for out of memory errors |
| /error bounds_check | Check size vs transmission length specification |
| /error enum | Check enum values to be in allowable range |
| /error ref | Check ref pointers to be non-null |
| /error stub_data | Emit additional check for server side stub data validity |
| /no_warn | Suppress compiler warning messages |
| Switch | Use |
|---|---|
| /align {1|2|4|8} | Designate packing level of structures |
| /pack {1|2|4|8} | Designate packing level of structures |
| /Zp{1|2|4|8} | Designate packing level of structures |
| /Oi | Generate fully interpreted stubs |
| /Oic | Generate fully interpreted stubs for standard interfaces and stubless proxies for object interfaces as of NT 3.51 release |
| /Oicf | Generate fully interpreted stubs with extensions and stubless proxies for object interfaces as of NT 4.0 release |
| /Os | Generate inline stubs |
| /hookole | Generate HookOle debug info for local object interfaces |
| Switch | Use |
|---|---|
| @response_file | Accept input from a response file |
| /? | Display a list of MIDL compiler switches |
| /confirm | Display options without compiling MIDL source |
| /help | Display a list of MIDL compiler switches |
| /nologo | Suppress displaying of the banner lines |
| /o filename | Redirects output from screen to a file |
| /W{0|1|2|3|4} | Specify warning level 0-4 (default = 1) |
| /WX | Report warnings at specified /W level as errors |
When you perform a significant number of simultaneous NTLM authentications, the following errors are likely to occur. Several factors affect the number of simultaneous NTLM authentications, however, you are most likely to see these errors when the network is congested or when the RPC application server does not respond to requests in a timely manner. The errors are returned as standard RPC application return values.
Table B-1 provides a description of the suspected cause and possible workarounds.
| Error | Cause/Corrective Actions |
|---|---|
| RPC_S_CONNECTION_REJECTED |
This error is seen by the client application as an exception when using
either DECnet Phase IV or DECnet Phase V as a transport and when the
server is heavily loaded servicing other DECnet clients.
The system returns this error when the client RPC run time binds to a newly created socket and the socket call returns error 61 (connection refused). Possible solutions:
|
| RPC_S_CONNECTION_TIMED_OUT |
This error is seen by the client application as an exception when using
TCP or DECnet as a transport and when the server is heavily loaded.
The system returns this error when the client RPC run time binds to a newly created socket and the server takes too long to either accept or reject the connection. Possible solutions:
|
| RPC_S_ASSOC_SHUTDOWN |
This error is seen by the client application as an exception when using
TCP or DECnet as a transport and when the client is heavily loaded
(usually when the client is also an RPC server).
After an RPC server receives an RPC_BIND packet from a client and the server sends back an RPC_BIND_ACK packet to the client, the server expects to receive a REQUEST packet within 12 seconds. If the client does not send the REQUEST packet within 12 seconds, the RPC server deletes the association and sends a SHUTDOWN packet to the client. The client RPC run time raises an exception to the RPC application. This scenario is likely to occur when the client RPC application is also acting as an RPC server and that RPC server is already heavily loaded. Possible solutions:
|
| RPC_S_COMM_FAILURE |
This error is seen by the client application as an exception when using DG (UDP) as a transport and when the RPC server is heavily loaded. The RPC client sends a REQUEST packet to the server. If the client does not get a WORKING packet response from the server within 30 seconds, the client sends a PING packet to the server to see if the server is still active and working on the client's request. If the RPC server is under heavy load, the server may not return the WORKING packet to the client before the client times out. Possible solutions:
|
Use the following procedure to troubleshoot problems with the ACME server:
The DCOM$RPCSS process must be running to run any COM for OpenVMS applications on your OpenVMS system. The DCOM$STARTUP.COM command file is automatically starts this process. If you have problems running COM for OpenVMS applications, check that this process is running. Use the following command:
$ SHOW SYSTEM |
If the process is initializing, the process name is DCOM$STARTUP-**. If the process is in its normal running state, the process name is be DCOM$RPCSS.
Check the SYS$MANAGER:DCOM$RPCSS.OUT log file for error messages from the DCOM$RPCSS process. The messages can include the following:
The Advanced Server for OpenVMS must be running to authenticate users with credentials.
A troubleshooter may wish to enable the audit policy to capture failures for logonoff and system events. For example, on systems running Advanced Server for OpenVMS, issue the command:
$ ADMINISTER SET AUDIT POLICY/AUDIT/FAILURE=(LOGONOFF,SYSTEM) |
To monitor events, issue the commands:
    $ ADMINISTER SHOW EVENT /FULL /TYPE=SYSTEM
    $ ADMINISTER SHOW EVENT /FULL /TYPE=SECURITY
|
For more information, the Advanced Server for OpenVMS Server Administrator's Guide provides a chapter on Monitoring Events and Troubleshooting.
Additionally, the system manager may want to check the system operator log, SYSMANAGER:OPERATOR.LOG, to verify that no network errors have occurred.
This section describes problems you may encounter when running a COM application.
For information on access denied failures, see Section 5.4.6.
SAMPLE1 and DISPATCH_SAMPLE1 are taken from Dale Rogerson's book, Inside COM, published by Microsoft Press. |
This example implements a COM client and server in which the component provides two interfaces: IX and IY . The client also queries the component for a third interface, IZ , an interface that the component does not provide.
This example demonstrates connectivity between two OpenVMS systems, between two Windows systems, or between an OpenVMS system and a Windows system.
Before you build the application on OpenVMS, you must run NTA$LOGON and acquire Windows credentials. For more information, see Section 8.2. |
The following sections describe how to build the application on an OpenVMS system.
Copy files from the DCOM examples directory to your local directory. For example:
$ set default mydisk:[mydirectory] $ copy dcom$examples:[sample1]*.* [] |
To build the application, run the following command procedure:
$ @build_sample1 |
If you have MMS, you can use the included description file as follows:
$ MMS/DESCRIPTION=BUILD_SAMPLE1.MMS |
The BUILD file builds and registers both the in-process and out-of-process servers.
The build procedure automatically registers both DISPCMPNT$SHR.EXE and DISPCMPNT.EXE . To register the components manually, use the following procedure:
$ regsvr32 :== $DCOM$REGSVR32.EXE $ regsvr32 path-nameDISPCMPNT$SHR.EXE |
$ regsvr32 /u path-nameDISPCMPNT$SHR.EXE |
$ dispcmpnt :== $path-nameDISPCMPNT.EXE $ dispcmpnt /regserver |
$ dispcmpnt /unregserver |
$ regsvr32 path-namePROXY$SHR.EXE |
$ regsvr32 /u path-namePROXY$SHR.EXE |
To run the sample where the component is an out-of-process server, run DISPCMPNT.EXE . When the system displays the Server: Waiting message from the component, run the client in a separate window or terminal session.
$ run dispcmpnt |
$ client :== $path-nameCLIENT.EXE For OutProc: $ client 2 $ |
The client displays the following:
To which server do you want to connect? 1) In-Process Server 2) Out-of-Process Server : |
Enter 2 to select the out-of-process server.
Run DISPCMPNT.EXE on the system you designate as the remote machine (or server system). The remote system can also be a Windows system. When you receive the Server: Waiting message from the component, run the client on the system you designate as the local machine (or client system). For example:
$ client :== $path-nameCLIENT.EXE $ client remote-system-name 2 $ |
The client displays the following:
To which server do you want to connect? 1) In-Process Server 2) Out-of-Process Server : |
Enter 2 to select remote server execution, out-of-process server.
To run the sample where the component is an in-process server, run only the client. For example:
For InProc: $ client 1 $ |
The client displays the following:
To which server do you want to connect? 1) In-Process Server 2) Out-of-Process Server : |
Enter 1 to select the in-process server.
The following sections describe how to build the application on a Windows system.
In order to build Visual C++ applications from a DOS window, you must first set up a number of environment variables. If you did not select the option to have these variables set up automatically when you installed Visual C++, you will need to set them up each time you create a DOS window. To set up these variables, execute the file
|
Copy the README-SAMPLE1.TXT file and the following files from the COM examples directory to your Windows system:
CLIENT.CXX CMPT.CXX CMPT.DEF MAKE-ONE. MAKEFILE.BAT PROXY.DEF REGISTRY.CXX REGISTRY.H SERVER.IDL |
Build the sample using the MAKEFILE.BAT file. For example:
> MAKEFILE |
The Makefile builds and registers both the in-process and out-of-process servers.
The build procedure make-one automatically registers DISPCMPNT.DLL , PROXY.DLL , and CMPNT.EXE as follows:
regsvr32 -s Dispcmpnt.dll regsvr32 -s Proxy.dll Dispcmpnt /RegServer |
To unregister the application, enter the following:
regsvr32 -u Dispcmpnt.dll regsvr32 -u Proxy.dll Dispcmpnt /UnRegServer |
Run CLIENT . Follow the same procedure as described for OpenVMS for running the application as an in-process server ( Section C.1.1.5) and out-of-process server Section C.2.1.3).
Use the name of a remote machine (UNC or DNS) as an argument to instantiate the object on the remote machine. For example:
>Client hostname ! point the client at the remote system 2 ! means outproc invocation > |
This example implements the Automation component server as a dual interface. There are two separate clients: Dclient , which connects to the dual interface through the dispinterface, and Client , which is a COM client implementation that connects through the IUnknown interface (using a v-table).
This example demonstrates connectivity between two OpenVMS systems, between two Windows systems, or between an OpenVMS system and a Windows system.
The following sections describe how to build the application on an OpenVMS system.
Copy files from the DCOM examples directory to your local directory. For example:
$ set default mydisk:[mydirectory] $ copy dcom$examples:[dispatch_sample1]*.* [] |
To build the application, run the following command procedure:
$ @build_dispatch_sample1 |
If you have MMS, you can use the included description file as follows:
$ MMS/DESCRIPTION=BUILD_DISPATCH_SAMPLE1.MMS |
The BUILD file builds and registers both the in-process and out-of-process servers.
The build procedure automatically registers both DISPCMPNT$SHR.EXE and DISPCMPNT.EXE . To register the components manually, use the following procedure:
$ regsvr32 :== $DCOM$REGSVR32.EXE $ regsvr32 path-nameDISPCMPNT$SHR.EXE |
$ regsvr32 /u path-nameDISPCMPNT$SHR.EXE |
$ dispcmpnt :== $path-nameDISPCMPNT.EXE $ dispcmpnt /regserver |
$ dispcmpnt /unregserver |
To run the sample where the component is an out-of-process server, run DISPCMPNT.EXE .
When the system displays the Server: Waiting message from the component, run the client in a separate window or terminal session.
$ run dispcmpnt |
$ run dclient |
$ run client |
The client displays the following:
To which server do you want to connect? 1) In-Process Server 2) Out-of-Process Server : |
Enter 2 to select the out-of-process server.
Run DISPCMPNT.EXE on the system you designate as the remote machine (or server system). The remote system can also be a Windows system. When you receive the Server: Waiting message from the component, run the client on the system you designate as the local machine (or client system). For example:
To use the COM client, enter the following:
$ client :== $path-nameCLIENT.EXE $ client remote-system-name To which server do you want to connect? 1) In-Process Server 2) Out-of-Process Server : |
Enter 2 to select remote server execution, out-of-process server.
To run the sample where the component is an in-process server, run only the client. For example:
$ run dclient |
$ run client |
The client displays the following:
To which server do you want to connect? 1) In-Process Server 2) Out-of-Process Server : |
Enter 1 to select the in-process server.
The following sections describe how to build the application on a Windows system.
In order to build Visual C++ applications from a DOS window, you must first set up a number of environment variables. If you did not select the option to have these variables set up automatically when you installed Visual C++, you will need to set them up each time you create a DOS window. To set up these variables, execute the file
|
Copy the README-DISPATCH-SAMPLE1.TXT file and the following files from the COM examples directory to your Windows system:
CLIENT.CXX DCLIENT.CXX DISPCMPNT.CXX DISPCMPNT.DEF DISPCMPNT.IDL MAKE-ONE. MAKEFILE.BAT REGISTRY.CXX REGISTRY.H |
Build the sample using the MAKEFILE.BAT file. For example:
C:> MAKEFILE |
The Makefile builds and registers both the in-process and out-of-process servers.
The build procedure make-one automatically registers DISPCMPNT.DLL , PROXY.DLL , and DISPCMPNT.EXE as follows:
regsvr32 -s Dispcmpnt.dll Dispcmpnt /RegServer |
To unregister the application, enter the following:
regsvr32 -u Dispcmpnt.dll Dispcmpnt /UnRegServer |
Run DCLIENT or CLIENT . Follow the same procedure as described for OpenVMS for running the application as an in-process server ( Section C.2.1.5) and an out-of-process server ( Section C.2.1.3).
Use the name of a remote machine (UNC or DNS) as an argument to instantiate the object on the remote machine.
This example shows how you can authenticate a remote client that is not in the server's domain or in a domain that has a trust with the server's domain. The client must pass to this application the credentials (user name, domain and password) of an account on the server's domain that is allowed access and launch permissions. In fact, the client need not be in any domain and can be anywhere on the network. This is demonstrated in Section C.3.1.3.
The following sections describe how to build the application on an OpenVMS system.
Not all functionality is present in the underlying WindowsNT infrastructure on OpenVMS. Therefore, you cannot run the client on OpenVMS. This example works when you run the client on Windows and the server on OpenVMS. |
Copy files from the DCOM examples directory to your local directory:
$ set default mydisk:[mydirectory] $ copy dcom$examples:[clientauth]*.* [] |
To build the application, run the command procedure:
$ @build_clientauth |
The BUILD file builds and registers both the in-process and out-of-process servers.
PROXY$SHR.EXE , CLIENTAUTH$SHR.EXE , and CLIENTAUTH.EXE are registered automatically by the build procedure. To register the application manually, use the following procedure:
$ regsvr32 :== $DCOM$REGSVR32.EXE $ regsvr32 <path-name>CLIENTAUTH$SHR.EXE $ regsvr32 <path-name>PROXY$SHR.EXE |
$ regsvr32 /u <path-name>CLIENTAUTH$SHR.EXE $ regsvr32 /u <path-name>PROXY$SHR.EXE |
$ clientauth :== $<path-name>CLIENTAUTH.EXE $ clientauth /regserver |
$ clientauth /unregserver |
To run the example when the component is an out-of-process server, run CLIENTAUTH.EXE . When you receive the server waiting message from the component, run the client (in a separate window or terminal session).
$ run clientauth |
$ client :== $<path-name>CLIENT.EXE For OutProc: $ client 2 $ |
Run CLIENTAUTH.EXE on the system you designate as the remote machine, or server system. The remote system can also be a Windows system. When you receive the server waiting message from the component, run the client on the system you designate as the local machine, or client system.
$ client :== $<path-name>CLIENT.EXE $ client <remote-system-name> 2 $ Please enter account to use on remote machine: $ Username: $ Domain: $ Password: |
The client asks whether you want to start an in-process server or an out-of-process server. For remote server execution, specify out-of-process server. You then are prompted to enter the user name, domain, and password of an account on the remote server. Make sure this account has been granted access and launch permissions to the component (see Section 6.3.2).
To run the sample when the component is an in-process server, run only the client:
For InProc: $ client 1 $ |
The client asks whether you want to start an in-process server or an out-of-process server. Specify in-process server.
The following sections describe how to build the application on a Windows system.
In order to build Visual C++ applications from a DOS window, you must first set up a number of environment variables. If you did not select the option to have these variables set up automatically when you installed Visual C++, you will need to set them up each time you create a DOS window. To set up these variables, execute the following file:
|
Copy the file README-CLIENTAUTH.TXT and the following files from the DCOM examples directory to your Windows system:
CLIENT.CXX CLIENTAUTH.CXX CLIENTAUTH.DEF CLIENTAUTH.IDL GUIDS.CXX MAKE-ONE. MAKEFILE.BAT PROXY.DEF REGISTRY.CXX REGISTRY.H |
Build the sample using the MAKEFILE.BAT file:
> MAKEFILE |
The Makefile builds and registers both the in-process and out-of-process servers.
CLIENTAUTH.DLL , PROXY.DLL , and CLIENTAUTH.EXE are registered automatically by the build procedure <make-one>:
regsvr32 -s clientauth.dll regsvr32 -s Proxy.dll clientauth /RegServer |
To unregister the application:
regsvr32 -u clientauth.dll regsvr32 -u Proxy.dll clientauth /UnRegServer |
Run CLIENT. Follow the same procedure as described for running the application on an in-process server and out-of-process server (see Section C.3.1.2 and Section C.3.1.4).
Do not use command line arguments to instantiate the object on the current machine. Instead, use the name of a remote machine (UNC or DNS) as an argument to instantiate the object on the remote machine.
  (i.e) >Client hostname        ! point the client at the remote system
        2                       ! means outproc invocation
        >
        >Username:
        >Domain:
        >Password:
|
| Previous | Next | Contents | Index |