Software > OpenVMS Systems > Documentation > 732final > 6048 HP OpenVMS Systems Documentation |
HP OpenVMS System Management Utilities Reference Manual
IO CREATE_WWID (Alpha Only)
Assigns a specific, previously unused device name to a specific, previously unused worldwide identifier (WWID) from the SYSMAN IO LIST_WWID display. FormatIO CREATE_WWID devnam_string/WWID=wwid_string Parameter
Qualifier
DescriptionThis command is an alternative to the SYSMAN IO FIND_WWID command, which selects system-generated device names for the discovered WWIDs. Do not, however, use the SYSMAN IO CREATE_WWID command after the SYSMAN IO FIND_WWID command to redefine WWID correlations. Also, do not specify device and WWID strings in the SYSMAN IO CREATE_WWID command that are specified elsewhere in the cluster. Example
IO FIND_WWID (Alpha Only)
The SYSMAN IO FIND_WWID command probes all Fibre Channel ports, detects all previously undiscovered tapes and medium changers behind a Network Storage Router (NSR) or a Modular Data Router (MDR), and assigns a worldwide identifier (WWID) to each one. FormatIO FIND_WWID DescriptionPrior to configuring a tape device on Fibre Channel ports, the worldwide identifier (WWID) of the device must be detected and stored, along with a device name, in the text file SYS$SYSTEM:SYS$DEVICES.DAT. You use the SYSMAN command IO FIND_WWID to accomplish this. Example
IO LIST_WWID (Alpha Only)
Applies only to tape devices on Fibre Channel. Lists all tape device WWIDs that are not yet configured on Fibre Channel. FormatIO LIST_WWID Example
IO LOAD (Alpha Only)
On Alpha systems, loads an I/O driver. On VAX systems, use the SYSGEN command LOAD.
FormatIO LOAD filespec Parameter
Qualifier
DescriptionThe SYSMAN IO LOAD command loads an I/O driver. VAX system managers use the SYSGEN command LOAD. You must have CMKRNL and SYSLCK privileges to use the SYSMAN IO LOAD command. Example
IO REBUILD (Alpha Only)
On Alpha systems, rebuilds device configuration tables in preparation for using the SYSMAN IO AUTOCONFIGURE command to reconfigure the system. FormatIO REBUILD ParametersNone. Qualifier
DescriptionThe SYSMAN IO REBUILD command rebuilds the system's device configuration tables by reading and parsing the SYS$SYSTEM:SYS$USER_CONFIG.DAT and SYS$SYSTEM:SYS$CONFIG.DAT files. Example
IO REPLACE_WWID (Alpha Only)
This command allows a user to replace one tape drive behind a Network Storage Router (NSR) with another tape drive at the same Fibre Channel (FC) Logical Unit Number (LUN) location. FormatIO REPLACE_WWID devnam_string/WWID=wwid_string Parameter
Qualifier
DescriptionYou can use the two parameters, devnam_string and wwid_string, with the REPLACE_WWID command to replace a broken tape device with a new device. The command automatically updates the data structures that record the new devnam-WWID correlation, and the device automiatically begins to function correctly. Example
IO SCSI_PATH_VERIFY (Alpha Only)
On Alpha systems, the SYSMAN IO SCSI_PATH_VERIFY subcommand checks each SCSI and FC path in the system to determine whether the attached device has been changed. If a device change is detected, then the SCSI or FC path is disconnected in the IO database. This allows the path to be reconfigured on the new device, by using the SYSMAN IO AUTOCONFIGURE command. FormatIO SCSI_PATH_VERIFY ParametersNone. QualifiersNone. DescriptionYou usually enter the SYSMAN IO SCSI_PATH_VERIFY command after performing an online reconfiguration of a SCSI or an FC interconnect. The command reads the device type and device identifier on each SCSI and FC path in the system. If the device does not match the data stored in the IO database, then the path is disconnected in the IO database. Following a SYSMAN IO SCSI_PATH_VERIFY command, you usually enter a SYSMAN IO AUTOCONFIGURE command, which updates the IO database to match the new SCSI or FC configuration. Example
IO SET EXCLUDE (Alpha Only)
On Alpha systems, sets the permanent exclusion list to be used when configuring devices automatically. FormatIO SET EXCLUDE = device_name Parameter
QualifiersNone. DescriptionSets the permanent exclusion list to be used when configuring devices. Example
IO SET PREFIX (Alpha Only)
On Alpha systems, sets the prefix list that is used to manufacture the IOGEN Configuration Building Module (ICBM) names. FormatIO SET PREFIX =icbm_prefix Parameter
QualifiersNone. DescriptionThe SYSMAN IO SET PREFIX command sets the prefix list which is used to manufacture ICBM names. Example
IO SHOW BUS (Alpha Only)
On Alpha systems, lists all the buses, node numbers, bus names, TR numbers, and base CSR addresses on the system. This display exists primarily for internal engineering support. ParametersNone. QualifiersNone. DescriptionThe SYSMAN IO SHOW BUS command lists all the buses, node numbers, bus names, TR numbers, and base CSR addresses. This display exists primarily for internal engineering support. You must have CMKRNL privilege to use SYSMAN IO SHOW BUS. Example
On Alpha systems, you can use the SDA command CLUE CONFIG to display additional information including hardware adapters and devices. This command is documented in the OpenVMS Alpha System Dump Analyzer Utility Manual. For more information about loading and configuing device drivers, refer to Writing OpenVMS Alpha Device Drivers in C. IO SHOW DEVICE (Alpha Only)
On Alpha systems, displays information about device drivers loaded into the system, the devices connected to them, and their I/O databases. All addresses are in hexadecimal and are virtual. On VAX systems, use the SYSGEN command SHOW/DEVICE. FormatIO SHOW DEVICE ParametersNone. QualifiersNone. DescriptionThe SYSMAN IO SHOW DEVICE command displays information about the device drivers loaded into the system, the devices connected to them, and their I/O databases. Example
IO SHOW EXCLUDE (Alpha Only)
On Alpha systems, displays the permanent exclusion list used in the autoconfiguration of devices. FormatIO SHOW EXCLUDE ParametersNone. QualifiersNone. DescriptionThe SYSMAN IO SHOW EXCLUDE command displays the permanent exclusion list on the console. This list is used in the autoconfiguration of devices. Example
IO SHOW PREFIX (Alpha Only)
On Alpha systems, displays the current prefix list used in the manufacture of IOGEN Configuration Building Module (ICBM) names. FormatIO SHOW PREFIX ParametersNone. QualifiersNone. DescriptionThe SYSMAN IO SHOW PREFIX command displays the current prefix list on the console. This list is used by the SYSMAN IO AUTOCONFIGURE command to build ICBM names. Example
LICENSE LOAD
Activates licenses registered in the LICENSE database. FormatLICENSE LOAD product Parameter
Qualifiers
DescriptionYou can use the LICENSE LOAD command to activate licenses on multiple systems and on nonlocal systems in the system management environment. The SYSMAN LICENSE commands are a subset of the License Management Facility (LMF) commands. For more information about the LMF, refer to the OpenVMS License Management Utility Manual. Example
LICENSE UNLOAD
Deactivates licenses registered in the LICENSE database. FormatLICENSE UNLOAD [product] Parameter
Qualifier
DescriptionYou can use the LICENSE UNLOAD command to deactivate licenses on multiple systems and on nonlocal systems in the system management environment. The SYSMAN LICENSE commands are a subset of the License Management Facility (LMF) commands. For more information about the LMF, refer to the OpenVMS License Management Utility Manual. Example
PARAMETERS DISABLE CHECKS
Bypasses validation of parameter values. SYSMAN parameter validation ensures that the parameters fall within the defined minimum and maximum values specified in the PARAMETERS SET command. FormatPARAMETERS DISABLE CHECKS ParametersNone. QualifiersNone. DescriptionThe PARAMETERS DISABLE CHECKS command enables you to override minimum and maximum values established for system parameters. SYSMAN does parameter checks by default. If you attempt to set parameter values outside the allowable limits when checks are enabled, the operating system issues an error message. By disabling checks you can set parameter values regardless of the minimum and maximum limits. Example
PARAMETERS ENABLE CHECKS
Validates all parameter values to ensure that they fall within the defined minimum and maximum values. FormatPARAMETERS ENABLE CHECKS ParametersNone. QualifiersNone. Example
PARAMETERS SET
Changes the value of a specific parameter in the work area. FormatPARAMETERS SET parameter-name [value] Parameters
Qualifier
Examples
PARAMETERS SHOW
Displays the value of a parameter or a group of parameters in the work area. In addition, the command shows the minimum, maximum, and default values of a parameter and its unit of measure. FormatPARAMETERS SHOW [parameter-name] Parameter
Qualifiers
DescriptionSYSMAN displays parameters in decimal unless you specify the /HEX qualifier. ASCII values are always displayed in ASCII. Examples
. . . The command in this example allows you to control the rate at which the information is displayed. PARAMETERS USE
Reads a set of system parameters into the work area for display or modification. FormatPARAMETERS USE source Parameter
QualifiersNone. DescriptionDepending on the source you enter with the command, PARAMETERS USE activates the parameter values: Example
PARAMETERS WRITE
Writes the contents of the work area to memory, to disk, or to a file, depending on the destination that you specify. FormatPARAMETERS WRITE destination Parameter
QualifiersNone. DescriptionThe PARAMETERS WRITE command writes the system parameter values and the name of the site-independent startup command procedure from the work area to the active system in memory, the current system parameter file on disk, or your choice of a parameter file. You can write only dynamic parameter values to the active system. Examples
RESERVED_MEMORY ADD (Alpha Only)
On Alpha systems, adds an entry to the Reserved Memory Registry data file. Changes and additions to the Reserved Memory Registry data file do not take effect until the next reboot of the system. FormatRESERVED_MEMORY ADD name Parameter
Qualifiers
DescriptionThe OpenVMS operating system allows you to reserve non-fluid memory for use within a memory-resident global demand-zero section. The reserved memory can be simply a deduction from the system's fluid memory size, or it can be preallocated as physical pages. Example
RESERVED_MEMORY EXTEND (Alpha Only)
On Alpha systems, adds sections of memory if you want to specify more than one resource affinity domain (RAD) for a single reservation. FormatRESERVED_MEMORY EXTEND name Parameter
Qualifiers
RESERVED_MEMORY FREE (Alpha Only)
On a running Alpha system, frees reserved memory. This command does not affect the contents of the Reserved Memory Registry data file; it affects only the running system. FormatRESERVED_MEMORY FREE name Parameter
Qualifiers
DescriptionIf physical pages were not preallocated during system initialization for this global section, the reserved memory is simply added to the system's fluid page count. Otherwise, the pages are deallocated to the system's free or zeroed page list. Example
RESERVED_MEMORY LIST (Alpha Only)
On Alpha systems, provides a preview of this reservation as it is currently stored in the Reserved Memory Registry data file. If no reservation is specified, all current reservations are displayed. FormatRESERVED_MEMORY LIST name Parameter
Qualifiers
RESERVED_MEMORY MODIFY (Alpha Only)
On Alpha systems, allows you to modify an existing entry in the Reserved Memory Registry data file. FormatRESERVED_MEMORY MODIFY name Parameter
Qualifiers
DescriptionThe Reserved Memory Registry entry to be modified is identified by the combination of the following items:name Example
RESERVED_MEMORY REMOVE (Alpha Only)
On Alpha systems, removes a reserved memory entry from the Reserved Memory Registry data file. This command takes effect on the next reboot and does not affect the running systems. FormatRESERVED_MEMORY REMOVE name Parameter
Qualifiers
Example
RESERVED_MEMORY SHOW (Alpha Only)
On Alpha systems, displays the memory reservations on the running system. FormatRESERVED_MEMORY SHOW name Parameter
Qualifiers
Example
SET ENVIRONMENT
Defines the nodes or cluster to which subsequent commands apply. FormatSET ENVIRONMENT ParametersNone. Qualifiers
DescriptionThe SET ENVIRONMENT command defines the target nodes or cluster for subsequent commands. When invoked, the system management environment is the local node where you are running SYSMAN. You can change the environment to any other nodes in the cluster, the entire cluster, or any nodes or cluster available through DECnet. Examples
SET PROFILE
Temporarily modifies a user's current privileges and default device and directory. FormatSET PROFILE ParametersNone. Qualifiers
DescriptionThe SET PROFILE command modifies process attributes for the current management environment. After considering the privilege requirements of commands that you intend to use in an environment, you can add or delete current privileges, if they are authorized. You can also set a new default device and directory, as well as use the SET PROFILE/[NO]VERIFY command to control DCL command verification in SYSMAN. Other attributes of your process remain constant. The profile is in effect until you change it, reset the environment, or exit from SYSMAN. The HP OpenVMS System Manager's Manual discusses profile changes in more detail. Examples
SET TIMEOUT
Establishes the amount of time SYSMAN waits for a node to respond. Once the time limit expires, SYSMAN proceeds to execute the command on the next node in the environment. FormatSET TIMEOUT time Parameter
QualifiersNone. Example
SHOW ENVIRONMENT
Displays the target nodes or cluster where SYSMAN is executing commands. FormatSHOW ENVIRONMENT ParametersNone. QualifiersNone. DescriptionThe SHOW ENVIRONMENT command displays the current management environment. It can be the local cluster, local or remote nodes, or a nonlocal cluster. SYSMAN indicates if the environment is limited to individual nodes or if it is clusterwide. It also shows the current user name. Examples
SHOW KEY
Displays key definitions created with the DEFINE/KEY command. FormatSHOW KEY [key-name] Parameter
Qualifiers
DescriptionSpecifies the name of the key whose definition you want displayed. See the DEFINE/KEY command for a list of valid key names. Example
SHOW PROFILE
Displays the privileges and the default device and directory being used in the current environment. FormatSHOW PROFILE ParametersNone. Qualifiers
DescriptionThe SHOW PROFILE command displays the privileges and the default device and directory that is being used in the current environment. You can modify these attributes with the SET PROFILE command. Example
SHOW TIMEOUT
Displays the amount of time SYSMAN waits for a node to respond. By default, there is no timeout period. FormatSHOW TIMEOUT ParametersNone. QualifiersNone. Example
SHUTDOWN NODE
Shuts down one or more nodes in an OpenVMS Cluster. FormatSHUTDOWN NODE ParametersNone. Qualifiers
DescriptionBecause SYSMAN enables you to define the target environment, you can perform a shutdown on your local node, your own cluster, or a subset of nodes on your cluster. If you are shutting down a local node, SYSMAN does not require you to remain logged in to the system during the shutdown, as long as you set the environment to the local node. See the SHUTDOWN NODE command examples and the SET ENVIRONMENT command for more information. Examples
SPAWN
Creates a subprocess of the current process. The context of the subprocess is copied from the current process. You can use the SPAWN command to leave SYSMAN temporarily, perform other tasks (such as displaying a directory listing or printing a file), and return to SYSMAN. FormatSPAWN [command-string] Parameter
Qualifiers
DescriptionThe SPAWN command creates a subprocess of your current process with the following attributes copied from the parent process: Examples
STARTUP ADD
Adds a component to the startup database. FormatSTARTUP ADD FILE filespec Parameters
Qualifiers
DescriptionThe STARTUP ADD command adds a component to the startup database. Startup components are the command procedures or executable files that perform actual startup work. Files from the startup database are used to start the operating system, site-specific programs, and layered products. STARTUP$STARTUP_VMS and STARTUP$STARTUP_LAYERED list the components of the startup database. Example
STARTUP DISABLE
Prevents a file in the startup database from executing. FormatSTARTUP DISABLE FILE filespec Parameters
Qualifiers
DescriptionThe STARTUP DISABLE command prevents a file in the startup database from executing. The command edits a record in the startup database, temporarily disabling the file. Example
STARTUP ENABLE
Enables a previously disabled file in the startup database to execute during system startup. FormatSTARTUP ENABLE FILE filespec Parameters
Qualifiers
DescriptionThe STARTUP ENABLE command permits a file that was previously disabled to execute during system startup. Example
STARTUP MODIFY
Changes information associated with a startup file in the startup database. FormatSTARTUP MODIFY FILE filespec Parameters
Qualifiers
DescriptionThe STARTUP MODIFY command edits startup information associated with components in the startup database. For example, the command can rename a file or change the parameters that are passed to a file during startup. You can select a group of files for modification based on the phase in which they run. Example
STARTUP REMOVE
Removes a record in the startup database, so the specified startup file no longer executes during system startup. FormatSTARTUP REMOVE FILE filespec Parameters
Qualifiers
Example
STARTUP SET DATABASE
Establishes the current startup database. FormatSTARTUP SET DATABASE database Parameter
QualifiersNone. Example
STARTUP SET OPTIONS
Controls logging and display of information for one or more nodes in a cluster during startup. FormatSTARTUP SET OPTIONS ParametersNone. Qualifiers
DescriptionThe STARTUP SET OPTIONS command enables you to control logging and checkpointing during startup. You can control the amount of information logged (full or partial) and where it is displayed (file or console). You can also choose checkpointing, which displays informational messages about the time and status of each phase during startup. Example
STARTUP SHOW
Displays the name of the current startup database or its components as well as the startup logging options selected with the STARTUP SET OPTIONS command. FormatSTARTUP SHOW DATABASE Parameters
Qualifiers
Example
SYS_LOADABLE ADD
Adds an entry in the system images file SYS$UPDATE:VMS$SYSTEM_IMAGES.IDX.
FormatSYS_LOADABLE ADD product image Parameters
Qualifiers
DescriptionThe SYS_LOADABLE ADD command adds an entry to the system images file SYS$UPDATE:VMS$SYSTEM_IMAGES.IDX. You can then process this file using the command procedure SYS$UPDATE:VMS$SYSTEM_IMAGES.COM. Processing the file with VMS$SYSTEM_IMAGES.COM generates a new system images data file that the system uses when it boots. SYS_LOADABLE REMOVE
Removes an entry in the system images file SYS$UPDATE:VMS$SYSTEM_IMAGES.IDX.
FormatSYS_LOADABLE REMOVE product Parameters
Qualifier
DescriptionThe SYS_LOADABLE REMOVE command removes an entry from the system images file SYS$UPDATE:VMS$SYSTEM_IMAGES.IDX. You can then process this file using the command procedure SYS$UPDATE:VMS$SYSTEM_IMAGES.COM. Processing the file with VMS$SYSTEM_IMAGES.COM generates a new system images data file that the system uses when it boots. 22.4 RAD ExampleThe following example procedure shows how to use SYSMAN resource affinity domain (RAD) qualifiers and options.
Chapter 23
|
|||||||||||||||||||||||||||||||||||||||||||||||||||||||||||||||||||||||||||||||||||||||||||||||||||||||||||||||||||||||||||||||||||||||||||||||||||||||||||||||||||||||||||||||||||||||||||||||||||||||||||||||||||||||||||||||||||||||||||||||||||||||||||||||||||||||||||||||||||||||||||||||||||||||||||||||||||||||||||||||||||||||||||||||||||||||||||||||||||||||||||||||||||||||||||||||||||||||||||||||||||||||||||||||||||||||||||||||||||||||||||||||||||||||||||||||||||||||||||||||||||||||||||||||||||||||||||||||||||||||||||||||||||||||||||||||||||||||||||||||||||||||||||||||||||||||||||||||||||||||||||||||||||||||||||||||||||||||||||||||||||||||||||||||||||||||||||||||||||||||||||||||||||||||||||||||||||||||||||||||||||||||||||||||||||||||||||||||||||||||||||||||||||||||||||||||||||||||||||||||||||||||||||||||||||||||||||||||||||||||||||||||||||||||||||||||||||||||||||||||||||||||||||||||||||||||||||||||||||||||||||||||||||||||||||||||||||||||||||||||||||||||||||||||||||||||||||||||||||||||
| Device Name | Description |
|---|---|
| KBD n 1 | Keyboard |
| MOU n 1 | Mouse |
| TXA n 1 | Modem |
| LPA n 1 | Printer driver |
| HID0 | Special-case driver that users cannot access |
| UCM0 | Hub driver (one per system) |
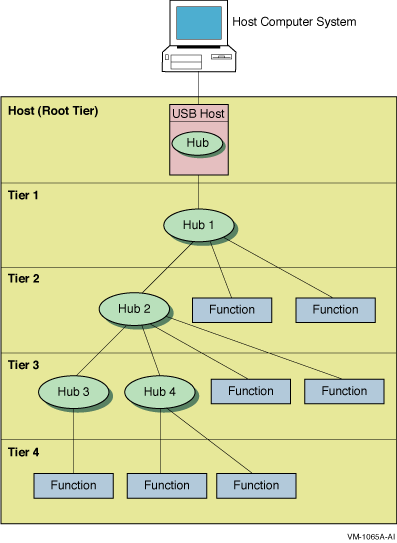
The UCM works with the hub driver to configure USB-supported devices.
The UCM is made up of client and server layers. The user interacts with the client layer, and the client layer interacts with the server layer. It is the server layer that interacts with the USB. Figure 23-3 shows the interaction of these layers.
Figure 23-3 UCM Architecture
As the figure indicates, the UCM server maintains the event-logging file and the generic and permanent list files. These files are passed to the UCM client, which can display the files to the user. (The types of lists that the UCM server uses are explained in Section 23.2.2.1.) The UCM server is in contact with the UCM driver, SYS$HUBDRIVER, which maintains connections with other layers of the architecture.
The UCM server has the following three types of lists:
Never delete USB$UCM_DEVICES.DAT. Deleting this file might result in the inability to use your USB attached devices. |
At system startup time, the following steps occur:
In configuring devices, keep in mind the following:
|
UCM uses the following log file to record disconnections, connections, and errors:
SYS$MANAGER:USB$UCM_EVENTS.LOG |
You do not need special permission to access the event log. However, you do need OPER privilege to use the UCM command SET LOG/NEW command to create a new log file. ( Section 23.5 contains a table listing UCM commands and the privileges required to issue each command.)
You can use UCM commands to select the devices you want to configure and to view USB events such as connections, disconnections, and errors. The following sections explain how to configure USB devices and how to view USB device information.
Before the system can configure a USB device, the device must have a corresponding entry on the permanent list. Although a few entries are included as part of USB installation, these entries provide only minimal support for a mouse and a keyboard. For most devices, you need to take certain steps to add an entry to the permanent list.
When you connect a USB device of a known type that has no entry on the permanent list, UCM uses information in the read-only generic list to create an entry in the tentative list. You must approve the entry before UCM creates an entry in the permanent list.
The following section explains how to create an entry in the permanent list.
Creating an Entry in the Permanent List
To set up a device to be configured, add the device as an entry in the permanent list. Once you do this, UCM recognizes the device each time you connect it.
In the following example, you connect a printer to the USB. The printer is a known device type; in other words, it has an entry in the generic list. However, it does not yet have an entry in the permanent list.
Follow these steps to configure the device:
$ UCM UCM> |
$ UCM Universal Serial Bus Configuration Manager, Version V1.0 UCM> SHOW DEVICE /UNCONFIGURED DEVICE DEVICE_TYPE TENTATIVE DEVICE_NAME_ROOT LP UNIT_NUMBER 0 BUS 1 PATH 1.0.0.0.0.0 END_DEVICE UCM> |
UCM> ADD DEVICE LPA0: UCM> EXIT |
The UCM event logger records events such as device connections and disconnections and certain types of errors. To see this information, you use the UCM utility SHOW EVENTS command. You can also use qualifiers to limit the display of various types of events.
Events stored in the event log include the following:
The following sections explain how to display information about unknown devices and configuration failures.
The UCM records unknown device connections in its event log. You can view this information by adding the /TYPE=UNKNOWN qualifier to the SHOW EVENT command.
The information in the following example includes the vendor ID, the product ID, and other optional device-supplied information. If an unknown device is connected to the USB, you might want to view only events showing the activity of unknown devices for today; for example:
UCM> SHOW EVENTS /TYPE=UNKNOWN /SINCE=TODAY

Date        Time        Type         Priority Component
--------------------------------------------------------------------------------
22-AUG-2002 13:04:23.26 UNKNOWN      NORMAL   UCM UNKNOWN DEVICE
     Message: VENDOR_ID = 1118.PRODUCT_ID = 8.RELEASE_NUMBER = 256.BUS_NUMBER
     = 1.PATH = 1.0.0.0.0.0.DEVICE_CLASS = 0.DEVICE_SUB_CLASS =
     0.DEVICE_PROTOCOL = 0.NUMBER_OF_INTERFACES = 1.NUMBER_OF_CONFIGURATIONS
     = 1.MANUFACTURER_STRING = Microsoft.PRODUCT_STRING =
     Microsoft SideWinder Precision Pro (USB).CONFIGURATION_NUMBER = 0.

UCM>
|
Note that the display on your screen might be somewhat different from the one you see here.
When UCM does not configure a device---because UCM cannot find an entry in the permanent list or because of a driver error---it stores this information in the event log. You can view such information using the SHOW EVENTS command and a qualifier that limits the display. For example:
UCM> SHOW EVENTS /SINCE=YESTERDAY

Date        Time        Type         Priority Component
-------------------------------------------------------------------------
28-AUG-2002 17:43:47.09 DRIVER       NORMAL   HUBDRIVER
        Message: Find a driver for DeviceClass/DeviceSubClass = 0x2/0x0

28-AUG-2002 17:43:47.09 UNKNOWN      NORMAL   UCM UNKNOWN DEVICE
        Message: VENDOR_ID = 4483.PRODUCT_ID = 16392.RELEASE_NUMBER =
        256.BUS_NUMBER = 3.PATH = 1.1.4.4.0.0.DEVICE_CLASS =
        2.DEVICE_SUB_CLASS = 0.DEVICE_PROTOCOL = 0.NUMBER_OF_INTERFACES =
        2.NUMBER_OF_CONFIGURATIONS = 2.MANUFACTURER_STRING
        = HP Computer Corp., Inc..PRODUCT_STRING = HP USB
        Modem.CONFIGURATION_NUMBER = 0.

28-AUG-2002 17:43:47.24 DRIVER       NORMAL   HUBDRIVER
        Message: hub_configure_device Unable to find Interface Driver


28-AUG-2002 17:43:47.24 DRIVER       NORMAL   HUBDRIVER
        Message: Find a driver for InterfaceClass/InterfaceSubClass/
        Protocol = 0xff/0xff/0xff

28-AUG-2002 17:43:49.17 UCM          CRITICAL ucm_config_request
        Message: %SYSTEM-W-DEVEXISTS, device unit already exists

28-AUG-2002 17:43:50.17 DRIVER       NORMAL   HUBDRIVER
        Message: Configured device TXA3 using driver SYS$YCDRIVER:

28-AUG-2002 17:43:56.11 DRIVER       NORMAL   HUBDRIVER         Message: Device on bus 3 at port 1 bus tier 4 can exceed the         bus power available

UCM> exit
|
Note that the display on your screen might be somewhat different from the one you see here.
The last message in this example, which is in bold type, indicates that there is insufficient power in the hub to supply the device. Therefore, UCM will not configure the device.
If no entry for the device is in the generic list, the log displays what is known about the device. If an error caused the failure, the error code is listed in the log.
The Universal Serial Bus (USB) Configuration Manager (UCM) utility allows you to connect a computer to a variety of USB devices using a single four-wire cable.
UCM
To invoke UCM, enter UCM at the DCL command prompt ($):
$ UCM UCM> |
At the UCM> prompt, you can enter any of the UCM commands described briefly in Section 23.5 and in more detail in the following sections.
Alternatively, you can enter UCM commands at the DCL prompt. For example:
$ UCM RELOAD $ |
To exit from UCM, enter the EXIT command at the UCM> prompt, or press Ctrl/Z.
The following table summarizes the UCM commands.
| Command | Description | Privilege Required |
|---|---|---|
| ADD DEVICE | Allows you to add a new device to the collection of known USB devices. | SYSPRV |
| DELETE DEVICE | Allows you to remove a device from the collection of known devices. | SYSPRV |
| EXIT | Exits the UCM utility. | None |
| HELP | Provides online help information for using the UCM commands. | None |
| MODIFY DEVICE | Modifies the unit number or flags of an entry in the permanent list. The changes take effect immediately. | SYSPRV |
| RELOAD | Reads the generic and permanent lists from disk. | SYSPRV |
| RESTART | Restarts the configuration server. | CMKRNL |
| SET LOG/NEW | Creates a new version of the event log file. | OPER |
| SHOW DEVICE | Displays configured and unconfigured devices that are connected to the USB. | None |
| SHOW EVENTS | Displays events in the event log file. | None |
Allows you to add a new device to the collection of known USB devices.Requires SYSPRV privilege.
ADD DEVICE device-name:
device-name:
The name of the device whose characteristics are to be added. The device name has the form ddcu, where:
dd is the device code---for example, LP. (The driver name corresponds to the device code; in this case, the driver name would be SYS$LPDRIVER.) c is the controller designation A through Z; unless UCM specifies a different letter, all USB devices are A. u is the unit number (0 through 9999). OpenVMS device names are made up of the two-character device code, followed by the controller designation, then by the unit number (which can be 1 to 4 characters long), then by a colon (:).
/BUS_NUMBER=number
Specifies the USB bus number of the device. This parameter is required to identify a particular device on a system that has multiple USB buses. If you do not use this qualifier, the bus number defaults to zero.The number can be any number from 0 through 25.
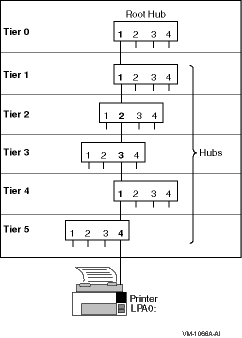
/PATH=(n1[.n2.n3.n4.n5.n6])
Specifies the path to the device on the bus. The path is used to uniquely identify a device if the device does not have a serial number. The path specification is a series of six or fewer nonzero numbers, where:
n1 is the number of the port on the root hub (at tier 0). n2 through n6 are port numbers for downstream hubs at tiers 1, 2, 3, 4, and 5. (If you do not specify trailing zeros, the UCM server supplies them.) For example, /PATH=1.4.3 indicates that the device is plugged into port 3 of the second tier hub, which is plugged into port 4 of the first tier hub, which in turn is plugged into the root hub 1.
For a more detailed explanation of path specifications, see Figure 23-2 and the text that introduces the figure.
/UNIT_NUMBER=number
Unit numbers can be between 0 and 9999. By default, UCM selects the next available unit number. This qualifier allows you to change the unit number to suit your needs.
$  UCM
Universal Serial Bus Configuration Manager, Version V1.0
UCM> SHOW DEVICE /UNCONFIGURED

DEVICE
DEVICE_TYPE                     TENTATIVE
DEVICE_NAME_ROOT                AG
UNIT_NUMBER                     0
BUS                             1
PATH                            1.0.0.0.0.0
END_DEVICE

UCM> ADD DEVICE AGA0:

UCM> SHOW DEVICE /PERMANENT /FULL AGA0:

DEVICE
DEVICE_TYPE                     PERMANENT
DEVICE_NAME_ROOT                AG
UNIT_NUMBER                     0
DRIVER                          SYS$AGDRIVER.EXE
BUS_NUMBER                      1
PATH                            1.0.0.0.0.0
HID_USAGE_DATA                  65540
BEGIN_INTERFACE
HID_USAGE_DATA                  65540
END_INTERFACE
END_DEVICE

UCM>
|
In this example, the first UCM command SHOW DEVICE /UNCONFIGURED indicates that the device has not yet been configured. It displays only the information that appears in the generic list: the device name root, the unit number, the bus, and the path.
After the ADD DEVICE command, the second SHOW DEVICE command, with the /PERMANENT and /FULL qualifiers, displays the information in the permanent list. The list includes the name of the driver assigned to the device, the bus number; and the Human Interface Device (HID) usage data number, which is used to configures devices in the HID interface class. Examples of HID devices are keyboards, mice, joysticks, and so on.
Allows you to remove a device from the the permanent list.Requires SYSPRV privilege.
DELETE DEVICE device-name:
device-name:
The name of the device whose characteristics are to be deleted. The device name has the form ddcu, where:
dd is the device code---for example, LP. (The driver name corresponds to the device code; in this case, the driver name would be SYS$LPDRIVER.) c is the controller designation A through Z; unless UCM specifies a different letter, all USB devices are A. u is the unit number (0 through 9999). OpenVMS device names are made up of the two-character device code, followed by the controller designation, then by the unit number (which can be 1 to 4 characters long), then by a colon (:).
$  UCM
Universal Serial Bus Configuration Manager, Version V1.0

UCM> SHOW DEVICE /PERMANENT AGA0:

DEVICE
DEVICE_TYPE                     PERMANENT
DEVICE_NAME_ROOT                AG
UNIT_NUMBER                     0
BUS                             1
PATH                            1.0.0.0.0.0
END_DEVICE

UCM> DELETE DEVICE AGA0:

UCM> SHOW DEVICE /PERMANENT AGA0:

%USB-E-NOSUCHDEV, Device name or device unit not found

UCM>
|
In this example, the first SHOW DEVICE AGA0: command displays information about the device that is in the permanent list. After the DELETE DEVICE AGA0: command, the second SHOW DEVICE AGA0: command displays an error message indicating that the device is no longer in the permanent list.
Stops the execution of UCM and returns control to DCL command level. You can also press Ctrl/Z to perform the same function.
EXIT
Provides online help for using the UCM commands.
HELP [command-name]
command-name
The name of a UCM command. When you enter the HELP command with a command name, UCM displays a list of all the command keywords used with the command.
UCM> HELP RESTART

RESTART

     Restarts the configuration server.  This command should be used
     only if the server is no longer responding to configuration requests
     or if the client cannot get the server to respond to commands.  Use
     of this command requires the CMKRNL privilege.

     Format

       RESTART

 Additional information available:

  Qualifiers
  /CONFIRM

RESTART Subtopic?
|
The HELP RESTART command describes the command, shows its format, and indicates what additional information is available, such as qualifiers. It then prompts you to enter the name of the /CONFIRM qualifier to display information about this qualifier.
Allows you to modify the path and unit number of a device in the permanent list. The changes take place immediately.Requires SYSPRV privilege.
MODIFY DEVICE device-name:
device-name:
The name of the device whose characteristics are to be modified. The device name has the form ddcu, where:
dd is the device code---for example, LP. (The driver name corresponds to the device code; in this case, the driver name would be SYS$LPDRIVER.) c is the controller designation A through Z; unless UCM specifies a different letter, all USB devices are A. u is the unit number (0 through 9999). OpenVMS device names are made up of the two-character device code, followed by the controller designation, then by the unit number (which can be 1 to 4 characters long), and then by a colon (:).
/BUS_NUMBER=number
Specifies the USB bus number of the device. This parameter is required to identify a particular device on a system that has multiple USB buses. If you do not use this qualifier, the bus number defaults to zero.The number can be any number from 0 through 25.
/PATH=(n1[.n2.n3.n4.n5.n6])
Specifies the path to the device on the bus. The path is used to uniquely identify a device if the device does not have a serial number. The path specification is a series of six or fewer numbers, where:
n1 is the number of the root hub (at tier 0). n2 through n6 are port numbers for downstream hubs at tiers 1, 2, 3, 4, and 5. For example, /PATH=1.4.3 indicates that the device is in turn plugged into port 3 of the second tier, which is plugged into port 4 of the first tier, which in turn is plugged into the root hub 1.
/UNIT_NUMBER=number
Unit numbers can be between 0 and 9999. By default, the configuration code selects the next available unit number. This qualifier allows you to change the unit number to suit your needs.
$  UCM
Universal Serial Bus Configuration Manager, Version V1.0

UCM> SHOW DEVICE /UNCONFIGURED

DEVICE
DEVICE_TYPE                     TENTATIVE
DEVICE_NAME_ROOT                AG
UNIT_NUMBER                     0
BUS                             1
PATH                            1.0.0.0.0.0
END_DEVICE

UCM> ADD DEVICE AGA0:

UCM> MODIFY DEVICE AGA0:/UNIT=9999

UCM> SHOW DEVICE /PERMANENT /FULL AGA9999:

DEVICE
DEVICE_TYPE                     PERMANENT
DEVICE_NAME_ROOT                AG
UNIT_NUMBER                     9999
DRIVER                          SYS$AGDRIVER.EXE
BUS_NUMBER                      1
PATH                            1.0.0.0.0.0
HID_USAGE_DATA                  65540
BEGIN_INTERFACE
HID_USAGE_DATA                  65540
END_INTERFACE
END_DEVICE

UCM>
|
The first SHOW DEVICE command displays information from the generic list about the unconfigured AG device. The ADD DEVICE command adds the device to the permanent list, and the MODIFY DEVICE command changes the unit number of the device. The second SHOW DEVICE command displays this change.
Forces the configuration server to reload the configuration data from the generic and permanent device files and to rebuild the lists. This allows you to add a new device type and lets the server find out about it without restarting UCM.Requires SYSPRV privilege.
RELOAD
Restarts the configuration server.
Note
Use this command only if the server no longer responds to configuration requests or client commands.Requires CMKRNL privilege.
RESTART
/CONFIRM (default)
Asks you to confirm the restart of the configuration server. If you answer yes, the configuration server is restarted. If you answer no, the operation is not performed.
/NOCONFIRM
$  UCM
UCM> RESTART

Restart UCM Server? [N]: yes

Waiting for UCM Server image to exit....
Waiting for UCM Server image to restart....
%USB-S-SRVRRESTART, Identification of new UCM Server is 00000217

UCM>
|
Following the RESTART command, UCM prompts you to confirm this command. The system assigns a new identification number to the UCM server when it restarts.
Tells the configuration server to create a new log file. You must use the /NEW qualifier with this command.Requires OPER privilege.
SET LOG /NEW
/NEW
Creates a new SYS$MANAGER:USB$UCM_EVENTS.DAT file. This qualifier is required with the SET LOG command.
Displays information about devices.
SHOW DEVICE device-name:
device-name:
The name of the device whose characteristics are to be displayed. The device name has the form ddcu, where:
dd is the device code---for example, LP. (The driver name corresponds to the device code; in this case, the driver name would be SYS$LPDRIVER.) c is the controller designation A through Z; unless UCM specifies a different letter, all USB devices are A. u is the unit number (0 through 9999.) OpenVMS device names are made up of the two-character device code, followed by the controller designation, then by the unit number (which can be 1 to 4 characters long), and then by a colon (:).
/BRIEF (default)
Displays summary information for each device./FULL
Displays complete information for each device.
/ALL (default)
Displays all device entries, including those that the /CONFIGURED, /GENERIC, /PERMANENT, /PHYSICAL, and /UNCONFIGURED qualifiers display./CONFIGURED
Displays all the devices connected to the bus that have been configured successfully./GENERIC
Displays the devices that are on the generic device list./PERMANENT
Displays the devices for which the system automatically loads device drivers if the devices are plugged in./PHYSICAL
Displays the devices that are connected to the bus even if drivers for these devices are not loaded./UNCONFIGURED
Displays devices that are attached to the bus and that have drivers, but that do not have entries in the permanent list. (These are also known as tentative devices.)You must execute an ADD DEVICE command to make these devices part of the permanent list. Once the drivers have been added, the device is automatically configured the next time it is plugged in.
$  UCM
UCM> SHOW DEVICE /PERMANENT /FULL DNA3:

DEVICE
DEVICE_TYPE                     PERMANENT
DEVICE_NAME_ROOT                DN
UNIT_NUMBER                     3
DRIVER                          SYS$DNDRIVER.EXE
USB_CONFIG_TYPE                 INTERFACE
VENDOR_ID                       3519
PRODUCT_ID                      768
RELEASE_NUMBER                  4352
BUS_NUMBER                      1
PATH                            1.0.0.0.0.0
DEVICE_CLASS                    0
DEVICE_SUB_CLASS                0
DEVICE_PROTOCOL                 0
NUMBER_OF_INTERFACES            1
CONFIGURATION_VALUE             2
NUMBER_OF_CONFIGURATIONS        1
SERIAL_NUMBER                   2B0301060D97A4C8
MANUFACTURER_STRING             QTS
PRODUCT_STRING                  USB 2.0 ATAPI Bridge
CONFIGURATION_NUMBER            0
BEGIN_INTERFACE
INTERFACE_CLASS                 8
INTERFACE_SUB_CLASS             6
INTERFACE_PROTOCOL              80
END_INTERFACE
END_DEVICE

UCM>
|
In this example, the SHOW DEVICE command displays complete information about DNA3:.
Displays important events that occur on the USB bus. Data displayed can include information about device events, such as removals, connections, unrecognized devices, new devices, and so on.
SHOW EVENTS
/BEFORE=time
Selects events that occurred before the specified time. You can specify time as an absolute time, as a combination of absolute and delta times, or as the keyword TODAY (default), TOMORROW, or YESTERDAY. Times are expressed in standard OpenVMS date/time format./OUTPUT=file-name
Writes the selected events to the specified file. By default, output is sent to the current SYS$OUTPUT device (usually your terminal).You cannot use the /OUTPUT qualifier with the /PAGE qualifier.
/PAGE
Controls how information is displayed. /PAGE displays events on one screen at a time.
/NOPAGE (default)You cannot use the /PAGE qualifier with the /OUTPUT qualifier.
/SINCE=time
Selects only those events that occurred on or after the specified time. You can specify time as absolute time, as a combination of absolute and delta times, or as the keyword TODAY (default) or YESTERDAY./TYPE=event-type
Selects only the specified type of events. Valid event-types are the following:
ALL All event-types (default). CONFIGURED Device was recognized and configured. DECONFIGURE Device was removed from the bus. DRIVER Driver events. UCM UCM server events. UNCONFIGURE Device was recognized but not configured. UNKNOWN Event type is unknown. /VALUE=event-number
Selects only the events specified by the event number. In a future version of this product, you will be able to use this qualifier as an alternative to the /TYPE qualifier for events that do not have an assigned keyword.
$  UCM
Universal Serial Bus Configuration Manager, Version V1.0

UCM> SHOW EVENTS /SINCE=YESTERDAY

USB EVENT LISTING
-----------------
Date        Time        Type         Priority Component
-----------------------------------------------------------------------
31-JUL-2002 11:46:20.76 DRIVER       NORMAL   HUBDRIVER
   Message: Find a driver for DeviceClass/DeviceSubClass = 0x9/0x0     1

31-JUL-2002 11:46:20.76 DRIVER       NORMAL   HUBDRIVER
   Message: Configured device UCM0 using driver SYS$HUBDRIVER:         2)

31-JUL-2002 11:46:21.06 DRIVER       NORMAL   HUBDRIVER
   Message: Find a driver for DeviceClass/DeviceSubClass = 0x0/0x0     3)

31-JUL-2002 11:46:21.31 UNKNOWN      NORMAL   UCM UNKNOWN DEVICE
   Message: VENDOR_ID = 3519.PRODUCT_ID = 768.RELEASE_NUMBER =
   4352.BUS_NUMBER = 1.PATH = 1.0.0.0.0.0.DEVICE_CLASS =
   0.DEVICE_SUB_CLASS = 0.DEVICE_PROTOCOL = 0.NUMBER_OF_INTERFACES =
   1.NUMBER_OF_CONFIGURATIONS = 1.SERIAL_NUMBER =
   2B0301060D97A4C8.MANUFACTUR                                         4)

31-JUL-2002 11:46:21.31 DRIVER       NORMAL   HUBDRIVER
   Message: Find a driver for InterfaceClass/InterfaceSubClass/
   Protocol = 0x8/0x6/0x50                                             5)

31-JUL-2002 11:46:21.46 DRIVER       NORMAL   HUBDRIVER
   Message: Configured device DNA3 using driver SYS$DNDRIVER:          6)

 1-AUG-2002 11:16:07.71 DECONFIGURED NORMAL   HUBDRIVER
   Message: Deconfiguring device on bus 1 at port 1 bus tier 1 usb
   address 2                                                           7)
|
Note that the display on your screen might be somewhat different from the one you see here.
Numbers in the example correspond to the following explanations:
- UCM saw the root hub.
- UCM configured the root hub.
- UCM saw a new device.
- Data about the new device in number 3 is displayed.
- For the device in number 3, UCM attempted to locate a drive based on device interface data.
- UCM found and loaded the driver for the device in number 3.
- The device specified in the message line was unplugged.
The Gateway allows a DECdtm-compliant resource manager, such as RMS Journaling or Oracle Rdb, to be used with an XA-compliant transaction manager.
The following table summarizes XGCP commands:
| Command | Description |
|---|---|
| CREATE_LOG | Creates a new XA Gateway log |
| EXIT | Exits XGCP |
| START_SERVER | Starts the XA Gateway server |
| STOP_SERVER | Stops the XA Gateway server |
RUN SYS$SYSTEM: XGCPDescription
To invoke XGCP, enter the following command at the DCL prompt:
$ RUN SYS$SYSTEM:XGCP |
XGCP displays the following prompt, at which you can enter any XGCP command:
XGCP> |
To exit from XGCP, enter the EXIT command at the XGCP> prompt, or press Ctrl/Z.
Creates a new XA Gateway log. Requires SYSPRV privilege or read/write access to the SYS$JOURNAL directory.
CREATE_LOG /GATEWAY_NAME=name /SIZE=size
None.
/GATEWAY_NAME=name
This qualifier is required. Specify a gateway name of up to 15 characters.Creates a gateway log named SYS$JOURNAL:name.DDTM$XG_JOURNAL. Create a separate Gateway log for each Gateway name under which you want your XA applications to run.
/SIZE=size
Specifies the initial size of the log, in blocks. If you omit this qualifier, the log is created with an initial size of 242 blocks. The log file is automatically expanded in size when necessary.
XGCP> CREATE_LOG/GATEWAY_NAME=MYLOG1/SIZE=150
|
The command in this example creates a gateway log named SYS$JOURNAL:MYLOG1.DDTM$XG_JOURNAL. Its initial size is 150 blocks.
Exits XGCP. You can also press Ctrl/Z to exit from XGCP.
EXIT
None.
None.
Starts the XA Gateway server. Requires IMPERSONATE privilege.
START_SERVER
None.
None.
XGCP> START_SERVER
|
The command in this example executes the DCL command file SYS$STARTUP:DDTM$XG_STARTUP.COM, which starts the server process called DDTM$XG_SERVER.
Stops the XA Gateway server process, called DDTM$XG_SERVER, on the current node.Requires OPER, SYSPRV and AUDIT privileges.
STOP_SERVER
None.
None.
XGCP> STOP_SERVER
|
The command in this example stops the Gateway server process, called DDTM$XG_SERVER.
By default, the access control list editor (ACL editor) prompts you for each access control entry (ACE) and provides values for some of the fields within an ACE. You can navigate the ACE fields by using keypad commands, such as FIELD and ITEM.
This appendix describes all the keypad editing commands supplied by the ACL editor. You can supplement or change these key definitions by modifying and recompiling the ACL editor section file SYS$LIBRARY:ACLEDIT.TPU (see Appendix B for more information). To get help on the ACL editor keypad commands, press PF2.
Figure A-1 shows the default ACL editor keypad commands for LK201 keyboards. The numeric keypad on VT100-series terminals is identical to that of the LK201 keyboard shown in Figure A-1; VT100 terminals, however, do not have the supplemental editing keypad (keys E1 through E6).
Figure A-1 Keypad for an LK201-Series Keyboard

Table A-1 describes each of the keypad commands you can use with the ACL editor. In this table, KPn refers to a keypad key labeled with the number n. For example, KP4 refers to the keypad key labeled with the number 4.
| Command | Key or Key Sequence |
Description |
|---|---|---|
| ADVANCE | KP4 | Sets the current direction forward for the FIND, FNDNXT, MOVE SCREEN, OVER ACE, and WORD commands. Movement is toward the end of the ACL. |
| ADV FIELD | GOLD-KP7 | Completes the current ACE field and moves the cursor to the next ACE field. |
| BACKUP | KP5 | Reverses the current direction for the FIND, FNDNXT, MOVE SCREEN, OVER ACE, and WORD keys. Movement is toward the beginning of the ACL. |
| BOTTOM | GOLD-KP4 | Positions the cursor after the last line of the last ACE. Any entries you add are placed at the end of the ACL. |
| DEL ACE | PF4 | Deletes the entire ACE in which the cursor is positioned and stores it in the delete-ACE buffer. |
| DEL C | Comma | Deletes the character on which the cursor is positioned and stores it in the delete-character buffer. |
| DEL EOL | GOLD-KP2 | Deletes text from the current cursor position to the end of the line and stores it in the delete-line buffer. |
| DEL W | Minus | Deletes the text from the current cursor position to the beginning of the next word and stores it in the delete-word buffer. |
| ENTER | Enter | Indicates that the current ACE is complete. The ACL editor terminates the insertion and verifies that the syntax of the ACE is complete. You can press the Enter key while the cursor is located at any position within the ACE. (Pressing the Return key produces the same results.) |
| EOL | KP2 | Moves the cursor to the end of the current line. |
| FIELD | KP7 | Completes the current ACE field and moves the cursor to the next ACE field or subfield, inserting text as needed. If the ACL editor is not in prompt mode, the ACL editor advances to the next field in the current ACE. |
| FIND | GOLD-PF3 | Searches for an occurrence of a string. Press the FIND key and then enter the string from the main keyboard. Press the ENTER key to search for the string in the current direction, or the ADVANCE or BACKUP key to change the search direction. |
| FNDNXT | PF3 | Searches in the current direction for the next occurrence of the string previously entered with the FIND key. |
| GOLD | PF1 | When pressed before another keypad key, specifies the second key's alternate function (the bottom function on the keypad diagram). |
| HELP | PF2 | Displays information about using the editing keypad. |
| HELP FMT | GOLD-PF2 | Displays information about ACE formats. |
| INSERT | GOLD-KP0 | Moves all text from the current line down one line, leaving a blank line where an ACE is to be inserted. |
| ITEM | Period | Selects the next item for the current ACE field. If the ACL editor is not in prompt mode, this key is ignored. |
| MOVE SCREEN | KP8 | Moves the cursor one screen in the current direction (see ADVANCE or BACKUP). A screen is defined as two-thirds the number of lines in the display. |
| OVER ACE | KP0 | Moves the cursor to the beginning of the next ACE (if the direction is set to ADVANCE) or to the beginning of the previous ACE (if the direction is set to BACKUP). |
| TOP | GOLD-KP5 | Moves the cursor position to the first character of the first ACE in the access control list. |
| UND ACE | GOLD-PF4 | Inserts the contents of the delete-ACE buffer in front of the ACE in which the cursor is currently positioned. |
| UND C | GOLD-Comma | Inserts the contents of the delete-character buffer directly in front of the cursor. |
| UND W | GOLD-Hyphen | Inserts the contents of the delete-word buffer directly in front of the cursor. |
| WORD | KP1 | Moves the cursor one word forward (if the direction is set to ADVANCE) or backward (if the direction is set to BACKUP). |
In addition to keypad editing, the ACL editor lets you use other keyboard keys and key sequences to perform editing functions. Table A-2 describes these additional ACL editing keys and key sequences. Keys in parentheses indicate the equivalent key for an LK201-series keyboard.
| Key or Sequence | Action Taken When Key or Sequence Is Pressed |
|---|---|
| DOWN ARROW KEY | Moves the cursor to the character directly in line below it. If the ACE in which the cursor is positioned is new, the ACL editor processes the ACE before moving the cursor. If the entry is incomplete or formatted incorrectly, an error occurs and the cursor does not move. |
| LEFT ARROW KEY | Moves the cursor one character to the left. If the cursor is at the left margin, moves it to the rightmost character in the line above. |
| RIGHT ARROW KEY | Moves the cursor one character to the right. If the cursor is at the right margin, moves it to the leftmost character in the line below. |
| UP ARROW KEY | Moves the cursor to the character directly in line above it. If the ACE in which the cursor is positioned is new, the ACL editor processes the ACE before moving the cursor. If the entry is incomplete or formatted incorrectly, an error occurs and the cursor does not move. |
| GOLD- <- | Shifts the text in the display window 8 characters to the left. |
| GOLD--> | Shifts the text in the display window 8 characters to the right. |
| Backspace (F12) | Moves the cursor to the beginning of the current line. |
| Ctrl/A | Changes the current mode from insert mode to overstrike mode or from overstrike mode to insert mode. Insert mode (the default) inserts a character to the left of the current character. Overstrike mode replaces the current character. |
| Ctrl/D | Allows you to execute one TPU command. |
| Ctrl/H | Moves the cursor to the beginning of the line. (Performs the same function as the backspace key.) |
| Ctrl/J | Deletes the text from the cursor back to the beginning of the word. (Performs the same function as the linefeed key.) |
| Ctrl/R | Refreshes the screen display. Clears and redraws the screen, deleting any extraneous characters or messages that might have appeared on the screen but are not part of the ACL you are editing. (Performs the same function as Ctrl/W.) |
| GOLD-Ctrl/R | Returns the ACL to its original state before the ACL editor was invoked. (Performs the same function as GOLD-Ctrl/W.) |
| Ctrl/U | Deletes the text from the cursor to the beginning of the line. |
| GOLD-Ctrl/U | Inserts the contents of the deleted-line buffer into the line at the current position. The line might wrap automatically. |
| Ctrl/W | See Ctrl/R. |
| GOLD-Ctrl/W | See GOLD Ctrl/R. |
| Ctrl/Z | Ends the editing session and updates the ACL. (Unless otherwise specified, any recovery and journal files are deleted.) |
| GOLD-Ctrl/Z | Ends (quits) the editing session without saving any of the changes made to the ACL. (Unless otherwise specified, any recovery and journal files are deleted.) |
| DELETE KEY | Deletes the character to the left of the cursor. |
| Linefeed (F13) | Deletes the text from the cursor back to the beginning of the word. If the cursor is positioned at the first character of the word, deletes to the beginning of the previous word. |
| Tab | Moves the text located to the right of the cursor to the next tab stop. |
You can use the supplemental keypad on an LK201-series keyboard to move sections of text from one part of an ACL to another. However, note that certain supplemental editing keys (Insert Here, Remove, and Select) require a PASTE buffer, which is not enabled by default. To enable the PASTE buffer for the current editing session, perform the following actions:
TPU command: ACLEDIT$X_PASTE_BUFFER:=1 |
TPU command: ACLEDIT$X_CHECK_MODIFY:=0 |
To enable the PASTE buffer for all ACL editing sessions, change the values of the variables ACLEDIT$X_PASTE_BUFFER and ACLEDIT$X_CHECK_MODIFY in the ACL editor section file and recompile the file (see Appendix B).
Table A-3 describes the supplemental keypad keys you can use with the ACL editor.
| Key or Key Sequence |
Description |
|---|---|
| Find | Elicits the Search for: prompt as the first step in the FIND operation. Type the search string after the prompt; then, press either the Do key or the Enter key to process the search. Performs the same function as the FIND keypad command. |
| Insert Here | Indicates where an ACE is to be inserted or, if support for the PASTE buffer is enabled, indicates the line where the selected text in the PASTE buffer is to be inserted. |
| Remove | Removes the selected text to the PASTE buffer. Each time you press the Remove key, the ACL editor deletes the previous contents of the PASTE buffer. |
| GOLD-Remove (COPY) | Copies the selected text to the PASTE buffer. Each time you use the COPY command, the ACL editor deletes the previous contents of the PASTE buffer. |
| Select | Marks the beginning of a range of text to be removed or copied to the PASTE buffer. Press the Select key. Then, move the cursor to include the desired amount of text to be removed or copied. Press either Remove or GOLD-Remove (COPY) to complete the operation. |
| Prev Screen | Moves the cursor to the previous screen. By default, a screen is defined as two-thirds the number of lines in the display. |
| Next Screen | Moves the cursor one screen forward. By default, a screen is defined as two-thirds the number of lines in the display. |
You can modify the access control list editor (ACL editor) by modifying and recompiling the ACL section file SYS$LIBRARY:ACLEDIT.TPU (the source file used to create the compiled ACL section file SYS$LIBRARY:ACLEDT$SECTION.TPU$SECTION). You can also create your own ACL section file.
Refer to the DEC Text Processing Utility Reference Manual for more information about writing and processing section files.
Table B-1 lists the ACL section file variables and their defaults.
| Variable | Meaning | ||||
|---|---|---|---|---|---|
| ACLEDIT$X_CHECK_DUPLICATES |
Controls whether a check for duplicate ACEs is made. This variable can
take the following values:
|
||||
| ACLEDIT$X_CHECK_MODIFY |
Allows or disallows modification of ACEs. This variable can take the
following values:
|
||||
| ACLEDIT$X_DIRECTORY_FILE |
Indicates whether the object is a directory file. This variable can
take the following values:
|
||||
| ACLEDIT$X_PASTE_BUFFER |
Controls whether PASTE buffer support is enabled for VT200 series
terminals. This variable can take the following values:
|
||||
| ACLEDIT$X_PROMPT |
Controls whether automatic text insertion (prompt mode) is enabled.
This variable can take the following values:
|
||||
| ACLEDIT$X_USE_DEFAULT_OPT |
Controls whether the DEFAULT option can be used with nondirectory ACEs.
This variable can take the following values:
|
||||
| ACLEDIT$C_WINDOW_SHIFT | Specifies the number of columns to shift the edit window in the direction wanted, GOLD key and left arrow for a left shift and GOLD key and right arrow for a right shift. The default is 8 columns. |
If you modify any of the variables in Table B-1 or change any other part of the ACL section file, recompile the section file with the following command:
$ EDIT/TPU/NOSECTION/COMMAND=SYS$LIBRARY:ACLEDIT |
Use the preceding command if you make changes directly to the source code file (SYS$LIBRARY:ACLEDIT) that creates the compiled ACL section file SYS$LIBRARY:ACLEDT$SECTION. If you add a private command file to the existing ACL section file, recompile the section file using the following command:
$ EDIT/TPU/SECTION=SYS$LIBRARY:ACLEDT$SECTION/COMMAND=CUSTOM_ACL.TPU |
The compiled DECtpu ACL section file is placed in your current directory. To use the new section file, perform one of the following actions:
$ DEFINE ACLEDT$SECTION yourdisk:[yourdir]ACLEDT$SECTION |
Note that the default file type for the section file before compiling (the source file) is TPU, and the default file type for the compiled section file is TPU$SECTION.
For more information about writing and processing a DECtpu section file, refer to the DEC Text Processing Utility Reference Manual.
The ACL editor CALL_USER routine is part of the shareable image SYS$LIBRARY:ACLEDTSHR.EXE. You can incorporate the ACL editor CALL_USER routine with its existing function codes into your own ACL section file, or you can write your own CALL_USER routine that recognizes a different set of function codes.
The ACL editor CALL_USER routine recognizes only those functions used by the ACL editor DECtpu section file. All other function codes are passed to a user-supplied CALL_USER routine; if the high-order word of the CALL_USER function code contains the ACL editor facility code (277 in decimal or 115 in hexadecimal), it is handled by the ACL editor CALL_USER routine. Otherwise, an attempt is made to locate a user-supplied CALL_USER routine. Refer to the description of the CALL_USER routine in the DEC Text Processing Utility Reference Manual for more information about creating your own CALL_USER routine.
Table B-2 describes the CALL_USER routine function codes supported by the ACL editor.
| Function Code |
Mnemonic | Description |
|---|---|---|
| 18153473 | ACLEDIT$C_PARSE_ACE | Parses the input string (ACE) and returns the parsed (binary) ACE if no errors are found. Otherwise, the returned string contains a zero as the first two characters, and the unparsed portion of the input ACE as the remainder of the string. |
| 18153474 | ACLEDIT$C_CHECK_MODIFY | Returns the string "READ_WRITE" if the ACE can be modified by the user. Otherwise, returns the string "READ_ONLY." |
| 18153475 | ACLEDIT$C_PROMPT_MODE | Returns the string "PROMPT_MODE" if the prompt mode option was specified. Otherwise, returns the string "NOPROMPT_MODE." |
| 18153476 | ACLEDIT$C_CHECK_ACE | Parses the input string (ACE) and returns the parsed (binary) ACE if no errors are found. Otherwise, the ACE text is highlighted in reverse video and a DECtpu variable of the form ACLEDIT$X_RANGE_x is created to identify the ACE in error. (The "x" is a sequential number starting with 1.) |
| 18153477 | ACLEDIT$C_CHECK_DIR | Returns the string "DIRECTORY_FILE" if the object being edited is a directory file. Otherwise, returns the string "NODIRECTORY_FILE." |
| 18153478 | ACLEDIT$C_SET_CANDIDATE | Parses the input string (ACE) and returns the string "PARSE_OK" if no error was encountered. Otherwise, returns the string "PARSE_ERROR." If the parse was successful, a check is made for duplicate ACEs using the CALL_USER function ACLEDIT$C_CHECK_DUP. |
| 18153479 | ACLEDIT$C_CHECK_DUP | Parses the input string (ACE) and returns the string "PARSE_ERROR" if an error was encountered. Otherwise, the parsed (binary) ACE is compared with the candidate ACE set by the CALL_USER function ACLEDIT$C_SET_CANDIDATE. Returns the string "DUPLICATE_ACE" if the ACE is a duplicate, or "UNIQUE_ACE" if it is not a duplicate. |
| 18153482 | ACLEDIT$C_MESSAGE | Assumes the input string is a system error code and returns in the ACL editor message window the message text associated with the error code. |
Table C-1 gives a summary of the system services that relate to accounting. No system service reads accounting files; to do this you must use knowledge of the structure of accounting files.
| System Service | Description |
|---|---|
| $CREPRC | Creates a process in which accounting can be disabled. |
| $SNDJBC | Controls what resources are logged in the current accounting file, or logs a user-defined record in the current accounting file. |
This appendix describes the structure of an accounting file. It is for programmers who want to access accounting data directly.
The formats described here are subject to change without notice in a future release. |
The symbols and offsets described in this appendix are defined by the $ACRDEF macro in the STARLET library.
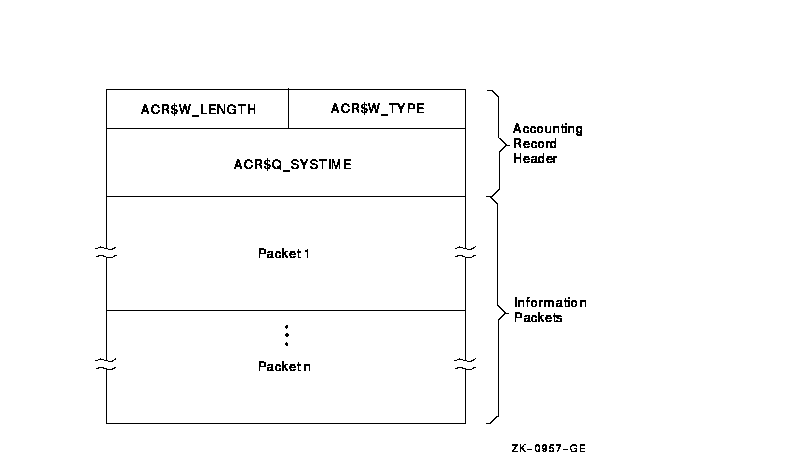
An accounting record consists of an accounting record header and a number of information packets. The number and type of information packets depend on the type of the record.
Figure C-1 illustrates the general format of an accounting record. Table C-2 describes the fields in the record header. The type field in the record header is subdivided into five fields, described in Table C-3.
Figure C-1 Format of an Accounting Record
| Symbolic Offset | Description |
|---|---|
| ACR$W_TYPE | Identifies the type of the record. This field is subdivided into five fields, described in Table C-3. (word) |
| ACR$W_LENGTH | Total length of the record, in bytes. (word) |
| ACR$Q_SYSTIME | System time (64-bit absolute time). (quadword) |
| Symbolic Offset | Description | ||||||||||||
|---|---|---|---|---|---|---|---|---|---|---|---|---|---|
| ACR$V_PACKET | Identifies this header as a record header. This bit must be 0. (1 bit) | ||||||||||||
| ACR$V_TYPE | Identifies the type of the record. The eight record types are described in Table C-4. (7 bits) | ||||||||||||
| ACR$V_SUBTYPE |
Identifies the type of process with which the record is associated. The
subtypes (4 bits) are:
Note that this field is only meaningful for records of type ACR$K_IMGDEL and ACR$K_PRCDEL. |
||||||||||||
| ACR$V_VERSION |
Identifies the version of the accounting file record structure. The
versions (3 bits) are:
|
||||||||||||
| ACR$V_CUSTOMER | Identifies whether the record was written by HP software or by customer software. If this bit is 0, the record was written by HP software. If this bit is 1, the record was written by customer software. (1 bit) |
ACR$K_CURVER = Current version. Set equal to ACR$K_VERSION3 in this release. |
The type of an accounting record identifies the type of event that caused the record to be logged. The eight types of accounting records are shown in Table C-4. This table shows the information packets contained in each type of record.
| Symbol | Event | Information Packets |
|---|---|---|
| ACR$K_FILE_BL | The accounting file was opened | ACR$K_FILENAME |
| ACR$K_FILE_FL | The accounting file was closed | ACR$K_FILENAME |
| ACR$K_IMGDEL | An image terminated |
ACR$K_ID
ACR$K_RESOURCE ACR$K_IMAGENAME |
| ACR$K_LOGFAIL | A login attempt failed |
ACR$K_ID
ACR$K_RESOURCE |
| ACR$K_PRCDEL | A process terminated |
ACR$K_ID
ACR$K_RESOURCE |
| ACR$K_PRINT | A print job finished |
ACR$K_ID
ACR$K_PRINT |
| ACR$K_SYSINIT | The system was initialized |
ACR$K_ID
ACR$K_RESOURCE |
| ACR$K_USER | An accounting message was sent by the $SNDJBC system service |
ACR$K_ID
ACR$K_USER_DATA |
The header, in each of the six types of information packets, defines the type of packet as follows:
Section C.1.2.1 describes the general format of an information packet. Section C.1.2.2 to Section C.1.2.7 describe the format of each type of information packet.
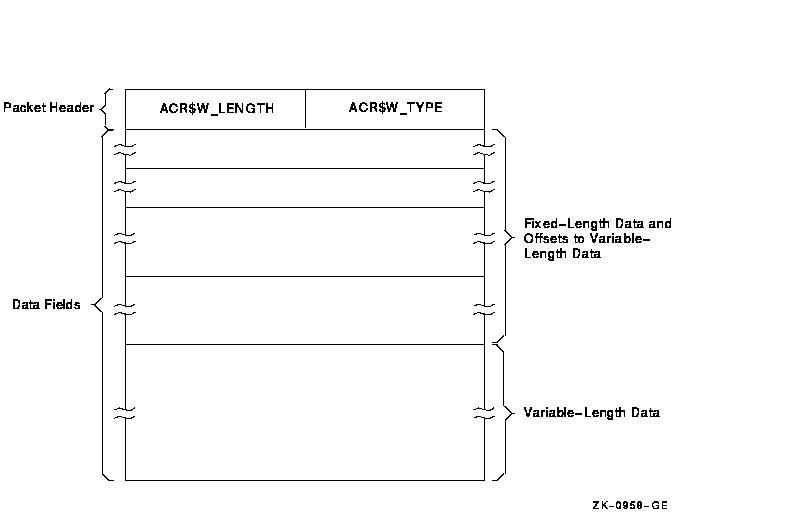
Each information packet contains a packet header, followed by data fields. The data fields can contain fixed-length data, variable-length data, or offsets to variable-length data. Offsets contain the distance in bytes from the beginning of the packet to the variable-length data.
All variable-length data are represented as counted strings. Variable-length data follow the last fixed-length data field in the packet. Figure C-2 shows the general format of an information packet. An information packet may not have values in all of its data fields.
See Section C.1.2.2 to Section C.1.2.7 for complete descriptions of the data fields contained in each information packet.
All information packets start with a packet header that has ACR$W_LENGTH and ACR$W_TYPE fields (see Table C-5 and Table C-6).
Figure C-2 Format of an Information Packet
| Symbolic Offset | Description |
|---|---|
| ACR$W_TYPE | Identifies the type of the packet. This field is subdivided into five fields, described in Table C-6. (word) |
| ACR$W_LENGTH | Total length of the packet, in bytes. (word) |
| Symbolic Offset | Description | ||||||||||||||
|---|---|---|---|---|---|---|---|---|---|---|---|---|---|---|---|
| ACR$V_PACKET | Identifies this header as a packet header. This bit must be 1. (1 bit) | ||||||||||||||
| ACR$V_TYPE |
Identifies the type of the packet. The six packet types (7 bits) are:
|
||||||||||||||
| ACR$V_SUBTYPE | Identifies the packet subtype; reserved for future use. (4 bits) | ||||||||||||||
| ACR$V_VERSION | See Table C-3. | ||||||||||||||
| ACR$V_CUSTOMER | See Table C-3. |
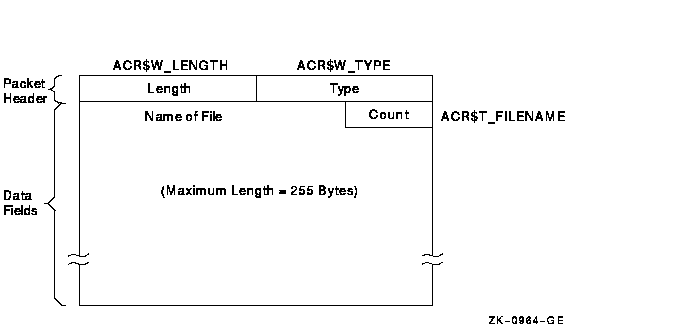
The file name packet contains the name of the accounting file. Figure C-3 shows the format of the file name packet. Table C-7 describes the field contained in the packet. See Section C.1.2.1 for information on the packet header.
Figure C-3 Format of a File Name Packet
| Symbolic Offset | Description |
|---|---|
| ACR$T_FILENAME | Name of the file (counted ASCII string that gives full file specification). |
The identification packet identifies the process that caused the record to be logged.
Figure C-4 shows the format of the identification packet. Table C-8 describes the fields contained in the packet. See Section C.1.2.1 for information on the packet header.
Figure C-4 Format of an Identification Packet
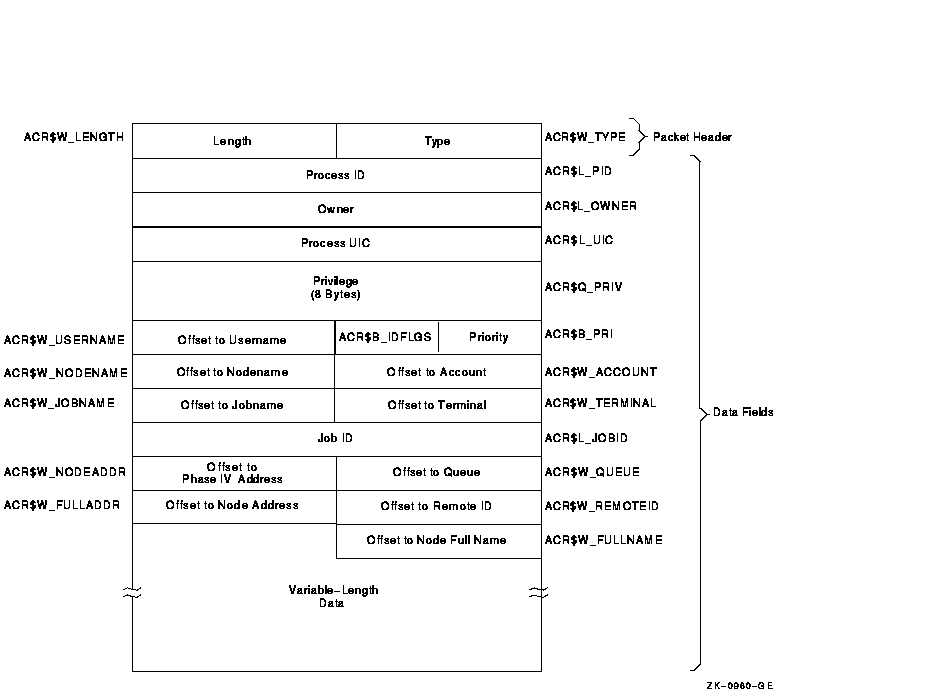
| Symbolic Offset | Description |
|---|---|
| ACR$L_PID | Process identifier (PID) of the process. (longword) |
| ACR$L_OWNER | PID of the parent process. (longword) |
| ACR$L_UIC | UIC of the process. The UIC can be addressed as two separate words: ACR$W_MEM for the member number, and ACR$W_GRP for the group number. (longword) |
| ACR$Q_PRIV | Privileges held by the process. (quadword) |
| ACR$B_PRI | Base priority of the process. (byte) |
| ACR$B_IDFLGS | Flags byte; full address and full name present if low bit is set. |
| ACR$W_USERNAME | Offset to counted ASCII string containing the user name of the process. (word) |
| ACR$W_ACCOUNT | Offset to counted ASCII string containing the account name of the process. (word) |
| ACR$W_NODENAME | Offset to counted ASCII string containing the Phase W node name of the remote process. (word) |
| ACR$W_TERMINAL | Offset to counted ASCII string containing the terminal name. (word) |
| ACR$W_JOBNAME | Offset to counted ASCII string containing the job name. (word) |
| ACR$L_JOBID | Identification of the print or batch job (queue entry number). (longword) |
| ACR$W_QUEUE | Offset to counted ASCII string containing the name of the queue with which a batch or print job is associated. (word) |
| ACR$W_NODEADDR | Offset to a counted binary string containing the Phase W remote node address. (word) |
| ACR$W_REMOTEID | Offset to counted ASCII string containing the remote ID of the remote process (varies with network implementation and use). (word) |
| ACR$W_FULLADDR | Offset to a counted binary string containing the complete remote node network address. On a DECnet-Plus system, this is the remote node's NSAP address. |
| ACR$W_FULLNAME | Offset to a counted ASCII string containing the complete remote node name. On a DECnet-Plus system, this is the remote node's full name. |
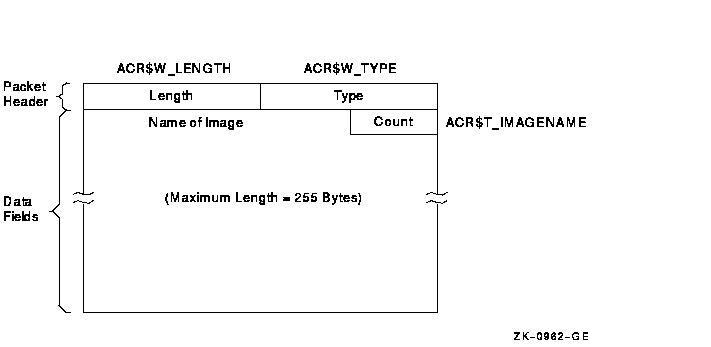
The image name packet contains the name of the image executed by the identified process.
Figure C-5 shows the format of the image name packet. Table C-9 describes the field contained in the packet. See Section C.1.2.1 for information on the packet header.
Figure C-5 Format of an Image Name Packet
| Symbolic Offset | Description |
|---|---|
| ACR$T_IMAGENAME | Name of the image (counted ASCII string that gives full file specification). |
The print resource packet contains information about print jobs.
Figure C-6 shows the format of the print resource packet. Table C-10 describes the fields contained in the packet. See Section C.1.2.1 for information on the packet header.
Figure C-6 Format of a Print Resource Packet
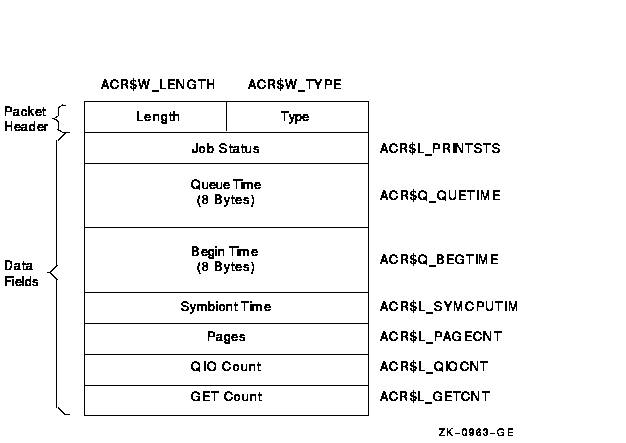
| Symbolic Offset | Description |
|---|---|
| ACR$L_PRINTSTS | Status of the print job. (longword) |
| ACR$Q_QUETIME | Time the job was queued. (64-bit absolute time) |
| ACR$Q_BEGTIME | Time the job was started. (64-bit absolute time) |
| ACR$L_SYMCPUTIM | Symbiont CPU time (always zero). (longword) |
| ACR$L_PAGECNT | Number of pages printed. (longword) |
| ACR$L_QIOCNT | Number of QIOs issued to the printer. (longword) |
| ACR$L_GETCNT | Number of GETs from the file that was printed. (longword) |
The resource packet contains information about the identified process.
Figure C-7 shows the format of a resource packet. Table C-11 describes the fields contained in the packet. See Section C.1.2.1 for information on the packet header.
Figure C-7 Format of a Resource Packet
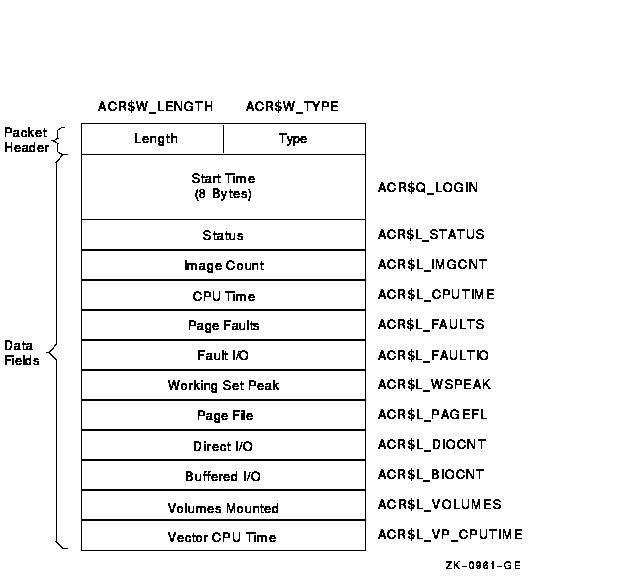
| Symbolic Offset | Description |
|---|---|
| ACR$Q_LOGIN | 64-bit absolute time at which the image was run or the process was created. (quadword) |
| ACR$L_STATUS | Final exit status of the image, or for a process, the final status of the last image executed in the process. (longword) |
| ACR$L_IMGCNT | Number of images run by the process. (longword) |
| ACR$L_CPUTIME | Total CPU time used by the image or process, measured in units of 10 milliseconds. This includes any vector CPU time. (longword) |
| ACR$L_FAULTS | Number of hard and soft page faults incurred by the image or process. (longword) |
| ACR$L_FAULTIO | Number of hard page faults incurred by the image or process. (longword) |
| ACR$L_WSPEAK | Maximum working set size used by the image or process. (longword) |
| ACR$L_PAGEFL | Maximum page file usage. (longword) |
| ACR$L_DIOCNT | Number of direct I/Os made by the image or process. (longword) |
| ACR$L_BIOCNT | Number of buffered I/Os made by the image or process. (longword) |
| ACR$L_VOLUMES | Number of volumes mounted by the image or process. (longword) |
| ACR$L_VP_CPUTIME | Vector CPU time used by the image or process, measured in units of 10 milliseconds. (longword) |
The user data packet contains an accounting message sent by the $SNDJBC system service.
Figure C-8 shows the format of the user data packet. Table C-12 describes the fields contained in the packet. See Section C.1.2.1 for information on the packet header.
Figure C-8 Format of a User Data Packet
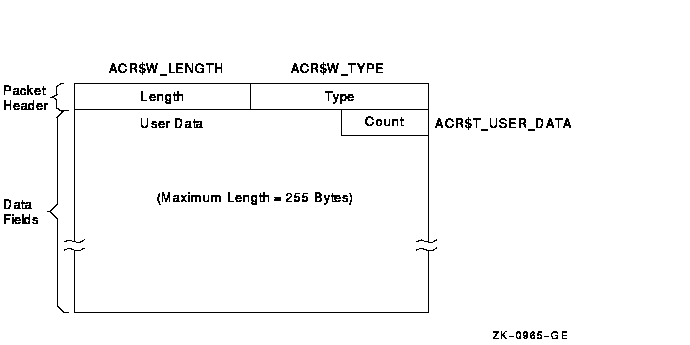
| Symbolic Offset | Description |
|---|---|
| ACR$T_USER_DATA | Up to 255 bytes of data (counted string). |
ANALYZE/DISK_STRUCTURE performs the verification of a volume or volume set in eight distinct stages. During these stages, ANALYZE/DISK_STRUCTURE compiles information that is used in reporting errors and performing repairs.
Before ANALYZE/DISK_STRUCTURE can proceed with each stage, it must perform the following four initialization functions:
The following sections describe the eight stages that ANALYZE/DISK_STRUCTURE goes through while verifying a disk. These descriptions assume that you specified the /REPAIR qualifier in the command. An annotated ANALYZE/DISK_STRUCTURE listing is included at the end of this appendix.
In Stage 1, ANALYZE/DISK_STRUCTURE gathers various volume information (such as cluster size, volume labels, and the number of volumes in the set) from several reserved files, verifies the information for accuracy, reports all discrepancies, and corrects problems discovered during this stage.
ANALYZE/DISK_STRUCTURE identifies the volume and all the characteristics of that volume by using the parameters of the home block in INDEXF.SYS. When ANALYZE/DISK_STRUCTURE confirms this information, it builds a current version of VOLSET.SYS in memory and reads and verifies the status control block (SCB) of BITMAP.SYS.
ANALYZE/DISK_STRUCTURE then compares the volume-set attributes for the version of VOLSET.SYS in memory to the attributes listed in the version of VOLSET.SYS resident on the volume, reports discrepancies, and corrects errors.
In Stage 2, ANALYZE/DISK_STRUCTURE copies the current version of QUOTA.SYS into working memory, and establishes the structure on which another QUOTA.SYS file is built during subsequent stages. In Stage 7, these copies are compared with each other and inconsistencies are reported.
Stage 3 checks consist of ANALYZE/DISK_STRUCTURE operations that use the reserved file INDEXF.SYS. During Stage 3, ANALYZE/DISK_STRUCTURE opens INDEXF.SYS, reads each file header, and completes the following steps:
ANALYZE/DISK_STRUCTURE also performs the following operations during Stage 3:
While performing these checks, ANALYZE/DISK_STRUCTURE builds several maps that it uses in subsequent stages. Table D-1 briefly describes each map built in Stage 3.
| Bitmap | Function |
|---|---|
| Valid file numbers | The current state of the bitmap for INDEXF.SYS |
| Lost file numbers | All the valid file numbers not yet found in a directory |
| Directory files | List of all directory files |
| Extension linkages | List of all valid extension headers |
| Multiply allocated clusters | List of all clusters that are referenced by more than one header |
| Allocated clusters | All allocated clusters on the volume (or volume set) |
| System map | The new storage bitmap |
| Valid file backlink | A map of all valid file backlinks |
| Invalid backlink | A map of all invalid backlinks |
In Stage 4, ANALYZE/DISK_STRUCTURE builds a current version of BITMAP.SYS using the maps built during Stage 3. In addition, ANALYZE/DISK_STRUCTURE reports any discrepancies between the headers' maps and the storage bitmap. In Stage 4, ANALYZE/DISK_STRUCTURE performs the following operations:
In this stage, ANALYZE/DISK_STRUCTURE completes a pass of all entries in the invalid backlink map. ANALYZE/DISK_STRUCTURE searches the directory hierarchy of the volume to confirm that all files included in INDEXF.SYS are retrievable through the directory structure. In addition, ANALYZE/DISK_STRUCTURE identifies lost directories and attempts to reestablish valid backlinks to those directories.
In Stage 5, ANALYZE/DISK_STRUCTURE performs the following operations:
Stage 6 is essentially a cleanup operation for lost file headers. Following Stage 5, ANALYZE/DISK_STRUCTURE is left with a list of files that are truly lost---files that have backlinks to nonexistent directories. These files were not traceable through the directory structure. ANALYZE/DISK_STRUCTURE is also left with a list of files with bad backlinks; these files are traceable through the directory structure, but the backlinks of the files do not point back to the directory that contains them.
During Stage 6, ANALYZE/DISK_STRUCTURE performs the following operations:
In this stage, ANALYZE/DISK_STRUCTURE compares the values stored in the quota file built during Stage 2 with those stored in the reserved file QUOTA.SYS. During Stage 7, ANALYZE/DISK_STRUCTURE opens QUOTA.SYS and performs the following operations:
Throughout the first seven stages, ANALYZE/DISK_STRUCTURE places operations that cannot be performed during a particular stage on a deferred list. The list includes FIDs sorted by operation. In Stage 8, ANALYZE/DISK_STRUCTURE performs all operations stored on the deferred list. In Stage 8, ANALYZE/DISK_STRUCTURE performs the following operations:
The following example is an annotated sample of an ANALYZE/DISK_STRUCTURE session. The command used to generate this example did not include the /REPAIR qualifier.
%VERIFY-I-BADHEADER, file (487,173,1) MAIL$0004008EEAEE0572.MAI;1 (1) invalid file header %VERIFY-I-BADHEADER, file (531,112,1) MAIL$0004008EEFBB198B.MAI;1 invalid file header %VERIFY-I-BADHEADER, file (589,104,1) MAIL$0004008EEAF199B9.MAI;1 invalid file header %VERIFY-I-BADHEADER, file (604,157,1) MAIL$0004008EF12C3B28.MAI;1 invalid file header %VERIFY-I-BADHEADER, file (674,247,1) MAIL$0004008EF6053C9B.MAI;1 invalid file header %VERIFY-I-BADHEADER, file (688,41,1) MAIL$0004008EF608AFF4.MAI;1 invalid file header %VERIFY-I-BADHEADER, file (689,135,1) MAIL$0004008EEE445A31.MAI;1 invalid file header %VERIFY-I-BADHEADER, file (750,71,1) MAIL$0004008EEED19ADF.MAI;1 invalid file header %VERIFY-I-BADHEADER, file (753,217,1) MAIL$0004008EE7C4A017.MAI;1 invalid file header %VERIFY-I-BADHEADER, file (780,236,1) MAIL$0004008EF777ACA8.MAI;1 invalid file header %VERIFY-I-BADHEADER, file (852,57,1) MAIL$0004008EF06C15F6.MAI;1 invalid file header %VERIFY-I-BADHEADER, file (856,44,1) MAIL$0004008EE7D2520D.MAI;1 invalid file header %VERIFY-I-BADHEADER, file (1059,42,1) MAIL$0004008EEB045608.MAI;1 invalid file header %VERIFY-I-BADHEADER, file (1134,76,1) MAIL$0004008EE9EC806D.MAI;1 invalid file header %VERIFY-I-BADHEADER, file (1316,147,1) MAIL$0004008EEEDA734F.MAI;1 invalid file header %VERIFY-I-BADHEADER, file (1350,74,1) MAIL$0004008EE89BA8B0.MAI;1 invalid file header %VERIFY-I-BADHEADER, file (1351,64,1) MAIL$0004008EEB09B036.MAI;1 invalid file header %VERIFY-I-BADHEADER, file (1490,104,1) MAIL$0004008EE8B448B0.MAI;1 invalid file header %VERIFY-I-BADHEADER, file (1493,106,1) LASTNOTIC.NIL;1 invalid file header %VERIFY-I-BADHEADER, file (1548,204,1) MAIL$0004008EF7B4D1B8.MAI;1 invalid file header %VERIFY-I-BADHEADER, file (1613,61,1) MAIL$0004008EECEE4BA5.MAI;1 invalid file header %VERIFY-I-BADHEADER, file (1812,81,1) MAIL$0004008EE7DF05EC.MAI;1 invalid file header %VERIFY-I-BADHEADER, file (1848,26,1) MAIL$0004008EF78659B9.MAI;1 invalid file header %VERIFY-I-BADHEADER, file (1983,34119,1) MAIL$0004008EE7E49C13.MAI;1 invalid file header %VERIFY-I-BADHEADER, file (1987,33907,1) REMIND.CAL;9 invalid file header %VERIFY-I-BADHEADER, file (2196,123,1) MAIL$0004008EE6FA2DC9.MAI;1 invalid file header %VERIFY-I-BADHEADER, file (2372,125,1) MAIL$0004008EF06339F9.MAI;1 invalid file header %VERIFY-I-BADHEADER, file (2569,67,1) MAIL$0004008EF2BF0C15.MAI;1 invalid file header %VERIFY-I-BADHEADER, file (2605,72,1) MAIL$0004008EE856FC73.MAI;1 invalid file header %VERIFY-I-BADHEADER, file (2616,70,1) MAIL$0004008EF063C04F.MAI;1 invalid file header %VERIFY-I-BADHEADER, file (2774,29818,1) LASTNOTIC.NIL;1 invalid file header %VERIFY-I-ALLOCCLR, blocks incorrectly marked allocated (2) LBN 442398 to 445538, RVN 1 %VERIFY-I-BADHEADER, file (487,0,1) MAIL$0004008EEAEE0572.MAI;1 (3) invalid file header %VERIFY-I-LOSTEXTHDR, file (487,0,1) lost extension file header %VERIFY-I-BADHEADER, file (531,0,1) MAIL$0004008EEFBB198B.MAI;1 invalid file header %VERIFY-I-LOSTEXTHDR, file (531,0,1) lost extension file header %VERIFY-I-BADHEADER, file (589,0,1) MAIL$0004008EEAF199B9.MAI;1 invalid file header %VERIFY-I-LOSTEXTHDR, file (589,0,1) lost extension file header %VERIFY-I-BADHEADER, file (604,0,1) MAIL$0004008EF12C3B28.MAI;1 invalid file header %VERIFY-I-LOSTEXTHDR, file (604,0,1) lost extension file header %VERIFY-I-BADHEADER, file (674,0,1) MAIL$0004008EF6053C9B.MAI;1 invalid file header %VERIFY-I-LOSTEXTHDR, file (674,0,1) lost extension file header %VERIFY-I-BADHEADER, file (688,0,1) MAIL$0004008EF608AFF4.MAI;1 invalid file header %VERIFY-I-LOSTEXTHDR, file (688,0,1) lost extension file header %VERIFY-I-BADHEADER, file (689,0,1) MAIL$0004008EEE445A31.MAI;1 invalid file header %VERIFY-I-LOSTEXTHDR, file (689,0,1) lost extension file header %VERIFY-I-BADHEADER, file (750,0,1) MAIL$0004008EEED19ADF.MAI;1 invalid file header %VERIFY-I-LOSTEXTHDR, file (750,0,1) lost extension file header %VERIFY-I-BADHEADER, file (753,0,1) MAIL$0004008EE7C4A017.MAI;1 invalid file header %VERIFY-I-LOSTEXTHDR, file (753,0,1) lost extension file header %VERIFY-I-BADHEADER, file (780,0,1) MAIL$0004008EF777ACA8.MAI;1 invalid file header %VERIFY-I-LOSTEXTHDR, file (780,0,1) lost extension file header %VERIFY-I-BADHEADER, file (852,0,1) MAIL$0004008EF06C15F6.MAI;1 invalid file header %VERIFY-I-LOSTEXTHDR, file (852,0,1) lost extension file header %VERIFY-I-BADHEADER, file (856,0,1) MAIL$0004008EE7D2520D.MAI;1 invalid file header %VERIFY-I-LOSTEXTHDR, file (856,0,1) lost extension file header %VERIFY-I-BADHEADER, file (1059,0,1) MAIL$0004008EEB045608.MAI;1 invalid file header %VERIFY-I-LOSTEXTHDR, file (1059,0,1) lost extension file header %VERIFY-I-BADHEADER, file (1134,0,1) MAIL$0004008EE9EC806D.MAI;1 invalid file header %VERIFY-I-LOSTEXTHDR, file (1134,0,1) lost extension file header %VERIFY-I-BADHEADER, file (1316,0,1) MAIL$0004008EEEDA734F.MAI;1 invalid file header %VERIFY-I-LOSTEXTHDR, file (1316,0,1) lost extension file header %VERIFY-I-BADHEADER, file (1350,0,1) MAIL$0004008EE89BA8B0.MAI;1 invalid file header %VERIFY-I-LOSTEXTHDR, file (1350,0,1) lost extension file header %VERIFY-I-BADHEADER, file (1351,0,1) MAIL$0004008EEB09B036.MAI;1 invalid file header %VERIFY-I-LOSTEXTHDR, file (1351,0,1) lost extension file header %VERIFY-I-BADHEADER, file (1490,0,1) MAIL$0004008EE8B448B0.MAI;1 invalid file header %VERIFY-I-LOSTEXTHDR, file (1490,0,1) lost extension file header %VERIFY-I-BADHEADER, file (1493,0,1) LASTNOTIC.NIL;1 invalid file header %VERIFY-I-LOSTEXTHDR, file (1493,0,1) lost extension file header %VERIFY-I-BADHEADER, file (1548,0,1) MAIL$0004008EF7B4D1B8.MAI;1 invalid file header %VERIFY-I-LOSTEXTHDR, file (1548,0,1) lost extension file header %VERIFY-I-BADHEADER, file (1613,0,1) MAIL$0004008EECEE4BA5.MAI;1 invalid file header %VERIFY-I-LOSTEXTHDR, file (1613,0,1) lost extension file header %VERIFY-I-BADHEADER, file (1812,0,1) MAIL$0004008EE7DF05EC.MAI;1 invalid file header %VERIFY-I-LOSTEXTHDR, file (1812,0,1) lost extension file header %VERIFY-I-BADHEADER, file (1848,0,1) MAIL$0004008EF78659B9.MAI;1 invalid file header %VERIFY-I-LOSTEXTHDR, file (1848,0,1) lost extension file header %VERIFY-I-BADHEADER, file (1983,0,1) MAIL$0004008EE7E49C13.MAI;1 invalid file header %VERIFY-I-LOSTEXTHDR, file (1983,0,1) lost extension file header %VERIFY-I-BADHEADER, file (1987,0,1) REMIND.CAL;9 invalid file header %VERIFY-I-LOSTEXTHDR, file (1987,0,1) lost extension file header %VERIFY-I-BADHEADER, file (2196,0,1) MAIL$0004008EE6FA2DC9.MAI;1 invalid file header %VERIFY-I-LOSTEXTHDR, file (2196,0,1) lost extension file header %VERIFY-I-BADHEADER, file (2372,0,1) MAIL$0004008EF06339F9.MAI;1 invalid file header %VERIFY-I-LOSTEXTHDR, file (2372,0,1) lost extension file header %VERIFY-I-BADHEADER, file (2569,0,1) MAIL$0004008EF2BF0C15.MAI;1 invalid file header %VERIFY-I-LOSTEXTHDR, file (2569,0,1) lost extension file header %VERIFY-I-BADHEADER, file (2605,0,1) MAIL$0004008EE856FC73.MAI;1 invalid file header %VERIFY-I-LOSTEXTHDR, file (2605,0,1) lost extension file header %VERIFY-I-BADHEADER, file (2616,0,1) MAIL$0004008EF063C04F.MAI;1 invalid file header %VERIFY-I-LOSTEXTHDR, file (2616,0,1) lost extension file header %VERIFY-I-BADHEADER, file (2774,0,1) LASTNOTIC.NIL;1 invalid file header %VERIFY-I-LOSTEXTHDR, file (2774,0,1) lost extension file header %VERIFY-I-BADDIRENT, invalid file identification in directory entry [ALLWAY]NOTES.LOG;25 (4) %VERIFY-I-BADDIRENT, invalid file identification in directory entry [BLAIN.BOOTS]LOADER.OBJ;1 %VERIFY-I-BADDIRENT, invalid file identification in directory entry [BLAIN.BOOTS]SYSGEN.OBJ;1 %VERIFY-I-BADDIRENT, invalid file identification in directory entry [BLAIN]MAIL_20600841.TMP;1 %VERIFY-I-BADDIRENT, invalid file identification in directory entry [BLAIN]NETSERVER.LOG;181 %VERIFY-I-BADDIRENT, invalid file identification in directory entry [BLAIN]NETSERVER.LOG;180 %VERIFY-I-BADDIRENT, invalid file identification in directory entry [BLAIN]NETSERVER.LOG;179 %VERIFY-I-BADDIRENT, invalid file identification in directory entry [BLAIN]NETSERVER.LOG;178 %VERIFY-I-BADDIRENT, invalid file identification in directory entry [BLAIN]NETSERVER.LOG;170 %VERIFY-I-BADDIRENT, invalid file identification in directory entry [BOEMUS.MAIL]MAIL$0004008EF94A72A0.MAI;1 %VERIFY-I-BADDIRENT, invalid file identification in directory entry [BOEMUS]NETSERVER.LOG;10 %VERIFY-I-BADDIRENT, invalid file identification in directory entry [BOEMUS]UPDATE.LOG;1 %VERIFY-I-BACKLINK, incorrect directory back link [CALGON.GER]OBJ.DIR;1 %VERIFY-I-BADDIRENT, invalid file identification in directory entry [CALGON]T.TMP;1 %VERIFY-I-BACKLINK, incorrect directory back link [CLABIN.BACKUP.TMPSRC]BACKDEF.SDL;1 %VERIFY-I-BACKLINK, incorrect directory back link [CLABIN.BACKUP.TMPSRC]COMMON.REQ;1 %VERIFY-I-BACKLINK, incorrect directory back link [CLABIN.BACKUP.TMPSRC]DUMMY.MSG;1 %VERIFY-I-BADDIRENT, invalid file identification in directory entry [CLABIN.NMAIL]NMAIL.LOG;77 %VERIFY-I-BADDIRENT, invalid file identification in directory entry [CLABIN.NMAIL]NMAIL.LOG;76 %VERIFY-I-BADDIRENT, invalid file identification in directory entry [DESIN.8800]2840HT86.GNC;1 %VERIFY-I-BADDIRENT, invalid file identification in directory entry [DESIN.8800]2840TP86.GNC;1 %VERIFY-I-BADDIRENT, invalid file identification in directory entry [DOWNE.MAIL]MAIL$0004008EF94A79B3.MAI;1 %VERIFY-I-BADDIRENT, invalid file identification in directory entry [DOWNE.PRO]MORT.OBJ;15 %VERIFY-I-BADDIRENT, invalid file identification in directory entry [DOWNE.PRO]OUTPUT.LOG;36 %VERIFY-I-BADDIRENT, invalid file identification in directory entry [DOWNE.PRO]OUTPUT.LOG;35 %VERIFY-I-BADDIRENT, invalid file identification in directory entry [DOWNE.PRO]OUTPUT.LOG;34 %VERIFY-I-BADDIRENT, invalid file identification in directory entry [DOWNE.PRO]OUTPUT.LOG;33 %VERIFY-I-BADDIRENT, invalid file identification in directory entry [DOWNE.PRO]OUTPUT.LOG;32 %VERIFY-I-BADDIRENT, invalid file identification in directory entry [DOWNE.PRO]OUTPUT.LOG;31 %VERIFY-I-BADDIRENT, invalid file identification in directory entry [DOWNE.PRO]OUTPUT.LOG;30 %VERIFY-I-BADDIRENT, invalid file identification in directory entry [GAMBLE]CONFLICTS.LIS;1 %VERIFY-I-BADDIRENT, invalid file identification in directory entry [GAMBLE.DOC]SMP.LOCK;6 %VERIFY-I-BADDIRENT, invalid file identification in directory entry [GAMBLE]NETSERVER.LOG;5 %VERIFY-I-BADDIRENT, invalid file identification in directory entry [GAMBLE.NMAIL]NMAIL.LOG;22 %VERIFY-I-BADDIRENT, invalid file identification in directory entry [GAMBLE.NMAIL]NMAIL.LOG;21 %VERIFY-I-BADDIRENT, invalid file identification in directory entry [GILLEY.MAIL]MAIL$0004008EF94A7B70.MAI;1 %VERIFY-I-BADDIRENT, invalid file identification in directory entry [GILLEY]NETSERVER.LOG;657 %VERIFY-I-BADDIRENT, invalid file identification in directory entry [GILLEY]NETSERVER.LOG;656 %VERIFY-I-BADDIRENT, invalid file identification in directory entry [HALL]2.LOG;33 %VERIFY-I-BADDIRENT, invalid file identification in directory entry [HALL]2.LOG;32 %VERIFY-I-BADDIRENT, invalid file identification in directory entry [HALL]2.LOG;31 %VERIFY-I-BADDIRENT, invalid file identification in directory entry [HALL]2.LOG;30 %VERIFY-I-BADDIRENT, invalid file identification in directory entry [HALL]2.LOG;29 %VERIFY-I-BADDIRENT, invalid file identification in directory entry [HALL]2.LOG;28 %VERIFY-I-BADDIRENT, invalid file identification in directory entry [HALL]2.LOG;27 %VERIFY-I-BADDIRENT, invalid file identification in directory entry [HALL]2.LOG;26 %VERIFY-I-BADDIRENT, invalid file identification in directory entry [HALL]2.LOG;25 %VERIFY-I-BADDIRENT, invalid file identification in directory entry [HALL]2.LOG;24 %VERIFY-I-BADDIRENT, invalid file identification in directory entry [NAMOLLY]NETSERVER.LOG;2 %VERIFY-I-BADDIRENT, invalid file identification in directory entry [NAMOLLY]NETSERVER.LOG;1 %VERIFY-I-BADDIRENT, invalid file identification in directory entry [RUSS]082654.LOG;1 %VERIFY-I-BADDIRENT, invalid file identification in directory entry [SCHROEDER.LOGIN]NETSERVER.LOG;17 %VERIFY-I-BADDIR, directory [SYSLOST.BOOTS] has invalid format %VERIFY-I-BADDIRENT, invalid file identification in directory entry [THOEN]NETSERVER.LOG;374 %VERIFY-I-BADDIRENT, invalid file identification in directory entry [THOEN]NETSERVER.LOG;373 %VERIFY-I-BADDIRENT, invalid file identification in directory entry [THOEN]NETSERVER.LOG;367 %VERIFY-I-BADDIRENT, invalid file identification in directory entry [THOMAS.MAIL]MAIL$0004008EF94D75EB.MAI;1 %VERIFY-I-BADDIRENT, invalid file identification in directory entry [THOMAS.MAIL]MAIL$0004008EF955DDF3.MAI;1 %VERIFY-I-BADDIRENT, invalid file identification in directory entry [THOMAS.MAIL]MAIL$0004008EFD118B44.MAI;1 %VERIFY-I-LOSTSCAN, due to directory errors, lost files will not be entered (5) %VERIFY-I-INCQUOTA, QUOTA.SYS indicates 69663 blocks used, actual use is 69740 blocks for [11,402] (6) %VERIFY-I-INCQUOTA, QUOTA.SYS indicates 1764 blocks used, actual use is 1770 blocks for [12,12] %VERIFY-I-INCQUOTA, QUOTA.SYS indicates 0 blocks used, actual use is 31 blocks for [11,720] |
When you specify the /USAGE qualifier, ANALYZE/DISK_STRUCTURE creates a disk usage accounting file. The first record of this file, the identification record, contains a summary of the disk and volume characteristics. The identification record is followed by many file summary records, one record for each file on the disk. Each file summary record contains the owner, size, and name of a file.
The identification record is characterized by the type code USG$K_IDENT in the USG$B_TYPE field of the record. Table E-1 contains a description of all the fields in this record.
| Field | Meaning |
|---|---|
| USG$L_SERIALNUM | Serial number of the volume. This is an octal longword value. |
| USG$T_STRUCNAM | Volume set name (if the volume is part of a volume set). For a Files-11 Structure Level 1 volume, this field contains binary zeros; for a Files-11 Structure Level 2 or 5 volume that is not part of a volume set, this field contains spaces. The length of this field is USG$S_STRUCNAME. |
| USG$T_VOLNAME | Volume name of relative volume 1. The length of this field is USG$S_VOLNAME. |
| USG$T_OWNERNAME | Volume owner name. The length of this field is USG$S_OWNERNAME. |
| USG$T_FORMAT | Volume format type. For a Files-11 Structure Level 1 volume, this field contains "DECFILE11A"; for a Files-11 Structure Level 2 or 5 volume, this field contains "DECFILE11B". The length of this field is USG$S_FORMAT. |
| USG$Q_TIME | Quadword system time when this usage file was created. The length of this field is USG$S_TIME. |
Each file summary record is characterized by the type code USG$K_FILE in the USG$B_TYPE field of the record. Table E-2 contains a description of all the fields in these records.
| Field | Meaning |
|---|---|
| USG$L_FILEOWNER | File owner UIC. This can be considered as a single longword value or as two word values (USG$W_UICMEMBER and USG$W_UICGROUP). |
| USG$W_UICMEMBER | The member field of the file owner UIC. This is an octal word value. |
| USG$W_UICGROUP | The group field of the file owner UIC. This is an octal word value. |
| USG$L_ALLOCATED | Number of blocks allocated to the file, including file headers. This is a decimal longword value. |
| USG$L_USED | Number of blocks used, up to and including the end-of-file block. This is a decimal longword value. |
| USG$W_DIR_LEN | Length of the directory string portion of USG$T_FILESPEC, including the brackets. This is a decimal word value. |
| USG$W_SPEC_LEN | Length of the complete file specification in USG$T_FILESPEC. This is a decimal word value. |
| USG$T_FILESPEC |
File specification, in the following format:
[dir]nam.typ;ver This field is of variable length. A file that has more than one directory entry is listed under the first file specification found. A lost file has an empty directory string "[]" and the file name is taken from the file header. In some cases this information does not exist; you must take this into consideration when you write application programs to process the usage file. The length of this field is USG$S_FILESPEC. |
The symbolic names referenced in both the identification and the file summary records are defined in the system definition macro $USGDEF. The length of the identification record is USG$K_IDENT_LEN. The length of a file summary record is USG$K_FILE_LEN.
This appendix describes the format of the auditing messages written to the security auditing log file. The default audit log file SECURITY.AUDIT$JOURNAL is created by default in the SYS$COMMON:[SYSMGR] directory.
Each security audit record consists of a header packet followed by one or more data packets, as shown in Figure F-1. The number of data packets depends on the type of information being sent. This appendix describes the format of the audit header and its data packets as well as the contents of the data packets.
Figure F-1 Format of a Security Audit Message
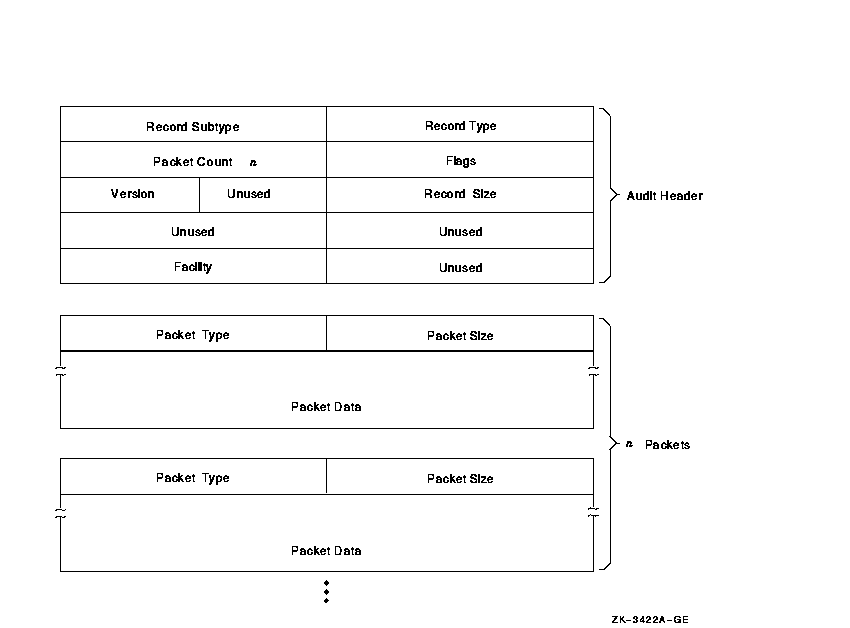
Figure F-2 Audit Header Packet Format
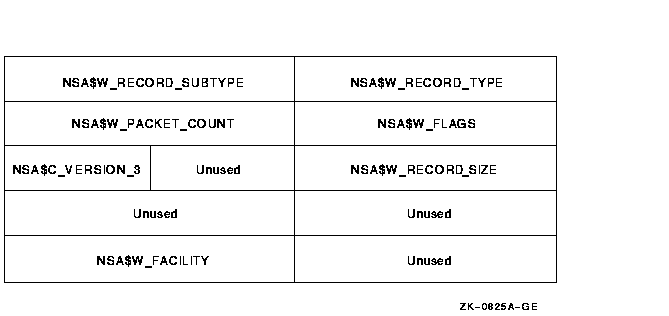
| Field | Symbolic Offset | Contents |
|---|---|---|
| Type | NSA$W_RECORD_TYPE | Indicates the type of event that has occurred. See Table F-2 for details. |
| Subtype | NSA$W_RECORD_SUBTYPE | Further defines the type of event that has occurred. See Table F-2 for details. |
| Flags | NSA$W_FLAGS | Identifies any flags associated with the audited event. See Table F-3 for details. Reserved to HP. (Word) |
| Packet count | NSA$W_PACKET_COUNT | Number of data packets in the audit record. (Word) |
| Record size | NSA$W_RECORD_SIZE | Total size of the audit message; the size represents the header packet plus all its data packets. (Word) |
| Version | NSA$C_VERSION_3 | Indicates the version of the security auditing facility. The symbol NSA$C_VERSION_3 indicates the current version. (Byte) |
| Facility | NSA$W_FACILITY | The facility code for the generated event. By default, this field is zero, indicating a system-generated event. (Word) |
When you enter subtypes, do not include a prefix, as shown in Table F-2.
Symbols representing the types or subtypes of security events are listed in Table F-2. For each audit event record type defined by NSA$W_RECORD_TYPE, there is a record subtype defined by the symbol NSA$W_RECORD_SUBTYPE, which further defines the event.
| Symbols for Event Types and Subtypes | Meaning | |
|---|---|---|
| NSA$C_MSG_AUDIT | Systemwide change to auditing | |
| ALARM_STATE | Events enabled as alarms | |
| AUDIT_DISABLED | Audit events disabled | |
| AUDIT_ENABLED | Audit events enabled | |
| AUDIT_INITIATE | Audit server startup | |
| AUDIT_LOG_FIRST | First entry in audit log (backward link) | |
| AUDIT_LOG_FINAL | Final entry in audit log (forward link) | |
| AUDIT_STATE | Events enabled as audits | |
| AUDIT_TERMINATE | Audit server shutdown | |
| SNAPSHOT_ABORT 1 | System snapshot attempt has aborted | |
| SNAPSHOT_ACCESS 1 | Snapshot file access/deaccess | |
| SNAPSHOT_SAVE 1 | System snapshot save in progress | |
| SNAPSHOT_STARTUP 1 | System booted from a snapshot file | |
| NSA$C_MSG_BREAKIN | Break-in attempt detected | |
| BATCH | Batch process | |
| DETACHED | Detached process | |
| DIALUP | Dialup interactive process | |
| LOCAL | Local interactive process | |
| NETWORK | Network server task | |
| REMOTE | Interactive process from another network node | |
| SUBPROCESS | Subprocess | |
| NSA$C_MSG_CONNECTION | Logical link connection or termination | |
| CNX_ABORT | Connection aborted | |
| CNX_ACCEPT | Connection accepted | |
| CNX_DECNET_CREATE | DECnet logical link created | |
| CNX_DECNET_DELETE | DECnet logical link disconnected | |
| CNX_DISCONNECT | Connection disconnected | |
| CNX_INC_ABORT | Incoming connection request aborted | |
| CNX_INC_ACCEPT | Incoming connection request accepted | |
| CNX_INC_DISCONNECT | Incoming connection disconnected | |
| CNX_INC_REJECT | Incoming connection request rejected | |
| CNX_INC_REQUEST | Incoming connection request | |
| CNX_IPC_CLOSE | Interprocess communication association closed | |
| CNX_IPC_OPEN | Interprocess communication association opened | |
| CNX_REJECT | Connection rejected | |
| CNX_REQUEST | Connection requested | |
| NSA$C_MSG_INSTALL | Use of the Install utility (INSTALL) | |
| INSTALL_ADD | Known image installed | |
| INSTALL_REMOVE | Known image deleted | |
| NSA$C_MSG_LOGFAIL | Login failure | |
|
See subtypes for
NSA$C_MSG_BREAKIN |
||
| NSA$C_MSG_LOGIN | Successful login | |
|
See subtypes for
NSA$C_MSG_BREAKIN |
||
| NSA$C_MSG_LOGOUT | Successful logout | |
|
See subtypes for
NSA$C_MSG_BREAKIN |
||
| NSA$C_MSG_MOUNT | Volume mount or dismount | |
| VOL_DISMOUNT | Volume dismount | |
| VOL_MOUNT | Volume mount | |
| NSA$C_MSG_NCP | Modification to network configuration database | |
| NCP_COMMAND | Network Control Program (NCP) command issued | |
| NSA$C_MSG_NETPROXY | Modification to network proxy database | |
| NETPROXY_ADD | Record added to network proxy authorization file | |
| NETPROXY_DELETE | Record removed from network proxy authorization file | |
| NETPROXY_MODIFY | Record modified in network proxy authorization file | |
| NSA$C_MSG_OBJ_ACCESS | Object access attempted | |
| OBJ_ACCESS | Access attempted to create, delete, or deaccess an object | |
| NSA$C_MSG_OBJ_CREATE | Object creation attempted | |
| OBJ_CREATE | Access attempted to create an object | |
| NSA$C_MSG_OBJ_DEACCESS | Object deaccessed | |
| OBJ_DEACCESS | Attempt to complete access to an object | |
| NSA$C_MSG_OBJ_DELETE | Object deletion attempted | |
| OBJ_DELETE | Object deletion attempted | |
| NSA$C_MSG_PROCESS | Process controlled through a system service | |
| PRC_CANWAK | Process wakeup canceled | |
| PRC_CREPRC | Process created | |
| PRC_DELPRC | Process deleted | |
| PRC_FORCEX | Process exit forced | |
| PRC_GETJPI | Process information gathered | |
| PRC_GRANTID | Process identifier granted | |
| PRC_RESUME | Process resumed | |
| PRC_REVOKID | Process identifier revoked | |
| PRC_SCHDWK | Process wakeup scheduled | |
| PRC_SETPRI | Process priority altered | |
| PRC_SIGPRC | Process exception issued | |
| PRC_SUSPND | Process suspended | |
| PRC_TERM | Process termination notification requested | |
| PRC_WAKE | Process wakeup issued | |
| NSA$C_MSG_PRVAUD | Use of privilege | |
| PRVAUD_FAILURE | Unsuccessful use of privilege | |
| PRVAUD_SUCCESS | Successful use of privilege | |
| NSA$C_MSG_RIGHTSDB | Modification to the rights database | |
| RDB_ADD_ID | Identifier added to rights database | |
| RDB_CREATE | Rights database created | |
| RDB_GRANT_ID | Identifier granted to user | |
| RDB_MOD_HOLDER | List of identifier holders modified | |
| RDB_MOD_ID | Identifier name or attributes modified | |
| RDB_REM_ID | Identifier removed from rights database | |
| RDB_REVOKE_ID | Identifier taken away from user | |
| NSA$C_MSG_SYSGEN | Use of the System Generation utility (SYSGEN) | |
| SYSGEN_SET | System parameter modified | |
| NSA$C_MSG_SYSTIME | Modification to system time | |
| SYSTIM_SET | System time set | |
| SYSTIM_CAL | System time calibrated | |
| NSA$C_MSG_SYSUAF | Modification to system user authorization file (SYSUAF) | |
| SYSUAF_ADD | Record added to system user authorization file | |
| SYSUAF_COPY | Record added to system user authorization file | |
| SYSUAF_DELETE | Record deleted from system user authorization file | |
| SYSUAF_MODIFY | Record modified in system user authorization file | |
| SYSUAF_RENAME | Record renamed in system user authorization file | |
Table F-3 identifies any flags associated with the audited event.
The symbol NSA$K_MSG_HDR_LENGTH defines the current size of the message header (in bytes).
| Symbol | Meaning |
|---|---|
| NSA$M_ACL | Event generated by an alarm access control entry (ACE) or an audit ACE. |
| NSA$M_ALARM | Event is a security alarm. |
| NSA$M_AUDIT | Event is a security audit. |
| NSA$M_FLUSH | Event forced the audit server to write all buffered event messages to the audit log file. |
| NSA$M_FOREIGN | Event occurred outside of the system trusted computing base. |
| NSA$M_MANDATORY | Event resulted from a mandatory process audit. |
All other flags besides those listed in the table are reserved by HP. |
Figure F-3 illustrates the format of an audit data packet. NSA$K_PKT_HDR_LENGTH defines the current size of each packet header (in bytes).
Note that audit data packets do not appear in any predefined order within an event message, and packet types can appear more than once throughout the event message.
For examples of the types of data appearing in different event messages, refer to the appendix of alarm messages in the HP OpenVMS Guide to System Security.
Figure F-3 Audit Data Packet Format
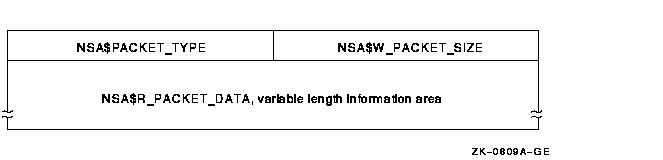
Table F-4 describes the fields contained in these packets.
| Field | Symbolic Offset | Contents |
|---|---|---|
| Packet size | NSA$W_PACKET_SIZE | Indicates the size of the data packet. (Word) |
| Packet type | NSA$W_PACKET_TYPE | Indicates the type of data in the packet, as described in Table F-5. |
| Packet data | NSA$R_PACKET_DATA | Variable length field containing the packet data. |
Table F-5 describes the types of data in audit packets.
| Symbol | Packet Contents |
|---|---|
| NSA$_ACCESS_DESIRED | Access requested or granted to the object as defined by $ARMDEF (Longword) |
| NSA$_ACCESS_MODE | Access mode of the process (Byte) |
| NSA$_ACCOUNT | Account name associated with the process (String of 1-32 characters) |
| NSA$_ALARM_NAME | Name of the user (or the security class operators terminal) to receive the record (String of 1-32 characters) |
| NSA$_ASSOCIATION_NAME | Interprocess communication (IPC) association name (String of 1-256 characters) |
| NSA$_AUDIT_FLAGS | Bit mask of enabled or disabled events. This is reserved to HP. (40-byte record) (String of 1-65 characters) |
| NSA$_AUDIT_NAME | Journal file to receive the audit record (String of 1-65 characters) |
| NSA$_COMMAND_LINE | Command line the user entered (String of 1-2048 characters) |
| NSA$_CONNECTION_ID | Interprocess communication (IPC) connection identification (Longword) |
| NSA$_DECNET_LINK_ID | DECnet logical link identification (Longword) |
| NSA$_DECNET_OBJECT_NAME | DECnet object name (String of 1-16 characters) |
| NSA$_DECNET_OBJECT_NUMBER | DECnet object number (Longword) |
| NSA$_DEFAULT_USERNAME | Default local user name for incoming network proxy requests (String of 1-32 characters) |
| NSA$_DEVICE_NAME | Device name where the volume resides (String of 1-64 characters) |
| NSA$_DIRECTORY_ENTRY | Directory entry associated with file system operation (Longword) |
| NSA$_DIRECTORY_ID | Directory file identification (Array of 3 words) |
| NSA$_DIRECTORY_NAME | Directory file name |
| NSA$_DISMOUNT_FLAGS | The $DMTDEF macro in STARLET defines the dismount flags; each flag is one quadword. |
| NSA$_EFC_NAME | Event flag cluster name (String of 1-16 characters) |
| NSA$_EVENT_FACILITY | Facility code for the generated event (Word) |
| NSA$_FIELD_NAME | Name of the field being modified. This is used in combination with NSA$_ORIGINAL_DATA and NSA$_NEW_DATA. (String of 1-256 characters) |
| NSA$_FILE_ID | File identification (Array of words) |
| NSA$_FINAL_STATUS | Status (successful or unsuccessful) causing the auditing facility to be invoked (Longword) |
| NSA$_HOLDER_NAME | Name of user holding the identifier (String of 1-32 characters) |
| NSA$_HOLDER_OWNER | Owner (UIC) of holder (Longword) |
| NSA$_ID_ATTRIBUTES | Attributes of the identifier, which are defined by the $KGBDEF macro in STARLET (Longword) |
| NSA$_IDENTIFIERS_USED | Identifiers (from the access control entry (ACE) granting access) used to gain access to the object (Array of longwords) |
| NSA$_ID_NAME | Name of the identifier (String of 1-32 characters) |
| NSA$_ID_NEW_ATTRIBUTES | New attributes of the identifier, which are defined by the $KGBDEF macro in STARLET (Longword) |
| NSA$_ID_NEW_NAME | New name of the identifier (String of 1-32 characters) |
| NSA$_ID_NEW_VALUE | New value of the identifier (Longword) |
| NSA$_ID_VALUE | Value of the identifier (Longword) |
| NSA$_ID_VALUE_ASCII | Identification value provided by $IDTOASC (Longword) |
| NSA$_IMAGE_NAME | Name of the image being executed when the event took place (String of 1-1024 characters) |
| NSA$_INSTALL_FILE | The name of the installed file (String of 1-255 characters) |
| NSA$_INSTALL_FLAGS | The INSTALL flags correspond to qualifiers for the Install utility (for example, NSA$M_INS_EXECUTE_ONLY); each flag is one longword. |
| NSA$_LNM_PARENT_NAME | Name of the parent logical name table (String of 1-31 characters) |
| NSA$_LNM_TABLE_NAME | Name of the logical name table (String of 1-31 characters) |
| NSA$_LOCAL_USERNAME | User name of the account available for incoming network proxy requests (String of 1-32 characters) |
| NSA$_LOGICAL_NAME | Logical name associated with the device (String of 1-255 characters) |
| NSA$_MAILBOX_UNIT | Mailbox unit number (Longword) |
| NSA$_MATCHING_ACE | ACE granting or denying access (Array of bytes) |
| NSA$_MESSAGE | Associated message code; see NSA$_MSGFILNAM for translation (Longword) |
| NSA$_MOUNT_FLAGS | The MOUNT flags defined by the $MNTDEF macro in STARLET (Longword) |
| NSA$_MSGFILNAM | Message file containing the translation for the message code in NSA$_MESSAGE (String of 1-255 characters) |
| NSA$_NEW_DATA | Contents of the field named in NSA$_FIELD_NAME after the event occurred. NSA$_ORIGINAL_DATA contains the field contents prior to the event. (String of 1-n characters) |
| NSA$_NEW_IMAGE_NAME | Name of the new image (String of 1-1024 characters) |
| NSA$_NEW_OWNER | New process owner (UIC) (Longword) |
| NSA$_NEW_PRIORITY | New process priority (Longword) |
| NSA$_NEW_PRIVILEGES | New privileges (Quadword) |
| NSA$_NEW_PROCESS_ID | New identification of the process (Longword) |
| NSA$_NEW_PROCESS_NAME | New name of the process (String of 1-15 characters) |
| NSA$_NEW_PROCESS_OWNER | New owner (UIC) of the process (Longword) |
| NSA$_NEW_USERNAME | New user name (String of 1-32 characters) |
| NSA$_NOP | Packet in static event list to omit from processing |
| NSA$_OBJECT_CLASS | Object class name, as defined by the system or by the user (String of 1-23 characters) |
| NSA$_OBJECT_MAX_CLASS | The minimum access classification of the object (20-byte record) |
| NSA$_OBJECT_MIN_CLASS | The minimum access classification of the object (20-byte record) |
| NSA$_OBJECT_NAME | Object's name (String of 1-255 characters) |
| NSA$_OBJECT_NAME_2 | Alternate object name; currently applies to file-backed global sections where the alternate name of global section is the file name. (String of 1-255 characters) |
| NSA$_OBJECT_OWNER | UIC or general identifier of the process causing the auditable event (Longword) |
| NSA$_OBJECT_PROTECTION | UIC-based protection of the object (Vector of words or longwords) |
| NSA$_OBJECT_TYPE | Object's type code, as listed in $ACLDEF. (String of 1-23 characters) |
| NSA$_OLD_PRIORITY | Former process priority (Longword) |
| NSA$_OLD_PRIVILEGES | Former privileges (Quadword) |
| NSA$_ORIGINAL_DATA | Contents of the field named in NSA$_FIELD_NAME before the event occurred. NSA$_NEW_DATA contains the field contents following the event. (String of 1-n characters) |
| NSA$_PARAMS_INUSE | Set of parameter values given to the SYSGEN command USE (String of 1-255 characters) |
| NSA$_PARAMS_WRITE | File name for the SYSGEN command WRITE (String of 1-255 characters) |
| NSA$_PARENT_ID | Process identifier (PID) of the parent process; only used when auditing events pertaining to a subprocess (Longword) |
| NSA$_PARENT_NAME | Parent's process name; only used when auditing events pertaining to a subprocess (String of 1-15 characters) |
| NSA$_PARENT_OWNER | Owner (UIC) of the parent process (Longword) |
| NSA$_PARENT_USERNAME | User name associated with the parent process (String of 1-32 characters) |
| NSA$_PASSWORD | Password used in unsuccessful break-in attempt (String of 1-32 characters) |
| NSA$_PRIVILEGES | Privilege mask (Quadword) |
| NSA$_PRIVS_MISSING | Privileges that are lacking (Longword or quadword) |
| NSA$_PRIVS_USED | Privileges used to gain access to the object (Longword or quadword) |
| NSA$_PROCESS_ID | PID of the process causing the auditable event (Longword) |
| NSA$_PROCESS_NAME | Process' name that caused the auditable event (String of 1-15 characters) |
| NSA$_REM_ASSOCIATION_NAME | Interprocess communication (IPC) remote association name (String of 1-256 characters) |
| NSA$_REMOTE_LINK_ID | Remote logical link identification number (Longword) |
| NSA$_REMOTE_NODE_ID | DECnet address of the remote process (Longword) |
| NSA$_REMOTE_NODENAME | DECnet node name of the remote process (String of 1-6 characters) |
| NSA$_REMOTE_USERNAME | User name of the remote process (String of 1-32 characters) |
| NSA$_REQUEST_NUMBER | Request number associated with the system service call (Longword) |
| NSA$_RESOURCE_NAME | Lock resource name (String of 1-32 characters) |
| NSA$_SECTION_NAME | Global section name (String of 1-42 characters) |
| NSA$_SNAPSHOT_BOOTFILE | The name of the snapshot boot file, the saved system image file from which the system just booted (String of 1-255 characters) |
| NSA$_SNAPSHOT_SAVE_FILNAM | The name of the snapshot save file, which is the original location of the snapshot file at the time that the system was saved (String of 1-255 characters) |
| NSA$_SNAPSHOT_TIME | The time the picture of the configuration was taken and saved in the snapshot boot file (Quadword) |
| NSA$_SOURCE_PROCESS_ID | Identification of process originating the request (Longword) |
| NSA$_SUBJECT_CLASS | The current access class of the process causing the auditable event (A 20-byte record) |
| NSA$_SUBJECT_OWNER | Owner (UIC) of the process causing the event (Longword) |
| NSA$_SYSTEM_ID | SCS identification of the cluster node where the event took place (SYSGEN parameter SCSSYSTEMID) (Longword) |
| NSA$_SYSTEM_NAME | System Communication Services (SCS) node name where the event took place (SYSGEN parameter SCSNODE) (String of 1-6 characters) |
| NSA$_SYSTEM_SERVICE_NAME | Name of the system service associated with the event (String of 1-256 characters) |
| NSA$_SYSTIM_NEW | New system time (Quadword) |
| NSA$_SYSTIM_OLD | Old system time (Quadword) |
| NSA$_TARGET_DEVICE_NAME | Target device name (String of 1-64 characters) |
| NSA$_TARGET_PROCESS_CLASS | The target process classification. (A 20-byte vector) |
| NSA$_TARGET_PROCESS_ID | Target process identifier (PID) (Longword) |
| NSA$_TARGET_PROCESS_NAME | Target process name (String of 1-64 characters) |
| NSA$_TARGET_PROCESS_OWNER | Target process owner (UIC) (Longword) |
| NSA$_TARGET_USERNAME | Target user name (String of 1-32 characters) |
| NSA$_TERMINAL | Name of the terminal to which the process was connected when the auditable event occurred (String of 1-256 characters) |
| NSA$_TIME_STAMP | The time that the event occurred (Quadword) |
| NSA$_TRANSPORT_NAME | Name of transport: interprocess communication (IPC), DECnet, or System Management Integrator (SMI), which handles requests from the SYSMAN utility (String of 1-256 characters) |
| NSA$_UAF_ADD | Name of the authorization record being added (String of 1-32 characters) |
| NSA$_UAF_COPY | Original and new names of the authorization record being copied (String of 1-32 characters) |
| NSA$_UAF_DELETE | Name of the authorization record being removed (String of 1-32 characters) |
| NSA$_UAF_FIELDS | Fields being changed in an authorization record and their new values. This is reserved to HP. (Quadword bit mask) |
| NSA$_UAF_MODIFY | Name of the authorization record being modified (String of 1-32 characters) |
| NSA$_UAF_RENAME | Name of the authorization record being renamed (String of 1-32 characters) |
| NSA$_UAF_SOURCE | User name of the source record for an Authorize utility (AUTHORIZE) copy operation (String of 1-32 characters) |
| NSA$_USERNAME | User name of process causing the auditable event (String of 1-32 characters) |
| NSA$_VOLUME_NAME | Volume name (String of 1-15 characters) |
| NSA$_VOLUME_SET_NAME | Volume set name (String of 1-15 characters) |
| Previous | Next | Contents | Index |