Software > OpenVMS Systems > Documentation > 732final > 6469 HP OpenVMS Systems Documentation |
Getting Started With the New Desktop
A.7.2 Node and Cluster Configuration DirectoriesTable A-2 shows the directories that a system manager creates for any resource, application default, or configuration files that have been customized for systemwide use. The corresponding UNIX path specifications are also shown.
A.7.3 User Configuration DirectoriesTable A-3 shows the directories that are used for individual users' customizations.
A.7.4 Font DirectoriesThe font directories of the New Desktop and the corresponding UNIX path specifications are shown in Table A-4.
Appendix B
|
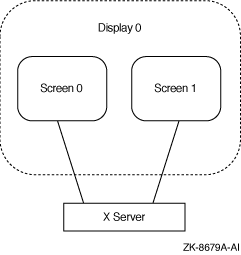
File Manager, Application Manager, and Trash Can are actually windows from the same dtfile application. Only one dtfile application will be active in your session. The first invocation of File Manager, Application Manager, or Trash Can defines the screen used for all future invocations of these tools. They will always be on the same screen. |
The Window Manager functions that are required for using multiple screens are described in Table B-1.
| Function | Description |
|---|---|
|
f.screen [next|prev|back|
screen_number] |
Causes the pointer to move to a specific screen number or to the next, previous, or last-visited (back) screen. The arguments to this function are mutually exclusive. The screen_number argument indicates the screen to which the pointer is to go. Screen numbers start with screen 0. Next or prev causes the pointer to move to the next or previous managed screen (skipping over any unmanaged screens). Specifying back causes the pointer to move to the last-visited screen. |
| f.create_workspace | Creates a new workspace on the screen. The new workspace name is generated automatically and takes the form ws_ n, where n is an integer. |
| f.delete_workspace | Deletes the current workspace. Windows that reside only in this workspace are moved to the next workspace. If the last workspace is being deleted, then windows are moved to the first workspace. |
| f.goto_workspace workspace-name | Causes Workspace Manager to switch to the named workspace. If no workspace exists by the specified name, then no action occurs. Note that adding and deleting workspaces dynamically affects this function. |
| f.next_workspace | Causes the workspace manager to switch to the next workspace on the screen. If the last workspace is currently active, then this function switches to the first workspace. |
| f.prev_workspace | Causes the Workspace Manager to switch to the previous workspace on the screen. If the first workspace is currently active, then this function switches to the last workspace. |
| f.action | Causes the specified action to be invoked on the screen. |
You can edit the Window Manager configuration file for managing multiple screens for systemwide use or for use by a single user. To set up a customized workspace menu (also known as a root window menu) for all users on a multiple-screen system, copy the system's default Window Manager configuration file to the user's default area and modify the file there, as shown in the following example:
$ COPY CDE$SYSTEM_DEFAULTS:[CONFIG.C]SYS.DTWMRC - _$ CDE$USER_DEFAULTS:[CONFIG.C]SYS.DTWMRC $ EDIT CDE$USER_DEFAULTS:[CONFIG.C]SYS.DTWMRC |
To set up a customized workspace menu for one user, copy the user's default Window Manager configuration file to disk$:[user.DT]DTWMRC.DAT and modify the file there, as shown in the following example:
$ COPY CDE$USER_DEFAULTS:[CONFIG.C]SYS.DTWMRC - _$ disk$:[user.DT]DTWMRC.DAT $ EDIT disk$:[user.DT]DTWMRC.DAT |
By default, the workspace menu is defined in SYS.DTWMRC, as shown in the following source code:
###
# Root Menu Description
###

Menu DtRootMenu
{
   "Workspace Menu"                  f.title
   "Shuffle Up"                      f.circle_up
   "Shuffle Down"                    f.circle_down
   "Refresh"                         f.refresh
   "Minimize/Restore Front Panel"    f.toggle_frontpanel
   no-label                          f.separator
   "Restart Workspace Manager..."    f.restart
   no-label                          f.separator
   "Log out..."                      f.action ExitSession
}
|
The following example shows what the workspace menu definition might look like after it has been customized for use in a multiple-screen configuration:
###
# Root Menu Description
###

Menu DtRootMenu
{
   "Workspace Menu"                  f.title
   "Shuffle Up"                      f.circle_up
   "Shuffle Down"                    f.circle_down
   "Refresh"                         f.refresh
   "Minimize/Restore Front Panel"    f.toggle_frontpanel
   no-label                          f.separator
   "Next Screen"                     f.screen next
   "Previous Screen"                 f.screen prev
   "Create Workspace"                f.create_workspace
   "Next Workspace"                  f.next_workspace
   "Previous Workspace"              f.prev_workspace
   "Delete Workspace"                f.delete_workspace
   no-label                          f.separator
   "Style Manager"                   f.action dtstyle
   "File Manager"                    f.action DtfileHome
   no-label                          f.separator
   "Restart Workspace Manager..."    f.restart
   no-label                          f.separator
   "Log out..."                      f.action ExitSession
}
|
Only one instance of Style Manager can be running at any time. Changes will apply to the workspace and screen on which Style Manager is running.
Initially, all screens except the default screen display a gray patterned background with the default X server colormap installed. You can then choose from any of the color palettes in Style Manager's Color dialog box to set the colors for the initial workspace of the screen. If you create additional workspaces on the screen, you must select a color palette from the Style Manager for each one. Backdrops function similarly.
In addition to the screen-specific attributes that you can customize with Style Manager, you can customize applications on a screen-specific basis by using command line options and screen-specific resources.
The Window Manager supports the following command line options for managing multiple screens:
The following example names the second screen "screen1" and displays the icon box on it, using the name in a screen-specific resource.
$ MCR CDE$PATH:DTWM -screens "screen0" "screen1" -xrm - _$ "*screen1*useIconBox: true" |
These options are not required for managing multiple screens with Window Manager.
All the CDE applications included in the New Desktop support the following command line options:
Screen-specific resources are Window Manager resources that apply only to the clients that appear on a particular screen. Workspace-specific resources are Window Manager resources that apply only to the clients that appear on a particular workspace.
The syntax for screen-specific resources is:
|
*screenname*resource_id: resource_value |
By default, the screen number is used as the screen name.
In the following example, Style Manager specifies the color palette resource for all clients on screen 0.
*0*ColorPalette: palette_name |
The syntax for workspace-specific resources is:
|
Dtwm[*screen_name]*workspace_name*resource_id: resource_value |
The following example specifies the workspace title for workspace wk1. This title is the value that appears in the workspace button representing workspace wk1 on the Front Panel.
Dtwm*0*ws1*title: MYWORKSPACE |
You can specify an application for a specific screen by editing its action definition file to include a specific screen number. The following example is a screen-specific action definition for the X Window Dump (xwd) application. When this action is invoked, the application prompts the user for a screen number and dumps only that screen's image to the file DISK$WORK:SCREENDUMP.XWD. The -display command line option in this example causes the prompt to be displayed.
  ACTION screendump
  {
     LABEL       Screen Dump
     ICON        Dtactn
     TYPE        COMMAND
     ARG_COUNT   0
     EXEC_STRING decw$utils:xwd \
                 -display :0.%"Screen Number: "% \
                 -root -screen -out DISK$WORK:SCREENDUMP.XWD
     WINDOW_TYPE NO_STDIO
     DESCRIPTION Dump the image on the Screen to DISK$WORK:SCREENDUMP.XWD
  }
|
This appendix lists all the CDE API routines. They are grouped by shareable libraries (pointed to by the logical SYS$LIBRARY) and by the header files within those libraries. The routines are defined in their respective header files. Each library of routines is shown in a separate table.
A few CDE API routines are not included in the New Desktop. They are indicated in each table by a footnote.
Detailed information describing the parameters and use of these routines is available from their respective manpages. You can either select the Man Page Viewer from the Desktop Apps application group or run it from the command line, as shown in the following example:
$ DTHELPVIEW == "$CDE$PATH:DTHELPVIEW" $ DTHELPVIEW "-manPage" DtInitialize |
The CDE Desktop Services API routines in CDE$LIBDTSVC.EXE are shown in Table C-1.
| API | Header File | Routines |
|---|---|---|
| API initialization | Dt.h | DtInitialize |
| DtAppInitialize | ||
| Action processing | Action.h | DtActionExists |
| DtActionLabel | ||
| DtActionDescription | ||
| DtDbReloadNotify 1 | ||
| DtDbLoad | ||
| DtActionInvoke | ||
| DtActionIcon | ||
| Data typing | Dts.h | DtDtsLoadDataTypes |
| DtDtsRelease | ||
| DtDtsDataToDataType | ||
| DtDtsFileToDataType | ||
| DtDtsFileToAttributeValue | ||
| DtDtsFileToAttributeList | ||
| DtDtsBufferToDataType 1 | ||
| DtDtsBufferToAttributeValue 1 | ||
| DtDtsBufferToAttributeList 1 | ||
| DtDtsDataTypeToAttributeValue | ||
| DtDtsDataTypeToAttributeList | ||
| DtDtsFreeDataTypeNames | ||
| DtDtsFreeAttributeList | ||
| DtDtsFreeAttributeValue | ||
| DtDtsFreeDataType | ||
| DtDtsDataTypeNames | ||
| DtDtsFindAttribute | ||
| DtDtsSetDataType | ||
| DtDtsDataTypeIsAction | ||
| Drag-and-drop convenience | Dnd.h | DtDndCreateSourceIcon |
| DtDndDragStart | ||
| DtDndVaDragStart | ||
| DtDndDropRegister | ||
| DtDndVaDropRegister | ||
| DtDndDropUnregister | ||
| Workspace Manager | Wsm.h | DtWsmAddWorkspaceFunctions |
| DtWsmRemoveWorkspaceFunctions | ||
| DtWsmGetWorkspaceInfo | ||
| DtWsmFreeWorkspaceInfo | ||
| DtWsmGetWorkspaceList | ||
| DtWsmGetCurrentWorkspace | ||
| DtWsmAddCurrentWorkspaceCallback 1 | ||
| DtWsmRemoveWorkspaceCallback 1 | ||
| DtWsmSetCurrentWorkspace 1 | ||
| DtWsmGetWorkspacesOccupied | ||
| DtWsmSetWorkspacesOccupied | ||
| DtWsmOccupyAllWorkspaces | ||
| DtWsmAddWorkspaceModifiedCallback 1 | ||
| DtWsmGetCurrentBackdropWindow | ||
| Session save/restore support | Session.h | DtSessionSavePath |
| DtSessionRestorePath | ||
| Screen saver | Saver.h | DtSaverGetWindows |
| Previous | Next | Contents | Index |