Software > OpenVMS Systems > Documentation > 82final > 6543 HP OpenVMS Systems |
HP Advanced Server for OpenVMS
|
| Previous | Contents | Index |
Using ADMINISTER commands on a member server (or directing them to a member server), you can manage the domainwide security accounts database as you would from any domain controller. Although a member server does not store or maintain the domainwide database, it still has access to the benefits of the centralized, domainwide database.
As with Windows NT, in some situations you might want to allow users to manage a server without giving them the ability to manage the entire domain. For this reason, the Advanced Server member server has a local security accounts database. This database initially has the users Administrator and Guest as local to the server.
Both the domain's Administrator and the local Administrator can manage the member server. Certain users can set the default to the member server's local database, as explained in Section 2.1.5.1, Administering the Member Server's Local Database. In any case, certain objects, such as global groups and trusts, are manageable only when logged into a domain controller's domain. Certain ADMINISTER commands will be restricted. Section 2.1.5.2, ADMINISTER Command Variances on Member Servers, lists the ADMINISTER commands that are not allowed or that provide restricted capabilities. The information in both of these sections applies to workstations as well as member servers.
Unless you have changed the default to the member server's local database, ADMINISTER commands normally operate domainwide --- that is, on the domain to which the member server belongs. For example, if you enter the ADMINISTER command on member server WIZARD in domain LANDOFOZ, the ADMINISTER prompt displays domain LANDOFOZ and server WIZARD:
$ ADMINISTER LANDOFOZ\\WIZARD> |
To manage a member server's local database, you must either log on, or change the default domain to the local database. To change the default domain, specify for the domain name the member server's name preceded by two backslashes (\\). The following example shows how to use the SET ADMINISTRATION command to administer member server WIZARD's local domain database:
LANDOFOZ\\TINMAN> SET ADMINISTRATION/DOMAIN=\\WIZARD %PWRK-S-ADMSET, now administering domain "\\WIZARD", server "WIZARD" \\WIZARD\\WIZARD> |
Note that when you administer the member server's local domain database, the ADMINISTER prompt displays the domain name preceded by two backslashes, and the domain name is the same as the name of the member server (in this case, \\WIZARD\\WIZARD).
In an OpenVMS Cluster in which the Advanced Servers are member servers, you can optionally specify for the domain name the Advanced Server cluster alias name preceded by two backslashes. When administering a clustered member server's local database, the ADMINISTER prompt displays the Advanced Server cluster alias as the domain (preceded by two backslashes). For the server name, unless you specified a server name, the prompt displays the name of the cluster member that responded first to the ADMINISTER interface.
As mentioned previously, member servers do not maintain or manage the domainwide security accounts database and cannot manage or display certain objects, such as global groups, primary groups, and trusts. Table 2-2, Disallowed or Restricted Commands When Administering a Member Server's Local Database, lists the commands that are not allowed or that are restricted, when administering the member server's local domain database. If you attempt to use these commands in such circumstances, the following error message will be displayed:
%PWRK-E-DCONLY, operation is only valid to a Domain Controller |
The affected commands are categorized by each of the following management objects: COMPUTER, GROUP, TRUST, and USER.
| Object | Command | Restriction |
|---|---|---|
| COMPUTER | ADD | Not allowed. |
| REMOVE | Not allowed. | |
| SET | Not allowed with the /ACCOUNT_SYNCHRONIZE or /ROLE= qualifiers. | |
| SHOW | When you do not specify a computer name with the command, it displays information about the member server only (the computer you are managing) rather than about all the computers in the domain. Note that the display symbol for a member server is [SV]. | |
| GROUP | ADD, COPY, MODIFY, REMOVE, SHOW | Do not use with global groups, and do not use the /GLOBAL or /PRIMARY_GROUP qualifier; GROUP commands manage local groups only. |
| TRUST | ADD, REMOVE, SHOW | Not allowed. |
| USER | ADD, COPY, MODIFY | Do not use with the /PRIMARY_GROUP qualifier; the ADD USER command adds the user to the Users local group; these commands manage memberships in local groups only. |
| REMOVE, SHOW | These commands manage memberships in local groups only; the SHOW USERS command does not display the primary group or memberships in global groups. |
For an Advanced Server or a Windows NT computer to become a domain member, it must be added to the domain's security accounts database.
When a computer is configured to join an existing domain (for example, when you install a Windows NT Server or workstation, or when you run the PWRK$CONFIG.COM command procedure on an Advanced Server), the computer account can be added to the domain's security database automatically. This procedure requires that the user name and password of a user account with membership in the Administrators group be supplied.
Alternatively, use the ADD COMPUTER command to add the computer account to the domain's security database. After you add the computer account, the computer joins the domain automatically when it is started. No password is required when a computer joins the domain in this case.
The ADD COMPUTER command is useful only if you do not want to give out the user name and password of an Administrator account in your domain to the administrator of the computer that will join your domain. You can use the ADD COMPUTER command to add the computer account to your domain before the computer's administrator joins the domain. If you supply password information to the administrator of the other computer, the administrator can use the password when joining, and the computer account will be added to the domain automatically. Note that until the intended computer account actually joins the domain, a malicious user could give a different computer that computer name, and then have it join the domain using the computer account you have just created.
If the intended computer does not join the domain immediately, you can remove the computer account from the domain's security database by using the REMOVE COMPUTER command, as described in Section 2.1.7, Removing a Computer Account from a Domain's Security Database.
To add a computer to a domain, follow these steps:
For example, the following command adds the computer GREENGIRL as a Windows NT workstation to the domain LANDOFOZ:
LANDOFOZ\\TINMAN> ADD COMPUTER GREENGIRL %PWRK-S-COMPADD, computer "GREENGIRL" added to domain "LANDOFOZ" LANDOFOZ\\TINMAN> |
The computer is added to the domain's security database. The SHOW COMPUTERS command shows GREENGIRL as a Windows NT workstation. For example:
LANDOFOZ\\TINMAN> SHOW COMPUTERS Computers in domain "LANDOFOZ": Computer Type Description ----------- --------------------- -------------------------------- [PD] TINMAN OpenVMS (NT 4.0) Primary Advanced Server V7.3B for OpenVMS [ws] GREENGIRL Windows NT Workstation |
Note that when the computer type display symbol is in lowercase, such as [ws] in this example, it indicates that the computer is unavailable to the network. The computer might be unavailable because it has not yet been configured and started.
To determine whether a specific computer is available, use the SHOW COMPUTER command and specify the name of the computer.
When you remove a computer account from the domain's security database, the computer can no longer participate in domain security. It might be useful to remove a computer account from the domain's security database if the computer did not join the domain after its account was added to the domain's security database. You cannot remove a primary domain controller.
To remove a computer from a domain, follow these steps:
For example, the following command removes the computer GREENGIRL from the domain LANDOFOZ:
LANDOFOZ\\TINMAN> REMOVE COMPUTER GREENGIRL Removing computer "GREENGIRL" from domain "LANDOFOZ" will render it incapable of authenticating domain logons until it is added to another domain. Do you want to continue with the removal [YES or NO] (YES) : YES %PWRK-S-COMPREM, computer "GREENGIRL" removed from domain "LANDOFOZ" LANDOFOZ\\TINMAN> |
A trust relationship is a link between two domains, in which one domain honors the users of another domain, trusting the other domain to authenticate the logons of its users. When trust relationships are properly established among domains and resource permissions are set properly, a user with an account in one domain is allowed to access resources on another domain. The domain that has the user accounts is the trusted domain; the domain with the required resources is the trusting domain.
The administrators of both domains must supply the same password when establishing the trust relationship. After the trust relationship is established, the password is changed periodically by the domain software.
Both domains participating in a trust relationship must take an action to establish the trust. First, the domain that will be trusted (that is, the domain in which the user accounts are defined) must indicate that it is willing to be trusted by permitting the other domain to trust it. Then the domain that will be trusting (that is, the domain in which the shared resources are defined) can indicate that it is willing to trust the other domain.
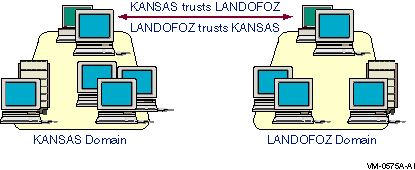
As an example, domain KANSAS has resources required by users who have user accounts in domain LANDOFOZ. You need to set up a trust relationship so that KANSAS trusts LANDOFOZ, as shown in Figure 2-1, One-Way Trust Relationship: KANSAS Domain Trusting LANDOFOZ Domain. This is called a one-way trust relationship.
Figure 2-1 One-Way Trust Relationship: KANSAS Domain Trusting LANDOFOZ Domain

LANDOFOZ\\TINMAN> ADD TRUST KANSAS/PERMITTED Password: Password verification: %PWRK-S-TRUSTADD, trust between domains "LANDOFOZ" and "KANSAS" added LANDOFOZ\\TINMAN> |
KANSAS\\TOPEKA> ADD TRUST LANDOFOZ/TRUSTED Password: Password verification: %PWRK-S-TRUSTADD, trust between domains "KANSAS" and "LANDOFOZ" added KANSAS\\TOPEKA> |
If the steps to establishing a trust are done in the opposite order (that is, one domain trusts the other before the other has permitted the first domain to trust it), the trust will eventually work. However, this can take up to 15 minutes.
When a two-way trust relationship has been established, each domain trusts the other, and users in both domains can access resources in the other domain, assuming resource permissions have been set up properly.
To set up a two-way trust relationship between domains LANDOFOZ and KANSAS, as shown in Figure 2-2, Two-Way Trust Relationship Between Domains KANSAS and LANDOFOZ, use the following procedure:
Figure 2-2 Two-Way Trust Relationship Between Domains KANSAS and LANDOFOZ
LANDOFOZ\\TINMAN> ADD TRUST KANSAS/PERMITTED |
KANSAS\\TOPEKA> ADD TRUST LANDOFOZ/TRUSTED |
KANSAS\\TOPEKA> ADD TRUST LANDOFOZ/PERMITTED |
LANDOFOZ\\TINMAN> ADD TRUST KANSAS/TRUSTED |
To display trust relationships, use the SHOW TRUSTS command. In the following example, a trust relationship has been established to enable domain KANSAS to trust domain LANDOFOZ. Use the SHOW TRUSTS command on domain LANDOFOZ to display its trust:
LANDOFOZ\\TINMAN> SHOW TRUSTS
There are currently no domains trusted by domain LANDOFOZ
Domains permitted to trust domain LANDOFOZ:
    KANSAS
LANDOFOZ\\TINMAN>
|
Use the SHOW TRUSTS command on domain KANSAS to display its trust:
LANDOFOZ\\TINMAN> SHOW TRUSTS/DOMAIN=KANSAS
Domains trusted by KANSAS:
    LANDOFOZ
There are currently no domains permitted to trust domain KANSAS
LANDOFOZ\\TINMAN>
|
If you no longer want a trust relationship to be in effect, you must remove it. When you remove a trust, the trusting domain must cease to trust the trusted domain, and the trusted domain must cease to permit the trusting domain to trust it.
To remove a trust relationship, use the REMOVE TRUST/TRUSTED command and the REMOVE TRUST/PERMITTED command. For example:
LANDOFOZ\\TINMAN> REMOVE TRUST KANSAS/PERMITTED Removing domain "KANSAS" from the Permitted Domains List will prevent users in domain "LANDOFOZ" from accessing resources in domain "KANSAS". If you choose to continue, you must also administer domain "KANSAS" and remove "LANDOFOZ" from its list of Trusted Domains. Do you want to continue with the removal [YES or NO] (YES) : YES %PWRK-S-TRUSTREM, trust between domains "LANDOFOZ" and "KANSAS" removed LANDOFOZ\\TINMAN> |
To reestablish the trust relationship, you again must supply matching passwords for the trusting and trusted domains. If only one side of the trust relationship is broken and reestablished, the trust will appear to work in some ways and fail in others. For example, you can grant resource access to a user from the trusted domain, but the user is not actually granted the indicated access. To eliminate such problems, remove the old trust relationships and establish new trust relationships.
You can manage the following security policies:
You manage the account policy for your domain using the SET ACCOUNT POLICY command. You can view the account policy with the SHOW ACCOUNT POLICY command. Changes to the account policy affect every user at the next logon.
The account policy characteristics that you can specify include:
The following example shows how to set the account policy for the domain so that users are disconnected when they exceed their logon hours (/FORCE_DISCONNECT), and they are locked out after three failed logon attemps. The failed logon count resets 20 minutes after the last failed login attempt, and locked-out accounts are unlocked after 25 minutes.
LANDOFOZ\\TINMAN> SET ACCOUNT POLICY/FORCE_DISCONNECT - _LANDOFOZ\\TINMAN> /LOCKOUT=(ATTEMPTS=3,WINDOW=20,DURATION=25) %PWRK-S-ACCPOLSET, account policy set for domain "LANDOFOZ" |
The following example shows how to use the SHOW ACCOUNT POLICY command to display the account policy for a domain:
LANDOFOZ\\TINMAN> SHOW ACCOUNT POLICY Account Policy for domain "LANDOFOZ": Minimum password age (days) : 1 Maximum password age (days) : 42 Minimum password length : 0 Length of password history maintained : None Force user logoff after logon hours expire: YES Lock out account after how many bad password attempts : 3 Number of minutes account remains locked : 20 Number of minutes to wait before resetting lockout count : 25 Role of server TINMAN : Primary Domain Controller |
| Previous | Next | Contents | Index |