Software > OpenVMS Systems > Documentation > 82final > 6552 HP OpenVMS Systems Documentation |
HP Availability Manager User's Guide
6.2 Performing Node FixesThe Availability Manager node fixes allow you to deliberately fail (crash) a node or to adjust cluster quorum. To perform a node fix, follow these steps:
6.2.1 Crash Node
When you select the Crash Node option, the Availability Manager displays the Crash Node page, shown in Figure 6-1. Figure 6-1 Crash Node Page 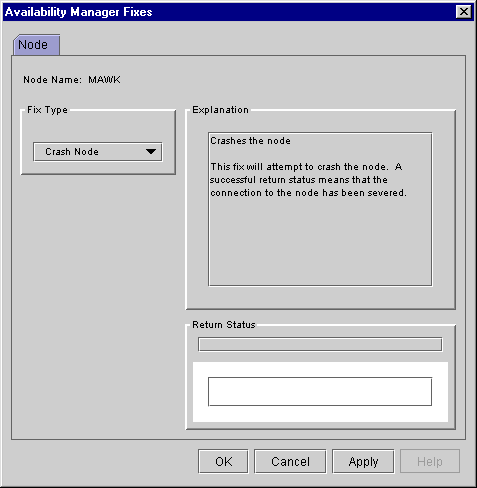
Recognizing a System Failure Forced by the Availability Manager
Because a user with suitable privileges can force a node to fail from the Data Analyzer by using the "Crash Node" fix, system managers have requested a method for recognizing these particular failure footprints so that they can distinguish them from other failures. These failures all have identical footprints: they are operator-induced system failures in kernel mode at IPL 8. The top of the kernel stack is similar the following display:
6.2.2 Adjust QuorumThe Adjust Quorum fix forces the node to refigure the quorum value. This fix is the equivalent of the Interrupt Priority C (IPC) mechanism used at system consoles for the same purpose. The fix forces the adjustment for the entire cluster so that each node in the cluster will have the same new quorum value. The Adjust Quorum fix is useful when the number of votes in a cluster falls below the quorum set for that cluster. This fix allows you to readjust the quorum so that it corresponds to the current number of votes in the cluster. When you select the Adjust Quorum option, the Availability Manager displays the page shown in Figure 6-2. Figure 6-2 Adjust Quorum Page 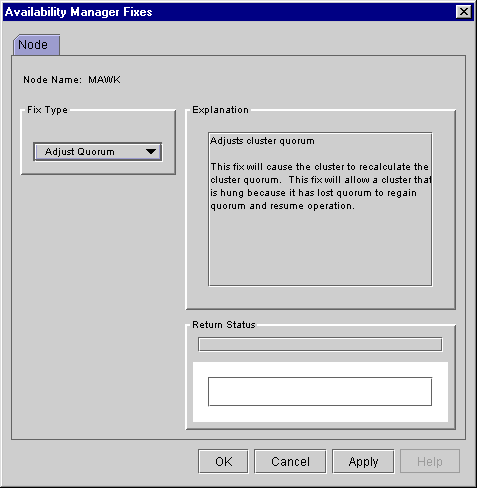
6.3 Performing Process FixesTo perform a process fix, follow these steps:
Some of the fixes, such as Process Priority, require you to use a slider to change the default value. When you finish setting a new process priority, click Apply at the bottom of the page to apply that fix. 6.3.1 General Process FixesThe following sections describe Availability Manager general process fixes.6.3.1.1 Delete ProcessIn most cases, a Delete Process fix deletes a process. However, if a process is waiting for disk I/O or is in a resource wait state (RWAST), this fix might not delete the process. In this situation, it is useless to repeat the fix. Instead, depending on the resource the process is waiting for, a Process Limit fix might free the process. As a last resort, reboot the node to delete the process.
When you select the Delete Process option, the Availability Manager displays the page shown in Figure 6-4. Figure 6-4 Delete Process Page 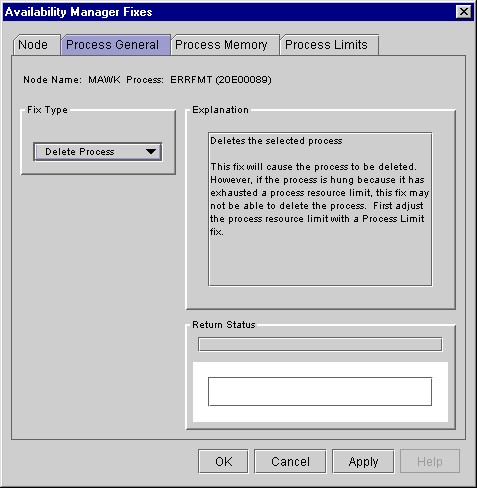
After reading the explanation, click Apply at the bottom of the page to apply the fix. A message displayed on the page indicates that the fix has been successful. 6.3.1.2 Exit ImageExiting an image on a node can stop an application that a user requires. Check the Single Process page first to determine which image is running on the node.
When you select the Exit Image option, the Availability Manager displays the page shown in Figure 6-5. Figure 6-5 Exit Image Page 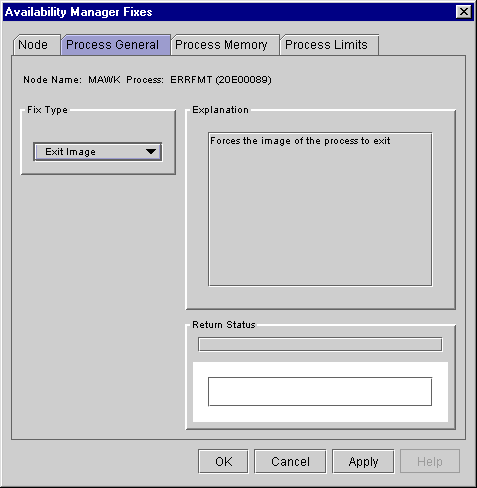
After reading the explanation in the page, click Apply at the bottom of the page to apply the fix. A message displayed on the page indicates that the fix has been successful. 6.3.1.3 Suspend ProcessSuspending a process that is consuming excess CPU time can improve perceived CPU performance on the node by freeing the CPU for other processes to use. (Conversely, resuming a process that was using excess CPU time while running might reduce perceived CPU performance on the node.)
When you select the Suspend Process option, the Availability Manager displays the page shown in Figure 6-6. Figure 6-6 Suspend Process Page 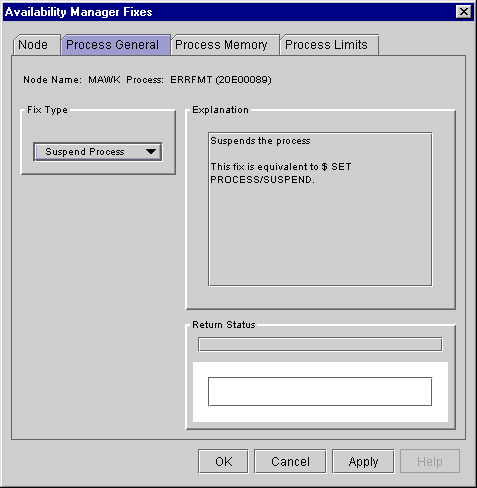
After reading the explanation, click Apply at the bottom of the page to apply the fix. A message displayed on the page indicates that the fix has been successful. 6.3.1.4 Resume ProcessResuming a process that was using excess CPU time while running might reduce perceived CPU performance on the node. (Conversely, suspending a process that is consuming excess CPU time can improve perceived CPU performance by freeing the CPU for other processes to use.) When you select the Resume Process option, the Availability Manager displays the page shown in Figure 6-7. Figure 6-7 Resume Process Page 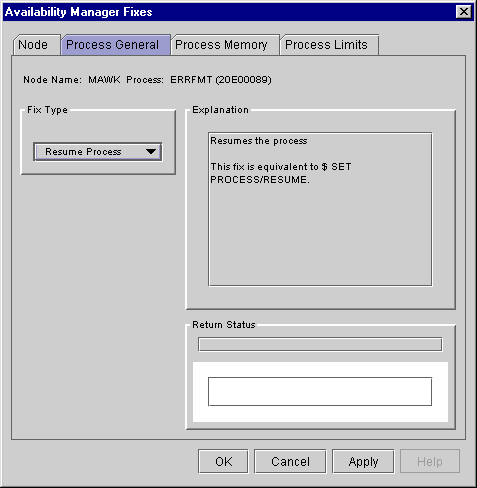
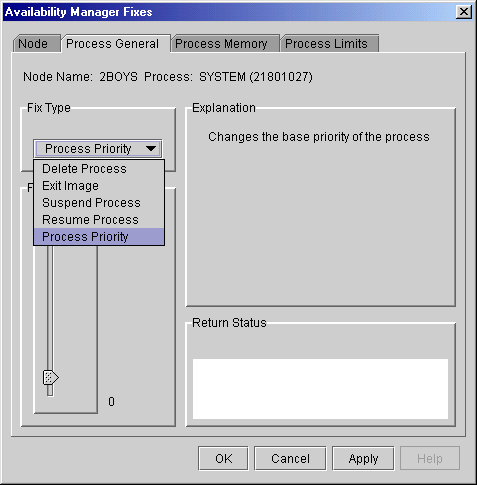
After reading the explanation, click Apply at the bottom of the page to apply the fix. A message displayed on the page indicates that the fix has been successful. 6.3.1.5 Process PriorityIf the priority of a compute-bound process is too high, the process can consume all the CPU cycles on the node, affecting performance dramatically. On the other hand, if the priority of a process is too low, the process might not obtain enough CPU cycles to do its job, also affecting performance. When you select the Process Priority option, the Availability Manager displays the page shown in Figure 6-8. Figure 6-8 Process Priority Page 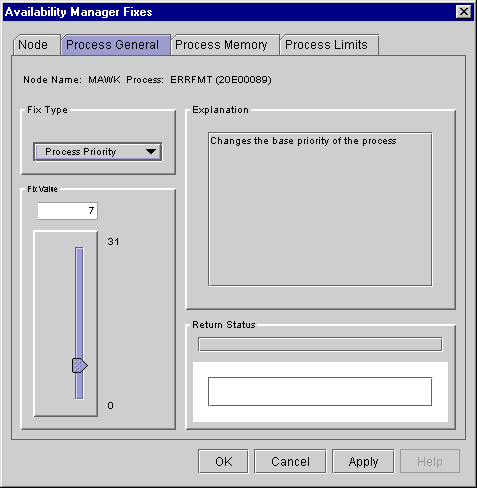
To change the base priority for a process, drag the slider on the scale to the number you want. The current priority number is displayed in a small box above the slider. You can also click the line above or below the slider to adjust the number by 1. When you are satisfied with the new base priority, click Apply at the bottom of the page to apply the fix. A message displayed on the page indicates that the fix has been successful. 6.3.2 Process Memory FixesThe following sections describe the Availability Manager fixes you can use to correct process memory problems:
6.3.2.1 Purge Working SetThis fix purges the working set to a minimal size. You can use this fix to reclaim a process's pages that are not in active use. If the process is in a wait state, the working set remains at a minimal size, and the purged pages become available for other uses. If the process becomes active, pages the process needs are page-faulted back into memory, and the unneeded pages are available for other uses. Be careful not to repeat this fix too often: a process that continually reclaims needed pages can cause excessive page faulting, which can affect system performance. When you select the Purge Working Set option, the Availability Manager displays the page shown in Figure 6-9. Figure 6-9 Purge Working Set Page 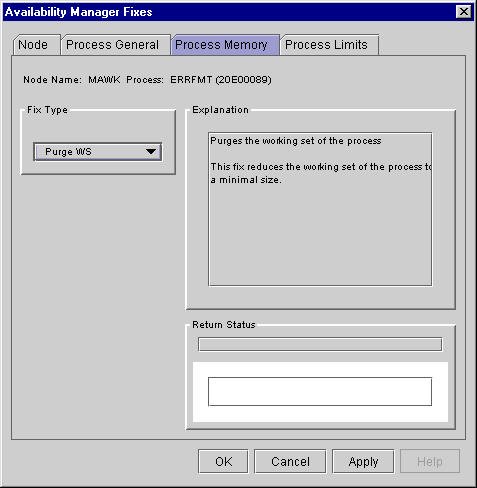
After reading the explanation on the page, click Apply at the bottom of the page to apply the fix. A message displayed on the page indicates that the fix has been successful. 6.3.2.2 Adjust Working SetAdjusting the working set of a process might prove to be useful in situations similar to the following ones:
When you select the Adjust Working Set fix, the Availability Manager displays the page shown in Figure 6-10. Figure 6-10 Adjust Working Set Page 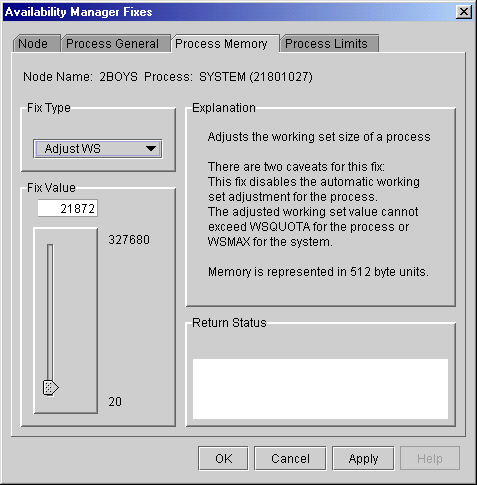
To perform this fix, use the slider to adjust the working set to the limit you want. You can also click the line above or below the slider to adjust the number by 1. When you are satisfied with the new working set limit, click Apply at the bottom of the page to apply the fix. A message displayed on the page indicates that the fix has been successful. 6.3.3 Process Limits FixesIf a process is waiting for a resource, you can use a Process Limits fix to increase the resource limit so that the process can continue. The increased limit is in effect only for the life of the process, however; any new process is assigned the quota that was set in the UAF. When you click the Process Limits tab, you can select any of the following options: Direct I/O These fix options are described in the following sections. 6.3.3.1 Direct I/O Count LimitYou can use this fix to adjust the direct I/O count limit of a process. When you select the Direct I/O option, the Availability Manager displays the page shown in Figure 6-11. Figure 6-11 Direct I/O Count Limit Page 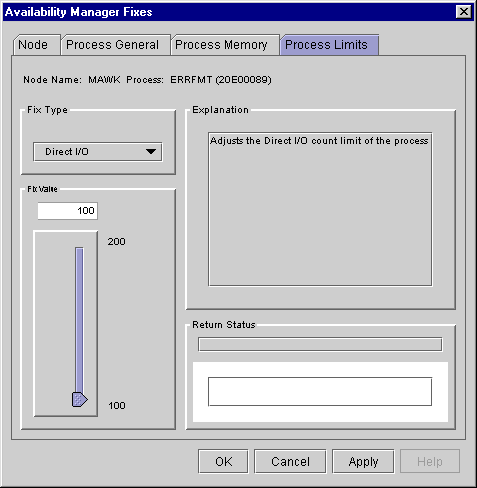
To perform this fix, use the slider to adjust the direct I/O count to the limit you want. You can also click the line above or below the slider to adjust the number by 1. When you are satisfied with the new direct I/O count limit, click Apply at the bottom of the page to apply the fix. A message displayed on the page indicates that the fix has been successful. 6.3.3.2 Buffered I/O Count LimitYou can use this fix to adjust the buffered I/O count limit of a process. When you select the Buffered I/O option, the Availability Manager displays the page shown in Figure 6-12.Figure 6-12 Buffered I/O Count Limit Page 
To perform this fix, use the slider to adjust the buffered I/O count to the limit you want. You can also click the line above or below the slider to adjust the number by 1. When you are satisfied with the new buffered I/O count limit, click Apply at the bottom of the page to apply the fix. A message displayed on the page indicates that the fix has been successful. 6.3.3.3 AST Queue LimitYou can use this fix to adjust the AST queue limit of a process. When you select the AST option, the Availability Manager displays the page shown in Figure 6-13.Figure 6-13 AST Queue Limit Page 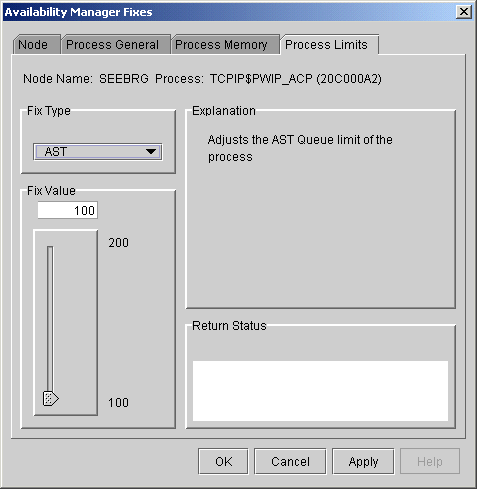
To perform this fix, use the slider to adjust the AST queue limit to the number you want. You can also click the line above or below the slider to adjust the number by 1. When you are satisfied with the new AST queue limit, click Apply at the bottom of the page to apply the fix. A message displayed on the page indicates that the fix has been successful. 6.3.3.4 Open File LimitYou can use this fix to adjust the open file limit of a process. When you select the Open File option, the Availability Manager displays the page shown in Figure 6-14.Figure 6-14 Open File Limit Page 
To perform this fix, use the slider to adjust the open file limit to the number you want. You can also click the line above or below the slider to adjust the number by 1. When you are satisfied with the new open file limit, click Apply at the bottom of the page to apply the fix. A message displayed on the page indicates that the fix has been successful. 6.3.3.5 Lock Queue LimitYou can use this fix to adjust the lock queue limit of a process. When you select the Lock option, the Availability Manager displays the page shown in Figure 6-15.Figure 6-15 Lock Queue Limit Page 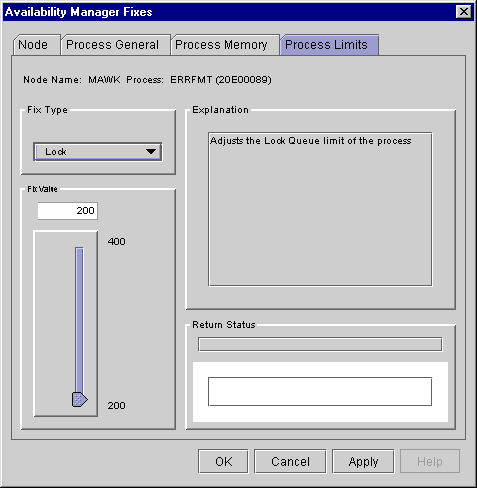
To perform this fix, use the slider to adjust the lock queue limit to the number you want. You can also click the line above or below the slider to adjust the number by 1. When you are satisfied with the new lock queue limit, click Apply at the bottom of the page to apply the fix. A message displayed on the page indicates that the fix has been successful. 6.3.3.6 Timer Queue Entry LimitYou can use this fix to adjust the timer queue entry limit of a process. When you select the Timer option, the Availability Manager displays the page shown in Figure 6-16.Figure 6-16 Timer Queue Entry Limit Page 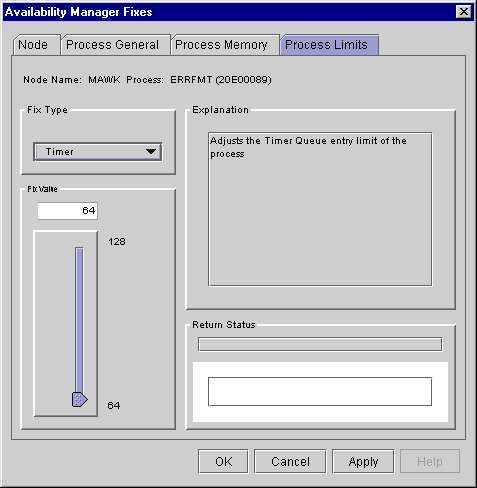
To perform this fix, use the slider to adjust the timer queue entry limit to the number you want. You can also click the line above or below the slider to adjust the number by 1. When you are satisfied with the new timer queue entry limit, click Apply at the bottom of the page to apply the fix. A message displayed on the page indicates that the fix has been successful. 6.3.3.7 Subprocess Creation LimitYou can use this fix to adjust the creation limit of the subprocess of a process. When you select the Subprocess option, the Availability Manager displays the page shown in Figure 6-17.Figure 6-17 Subprocess Creation Limit Page 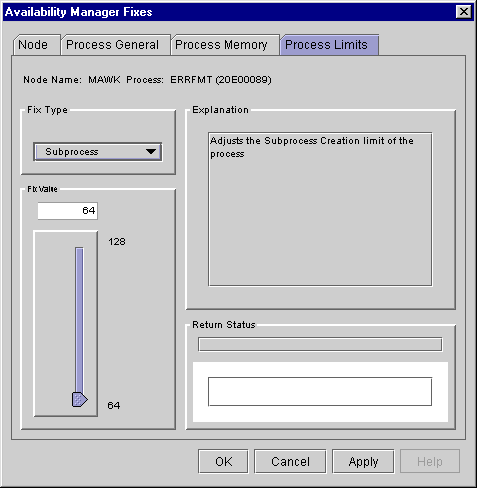
To perform this fix, use the slider to adjust the subprocess creation limit of a process to the number you want. You can also click the line above or below the slider to adjust the number by 1. When you are satisfied with the new subprocess creation limit, click Apply at the bottom of the page to apply the fix. A message displayed on the page indicates that the fix has been successful. 6.3.3.8 I/O ByteYou can use this fix to adjust the I/O byte limit of a process. When you select the I/O Byte option, the Availability Manager displays the page shown in Figure 6-18.Figure 6-18 I/O Byte Page 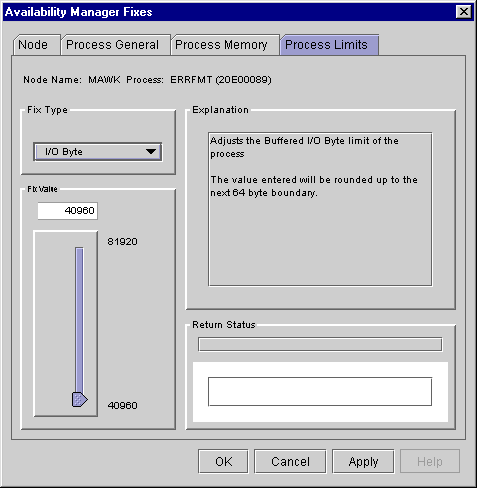
To perform this fix, use the slider to adjust the I/O byte limit to the number you want. You can also click the line above or below the slider to adjust the number by 1. When you are satisfied with the new I/O byte limit, click Apply at the bottom of the page to apply the fix. A message displayed on the page indicates that the fix has been successful. 6.3.3.9 Pagefile QuotaYou can use this fix to adjust the pagefile quota limit of a process. This quota is share among all the processes in a job. When you select the Pagefile Quota option, the Availability Manager displays the page shown in Figure 6-19.Figure 6-19 Pagefile Quota Page 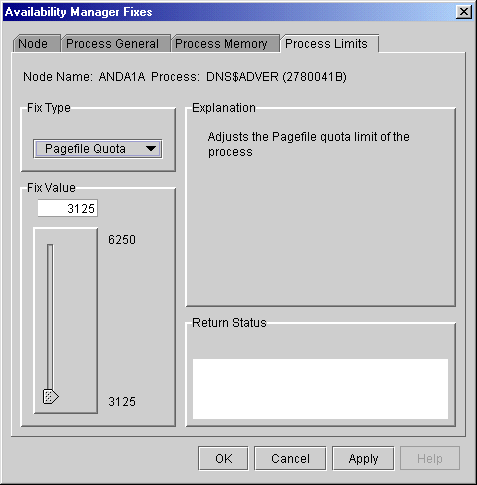
To perform this fix, use the slider to adjust the pagefile quota limit to the number you want. You can also click above or below the slider to adjust the fix value by 1. When you are satisfied with the new pagefile quota limit, click Apply at the bottom of the page to apply the fix. A message displayed on the page indicates that the fix has been successful. 6.4 Performing Cluster Interconnect FixesCluster interconnect fixes have been added to the Availability Manager beginning in Version 2.0. The following are categories of cluster interconnect fixes:
The following sections describe these types of fixes and tell how to access them and how to perform them. The descriptions also indicate whether or not the fix is currently available. 6.4.1 Port Adjust Priority FixTo access the Port Adjust Priority fix, right-click a data item in the local port data display line (see Figure 4-3). The Availability Manager displays a popup menu with the Port Fix option. This page (Figure 6-20) allows you to change the cost associated with this port, which, in turn, affects the routing of cluster traffic. Figure 6-20 Port Adjust Priority Page 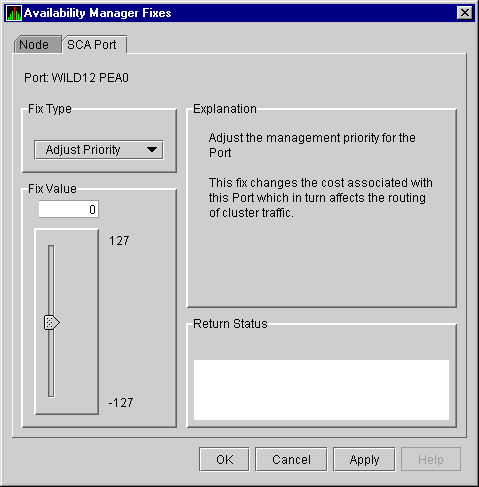
6.4.2 Circuit Adjust Priority FixTo access the Circuit Adjust Priority fix, right-click a data item in the local port data display line (see Figure 4-4). The Availability Manager displays a popup menu with the Circuit Fix option. This page (Figure 6-21) allows you to change the cost associated with this circuit, which, in turn, affects the routing of cluster traffic. Figure 6-21 Circuit Adjust Priority Page 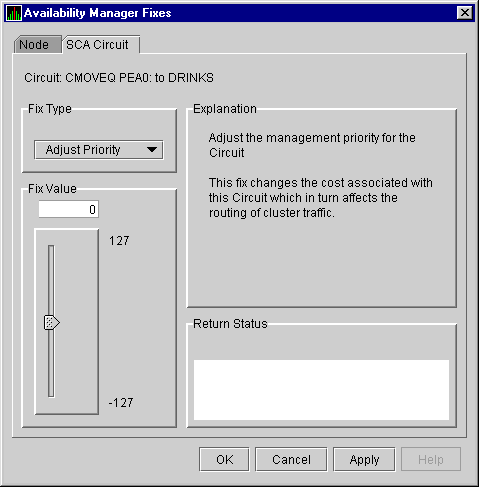
6.4.3 LAN Virtual Circuit Summary FixesTo access LAN virtual circuit summary fixes, right-click a data item in the LAN Virtual Circuit Summary category (see Figure 4-6). The Availability Manager displays a popup menu with the following options:
When you select VC LAN Fix..., the Availability Manager displays the first of several fix pages, the Maximum Transmit Window Size. By clicking Maximum Transmit Window Size, you can display a list of all the LAN VC summary fixes:
These fixes are described in the following sections. 6.4.3.1 LAN VC Maximum Transmit Window Size FixThis page (Figure 6-22) allows you to adjust the maximum transmit window size for the virtual circuit.
Figure 6-22 LAN VC Maximum Transmit Window Size Page 6.4.3.2 LAN VC Maximum Receive Window Size FixThis page, (Figure 6-23) allows you to adjust the maximum receive window size for the virtual circuit.
Figure 6-23 LAN VC Maximum Receive Window Size Page 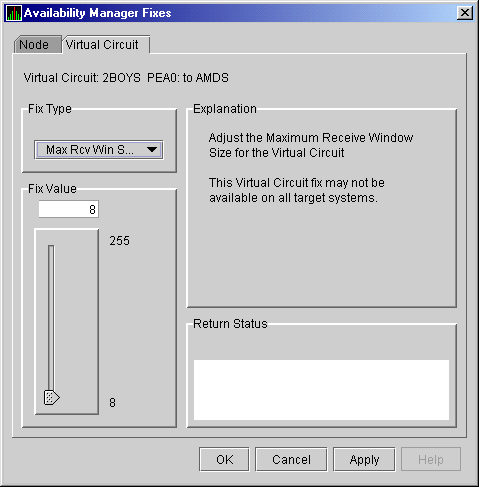
|