HP Availability Manager User's Guide
7.4 Customizing OpenVMS Data Collection
Note
Before you start this section, be sure to read the explanation of data
collection, events, thresholds, and occurrences in Chapter 1.
|
When you choose the Customize OpenVMS menu option in
the Application window (see Figure 7-1), by default the
Availability Manager displays the OpenVMS Data Collection Customization page,
shown in Figure 7-8, where you can select types of data you want to
collect for all of the OpenVMS nodes you are currently monitoring. You
can also change the default Availability Manager intervals at which data is
collected or updated.
Figure 7-8 OpenVMS Data Collection Customization Page

You can also customize data collection at the group and node levels
(see Section 7.1). Keep in mind that the customizations that you make
at the various levels override the ones set at the previous level (see
Table 7-1).
Table 7-2 identifies the page where each type of data collected
appears and indicates whether or not that type of data collection is a
default.
Table 7-2 Data Collection Choices
| Data Collected |
Default |
Page Where Data Is Displayed |
|
Cluster summary data
|
No
|
Cluster Summary page
|
|
CPU mode data
|
No
|
CPU Modes Summary page
|
|
CPU summary data
|
No
|
CPU Process States page
|
|
Disk status data
|
No
|
Disk Status Summary page
|
|
Disk volume data
|
No
|
Disk Volume Summary page
|
|
I/O data
|
No
|
I/O Summary page
|
|
Lock contention data
|
No
|
Lock Contention page
|
|
Memory data
|
No
|
Memory Summary page
|
|
Node summary data
|
Yes
|
Node pane, Node Summary page, and the top pane of the CPU, Memory, and
I/O pages
|
|
Page/Swap file data
|
No
|
I/O Page Faults page
|
|
Single disk data
|
Yes
1
|
Single Disk Summary page
|
|
Single process data
|
Yes
2
|
Data collection for the Process Information page
|
1Data is collected by default when you open a Single Disk
Summary page.
2Data is collected by default when you open a Single Process
page.
You can choose additional types of data to collect by selecting the
Collect check box on the Data Collection Customization page of the
Customize OpenVMS... menu (Figure 7-4). A check
mark indicates that data will be collected at the intervals described
in Table 7-3.
Table 7-3 Data Collection Intervals
| Interval (in seconds) |
Description |
|
Display
|
How often the data is collected when its corresponding display is
active.
|
|
Event
|
How often the data is collected when its corresponding display is not
active and when events are active.
|
|
NoEvent
|
How often the data is collected when its corresponding display is not
active and when events are not active.
|
You can enter a different collection interval by selecting a row of
data and clicking a value. Then delete the old value and enter a new
one.
If you change your mind and decide to return to the default collection
interval, select one or more rows of data items: then click Use
default values. The system displays the default values for all
the collection intervals.
When you finish customizing your data collection, click one of the
following buttons at the bottom of the page:
| Option |
Description |
|
OK
|
To confirm any changes you have made and exit the page.
|
|
Cancel
|
To cancel any changes you have made and exit the page.
|
|
Apply
|
To confirm and apply any changes you have made and not exit the page.
|
7.5 Customizing OpenVMS Data Filters
When you choose the Customize OpenVMS... menu option
and click the Filter tab, the Availability Manager displays a
page that allows you to display specific kinds of data by selecting
check boxes. The types of data filters available are as follows:
- CPU Filters
- Disk Status
- Disk Volume
- I/O
- Lock Contention
- Memory Filters
- Page/Swap File
Filters can vary depending on the type of data collected. For example,
filters might be process states or a variety of rates and counts. The
following sections describe data filters that are available for various
types of data collection.
You can also customize filters at the group and node levels (see
Section 7.1). Keep in mind that the customizations that you make at
the various levels override the ones set at the previous level (see
Table 7-1). The note on each filter page reminds you that:
"Changes to these settings will override the ... settings."
If you change your mind and decide to return to filter values set at a
previous level, click Use default values.
When you finish modifying a filters page, click one of the following
buttons at the bottom of the page:
| Option |
Description |
|
OK
|
To confirm any changes you have made and exit the page.
|
|
Cancel
|
To cancel any changes you have made and exit the page.
|
|
Apply
|
To confirm and apply any changes you have made and continue to display
the page.
|
7.5.1 OpenVMS CPU Filters
When you click CPU Filters on the Filter page, the
Availability Manager displays the OpenVMS CPU Filters page (Figure 7-9).
Figure 7-9 OpenVMS CPU Filters Page
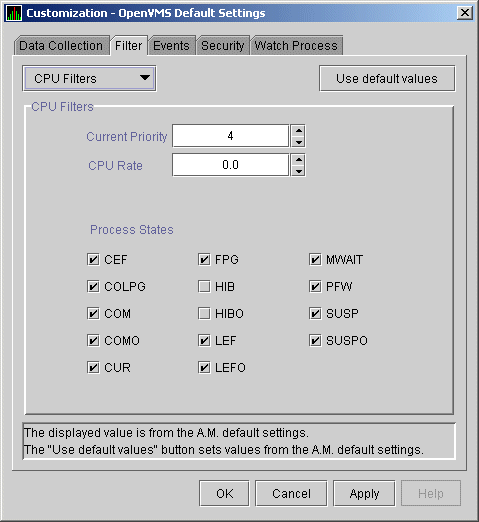
This page allows you to change and select values that are displayed on
the OpenVMS CPU Process States page (Figure 3-8).
You can change the current priority and rate of a process. By default,
a process is displayed only if it has a Current Priority of 4 or more.
Click the up or down arrow to increase or decrease the priority value
by one. The default CPU rate is 0.0, which means that processes with
any CPU rate used will be displayed. To limit the number of processes
displayed, you can click the up or down arrow to increase or decrease
the CPU rate by .5 each time you click.
The OpenVMS CPU Filters page also allows you to select the states of
the processes that you want to display on the CPU Process States page.
Select the check box for each state you want to display. (Process
states are described in Appendix B.)
When you click Disk Status on the Filter page, the
Availability Manager displays the OpenVMS Disk Status Filters page
(Figure 7-10).
Figure 7-10 OpenVMS Disk Status Filters Page
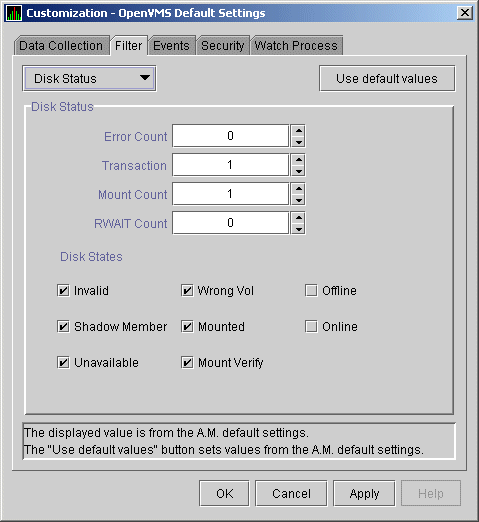
The OpenVMS Disk Status Summary page (Figure 3-14) displays the
values you set on this filters page.
This filters page lets you change the following default values:
| Data |
Description |
|
Error Count
|
The number of errors generated by the disk (a quick indicator of device
problems).
|
|
Transaction
|
The number of in-progress file system operations for the disk.
|
|
Mount Count
|
The number of nodes that have the specified disk mounted.
|
|
RWAIT Count
|
An indicator that a system I/O operation is stalled, usually during
normal connection failure recovery or volume processing of host-based
shadowing.
|
This filters page also lets you check the states of the disks you want
to display, as described in the following table:
| Disk State |
Description |
|
Invalid
|
Disk is in an invalid state (Mount Verify Timeout is likely).
|
|
Shadow Member
|
Disk is a member of a shadow set.
|
|
Unavailable
|
Disk is set to unavailable.
|
|
Wrong Vol
|
Disk was mounted with the wrong volume name.
|
|
Mounted
|
Disk is logically mounted by a MOUNT command or a service call.
|
|
Mount Verify
|
Disk is waiting for a mount verification.
|
|
Offline
|
Disk is no longer physically mounted in device drive.
|
|
Online
|
Disk is physically mounted in device drive.
|
7.5.3 OpenVMS Disk Volume Filters
When you click Disk Volume on the Filter page, the
Availability Manager displays the OpenVMS Disk Volume Filters page
(Figure 7-11).
Figure 7-11 OpenVMS Disk Volume Filters Page
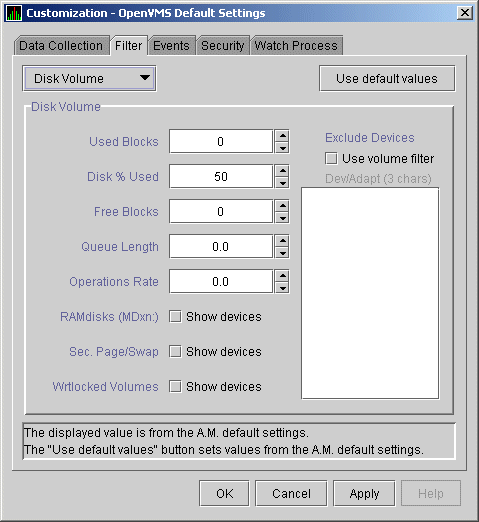
The OpenVMS Disk Volume Filters page allows you to change the values
for the following data:
| Data |
Description |
|
Used Blocks
|
The number of volume blocks in use.
|
|
Disk % Used
|
The percentage of the number of volume blocks in use in relation to the
total volume blocks available.
|
|
Free Blocks
|
The number of blocks of volume space available for new data.
|
|
Queue Length
|
Current length of I/O queue for a volume.
|
|
Operations Rate
|
The rate at which the operations count to the volume has changed since
the last sampling. The rate measures the amount of activity on a
volume. The optimal load is device specific.
|
You can also change options for the following to be on (checked) or off
(unchecked):
- RAMdisks (MDxn:): Show devices
- Wrtlocked Volumes: Show devices
- Sec. Page/Swap: Show devices
- Filtered Volumes: Use filter
7.5.4 OpenVMS I/O Filters
When you click I/O on the Filter page, the
Availability Manager displays the OpenVMS I/O Filters page (Figure 7-12).
Figure 7-12 OpenVMS I/O Filters Page
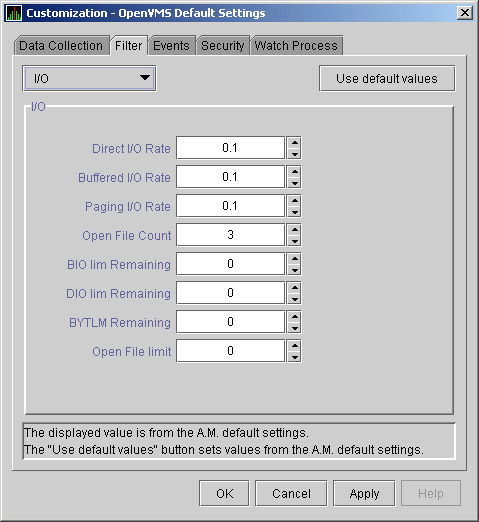
The OpenVMS I/O Summary page (Figure 3-12) displays the values you
set on this filters page.
This filters page allows you to change values for the following data:
| Data |
Description |
|
Direct I/O Rate
|
The rate of direct I/O transfers. Direct I/O is the average percentage
of time that the process waits for data to be read from or written to a
disk or tape. The possible state is DIO. Direct I/O is usually disk or
tape I/O.
|
|
Buffered I/O Rate
|
The rate of buffered I/O transfers. Buffered I/O is the average
percentage of time that the process waits for data to be read from or
written to a slower device such as a terminal, line printer, mailbox.
The possible state is BIO. Buffered I/O is usually terminal, printer
I/O, or network traffic.
|
|
Paging I/O Rate
|
The rate of read attempts necessary to satisfy page faults (also known
as Page Read I/O or the Hard Fault Rate).
|
|
Open File Count
|
The number of open files.
|
|
BIO lim Remaining
|
The number of remaining buffered I/O operations available before the
process reaches its quota. BIOLM quota is the maximum number of
buffered I/O operations a process can have outstanding at one time.
|
|
DIO lim Remaining
|
The number of remaining direct I/O limit operations available before
the process reaches its quota. DIOLM quota is the maximum number of
direct I/O operations a process can have outstanding at one time.
|
|
BYTLM Remaining
|
The number of buffered I/O bytes available before the process reaches
its quota. BYTLM is the maximum number of bytes of nonpaged system
dynamic memory that a process can claim at one time.
|
|
Open File limit
|
The number of additional files the process can open before reaching its
quota. FILLM quota is the maximum number of files that can be opened
simultaneously by the process, including active network logical links.
|
7.5.5 OpenVMS Lock Contention Filters
The OpenVMS Lock Contention Filters page allows you to remove (filter
out) resource names from the Lock Contention page (Figure 3-19).
When you click Lock Contention on the Filter page, the
Availability Manager displays the OpenVMS Lock Contention Filters page
(Figure 7-13).
Figure 7-13 OpenVMS Lock Contention Filters Page
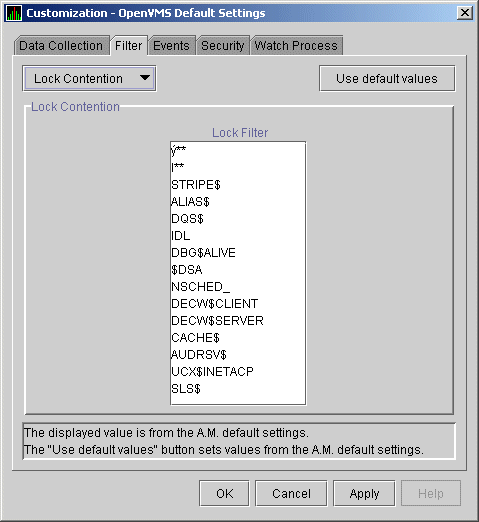
Each entry on the Lock Contention Filters page is a resource name or
part of a resource name that you want to filter out. For example, the
STRIPE$ entry filters out any value that starts with the characters
STRIPE$. To redisplay original entries, click Use default
values.
When you click Memory Filters on the Filter page, the
Availability Manager displays the OpenVMS Memory Filters page (Figure 7-14).
Figure 7-14 OpenVMS Memory Filters Page
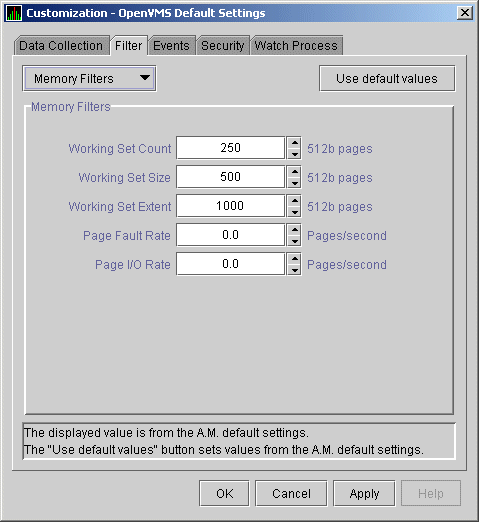
The OpenVMS Memory page (Figure 3-10) displays the values on this
filters page.
The OpenVMS Memory Filters page allows you to change values for the
following data:
| Data |
Description |
|
Working Set Count
|
The number of physical pages or pagelets of memory that the process is
using.
|
|
Working Set Size
|
The number of pages or pagelets of memory the process is allowed to
use. The operating system periodically adjusts this value based on an
analysis of page faults relative to CPU time used. An increase in this
value in large units indicates a process is receiving a lot of page
faults and its memory allocation is increasing.
|
|
Working Set Extent
|
The number of pages or pagelets of memory in the process's WSEXTENT
quota as defined in the user authorization file (UAF). The number of
pages or pagelets will not exceed the value of the system parameter
WSMAX.
|
|
Page Fault Rate
|
The number of page faults per second for the process.
|
|
Page I/O Rate
|
The rate of read attempts necessary to satisfy page faults (also known
as page read I/O or the hard fault rate).
|
7.5.7 OpenVMS Page/Swap File Filters
When you click Page/Swap File on the Filter page, the
Availability Manager displays the OpenVMS Page/Swap File Filters page
(Figure 7-15).
Figure 7-15 OpenVMS Page/Swap File Filters Page
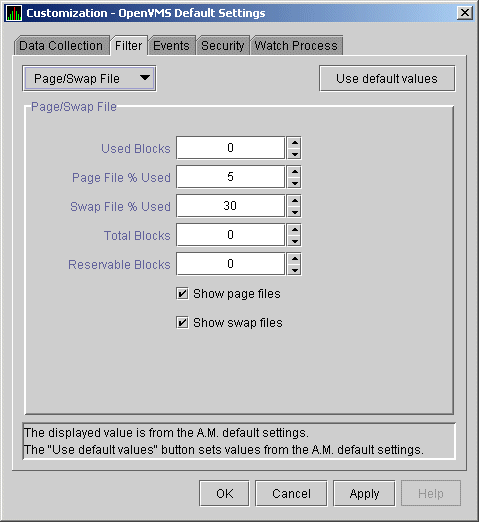
The OpenVMS I/O Summary page (Figure 3-12) displays the values that
you set on this filters page.
This filters page allows you to change values for the following data:
| Data |
Description |
|
Used Blocks
|
The number of used blocks within the file.
|
|
Page File % Used
|
The percentage of the blocks from the page file that have been used.
|
|
Swap File % Used
|
The percentage of the blocks from the swap file that have been used.
|
|
Total Blocks
|
The total number of blocks in paging and swapping files.
|
|
Reservable Blocks
|
Number of reservable blocks in each paging and swapping file currently
installed. Reservable blocks can be logically claimed by a process for
a future physical allocation. A negative value indicates that the file
might be overcommitted. Note that a negative value is not an immediate
concern but indicates that the file might become overcommitted if
physical memory becomes scarce.
Note: Reservable blocks are not used in more recent versions of
OpenVMS.
|
You can also select (turn on) or clear (turn off) the following options:
- Show page files
- Show swap files
7.6 Customizing Events and User Notification of Events
You can customize a number of characteristics of the events that are
displayed in the Event pane of the Application window (Figure 1-1).
You can also use customization options to notify users when specific
events occur.
When you choose the Customize OpenVMS... or
Customize Windows NT... option from the Application
window's Customize menu, the Availability Manager
displays a tabbed page similar to the one shown in Figure 7-16.
Figure 7-16 Events Customization Page
On OpenVMS systems, you can also customize events at the group and node
levels. Keep in mind that, for a group, the events that you customize
at the group level override the events customized at the previous level
(see Table 7-1).
You can change the values for any data that is available (not dimmed)
on this page.
The following table describes the data you can change:
| Data |
Description |
|
Severity
|
Controls the severity level at which events are displayed in the Event
pane. By default, all events are displayed. Increasing this value
reduces the number of event messages in the Event pane and can improve
perceived response time.
|
|
Occurrence
|
Each Availability Manager event is assigned an
occurrence value,
that is, the number of consecutive data samples that must exceed the
event threshold before the event is signaled.
By default, events have low occurrence values. However, you might find
that a certain event indicates a problem only when it occurs repeatedly
over an extended period. You can change the occurrence value assigned
to that event so that the Availability Manager signals it only when necessary.
For example, suppose page fault spikes are common in your
environment, and the Availability Manager frequently signals intermittent
HITTLP, total page fault rate is high events. You could change
the event's occurrence value to 3, so that the total page fault rate
must exceed the threshold for three consecutive collection intervals
before being signaled to the event log.
To avoid displaying insignificant events, you can customize an event
so that the Availability Manager signals it only when it occurs continuously.
|
|
Threshold
|
Most events are checked against only one threshold; however, some
events have dual
thresholds, where the event is triggered if either one is true. For
example, for the
LOVLSP, node disk volume free space is low event, the
Availability Manager checks both of the following thresholds:
- Number of blocks remaining
- Percentage of total blocks remaining
|
|
Event escalation action
|
You can enter one of the following values:
- None: Take no action if this event occurs.
- Opcom:
Not yet implemented.
- User: If the event occurs, the Availability Manager refers to the
"User Action" field to determine what action to take.
|
|
User Action
|
When the "Event escalation action" field is set to User,
User Action is no longer dimmed. You can enter the name of a procedure
to be executed if the event displayed at the top of the page occurs. To
use this field, see the instructions in Section 7.6.2.
|
The "Event explanation and investigation hints" section of
the Event Customization page, which is not customizable, includes a
description of the event displayed and a suggestion for how to correct
any problems that the event signals.
|