 |
Getting Started With the New Desktop
Getting Started With the New Desktop
1.7 APIs and Application Integration Services
A subset of CDE application programming interfaces (APIs) and
application integration services is available with the New Desktop
(see Section 5.2).
In addition to these new APIs and application integration services, all
the DECwindows Motif APIs and application integration services are
available from the New Desktop.
The following types of documentation are included in the DECwindows
Motif kit to support the New Desktop:
- Online introduction in Help
- Online reference pages (also known as manpages)
- Help for all CDE applications
- Help for all DECwindows applications
- CDE documentation set in HTML format
- DECwindows Motif documentation set (most manuals) in Bookreader
format
- Printed copies of this manual and selected DECwindows Motif manuals
See the Guide to the DECwindows Motif Version 1.2--4 for OpenVMS CD--ROM for a list of all manuals provided on line. The
CDE documentation set that is provided on line is also available in
print. The same is true for the entire DECwindows Motif documentation
set.
This manual and the Guide to the DECwindows Motif Version 1.2--4 for OpenVMS CD--ROM are provided in printed format with
DECwindows Motif Version 1.2--4. Additional DECwindows Motif printed
documentation is available through service contracts or by ordering
from DECdirect, as described in the Preface of this manual.
Table 1-2 briefly describes the documentation and how to access or
order it.
For more information about the documentation, see the Bookreader
versions of Overview of DECwindows Motif for OpenVMS Documentation and the DECwindows Motif Version 1.2--4 for OpenVMS Release Notes, as described in this
table.
Table 1-2 Documentation for the New Desktop
| Documentation |
Description |
How to Access |
| Online Help |
|
Front Panel Help
|
Overview help for the CDE desktop; access to the help for all CDE
applications in the New Desktop; and access to Bookreader
|
Click on the Help icon on the Front Panel to display the Help Manager,
or display the Help subpanel and select an introductory topic, Help
Manager, or Bookreader. From the Help Manager, you can select
introductory topics and CDE application help.
|
|
CDE On Item Help
|
Brief description of icons and controls on Front Panel and within
applications
|
Click on On Item Help, then position the cursor on the icon or control
for which you want help and click; repeat these two steps for each
request for On Item help.
|
|
Application help (CDE and DECwindows)
|
Help menu for each application, including context-sensitive help for
objects within an application
|
Start the application and select Help from the menu bar; then make your
selection from the Help menu.
|
| Online Manuals and Reference Pages |
|
CDE online manuals
|
Documents prepared by the UNIX vendors who developed CDE
|
Use the Enhanced Mosaic web browser, as described in Section 1.8.2.
|
|
CDE online reference pages
|
Reference documentation for many CDE system commands, written by the
UNIX vendors who developed CDE
|
Select the reference page directory
1 from File Manager; then select the file you want to view.
From Application Manager, select Desktop Apps; then select Man Page
Viewer; and enter the name of the file you want to view.
|
|
DECwindows Motif online manuals
|
Digital documents
|
Click on the arrow above the Help icon on the Front Panel to display
the Help subpanel; then select the Bookreader icon, then select a
manual.
2
|
| Printed Manuals |
|
CDE printed manuals
|
Documents prepared by the UNIX vendors who developed CDE (with Digital
UNIX covers)
|
See Section 1.8.1 for the order numbers; then order them by following
the instructions in this Preface.
|
|
DECwindows Motif printed manuals
|
This manual, the
DECwindows Motif Version 1.2--4 for OpenVMS Installation
Guide, and the Guide to the DECwindows Motif Version 1.2--4 for OpenVMS CD--ROM are shipped with the software.
|
See the online version of the Overview of DECwindows Motif for OpenVMS Documentation for brief descriptions and
order numbers; then order them by following the instructions in this
Preface.
|
1The directory name is CDE$SYSTEM_DEFAULTS:[MAN].
2To use this selection method, the Bookreader system
logical, DECW$BOOK, must point to the directory where the Bookreader
files reside.
1.8.1 CDE Manuals
The CDE manuals and their Digital order numbers are listed in
Table 1-3. You can order them from Digital, as described in the
Preface of this manual.
Table 1-3 CDE Manuals With Order Numbers
| Title |
Order Number |
Pages |
|
Common Desktop Environment: User's Guide
|
AA-QTLNA-TE
|
374
|
|
Common Desktop Environment: Advanced User's and System
Administrator's Guide
|
AA-QTLQA-TE
|
324
|
|
Common Desktop Environment: Programmer's Overview
|
AA-QTLWA-TE
|
118
|
|
Common Desktop Environment: Programmer's Guide
|
AA-QTLXA-TE
|
204
|
|
Common Desktop Environment: Help System Author's and Programmer's
Guide
|
AA-QTLYA-TE
|
320
|
|
Common Desktop Environment: Internationalization Programmer's
Guide
|
AA-QTM2A-TE
|
166
|
|
Common Desktop Environment: Style Guide and Certification
Checklist
|
AA-QTM3A-TE
|
316
|
|
Common Desktop Environment: Product Glossary
|
AA-QTM4A-TE
|
144
|
1.8.2 Using Enhanced Mosaic to Access Manuals
To access this manual or any of the CDE manuals provided in HTML format
on the kit, use the Enhanced Mosaic web browser in the following way:
- Start the Application Manager and click on the DECwindows
Applications Group icon.
- Click on the Mosaic icon.
- From the File menu, choose the Open Local... item.
- In the Selection field, enter the following file specification:
device_name:[DOCUMENTATION.HTML]INDEX.HTML
|
where device-name is the name of the drive on which you
have placed your New Desktop CD-ROM. For example:
DKB700:[DOCUMENTATION.HTML]
|
- The set of titles is displayed; click on the title of the manual
that you want to open.
Chapter 2
Using the New Desktop
This chapter provides information about the following topics:
2.1 CDE User Applications in the New Desktop
The CDE user applications that are included in the New Desktop are
briefly described in this section. The focus of these descriptions is
on the differences that users accustomed to the DECwindows desktop
applications might experience. Differences between CDE on UNIX systems
and the New Desktop are described in Appendix A.
The login manager provides login and authentication processing for the
New Desktop in a manner similar to the login box provided with the
traditional DECwindows desktop. In addition to user authentication, it
also provides several options, as shown in Figure 2-1.
Figure 2-1 Login Dialog Box
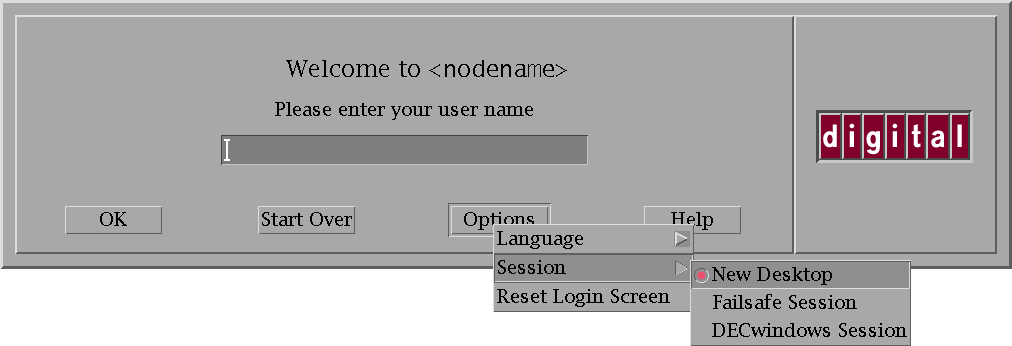
From the Options pull-down menu you can select:
- Language of the user interface
- Type of session you want
- Whether to reset the login screen
You can select from the following session types:
- New Desktop session
New Desktop is the default environment.
- Failsafe session
A failsafe session is a limited,
single-DECterm window environment that allows you to correct startup
problems in other environments.
- DECwindows session
A DECwindows session is the traditional
DECwindows environment.
Resetting the login screen is useful if you want to take advantage of
customizations made to the login screen or, in an X terminal
environment, if you want to remove the login box and terminate login
processing.
The Front Panel, shown in Figure 2-2, provides quick access to
applications and many other features. This section describes some
aspects of the Front Panel that may not be immediately apparent to
users accustomed to the DECwindows desktop. Here are some details to
help you get started.
Figure 2-2 Front Panel Details
- Moving the Front Panel
Position the cursor on the left or right
border and press MB1 to move the Front Panel. The Front Panel can be
moved up and down but cannot be rotated.
- A single click on any application icon (except Clock)
starts the application.
- Getting information about each icon
Position the cursor on any
icon and press mouse button 3 (MB3) to either get help about the icon
or add or delete a subpanel.
- Clock icon
The clock displays the current time. However, unlike the other
Front Panel controls, the clock is not a separate application. It is
part of the Window Manager and can be customized by editing the date
control definition in the Front Panel configuration file. (Refer to the
Common Desktop Environment: Advanced User's and System
Administrator's Guide for instructions.) The DECwindows Clock
application can be accessed from Application Manager's DECwindows Apps
group.
- Arrows above icons
The arrows indicate that a subpanel, or menu, is available.
Position the cursor on any arrow and single click. A subpanel is
displayed with an Install Icon item that enables you to add
applications to the menu. To close the subpanel, position the cursor on
the same arrow, which now faces down, and single click on it.
- Moving a subpanel
You can move any subpanel with mouse button 1 (MB1). Position the
cursor on the subpanel menu bar, press and hold MB1, drag the subpanel
to a new location, and release MB1.
- Relationship of Front Panel to workspaces
You can have as many as 64 different workspaces. The Front Panel is
the same for all workspaces and is displayed on each workspace.
- Relationship of applications to workspaces
You can put the same
application in more than one workspace. For example, you can put the
Text Editor in two workspaces and the clock in every workspace. You do
this by selecting either Occupy Workspace... or Occupy All Workspaces
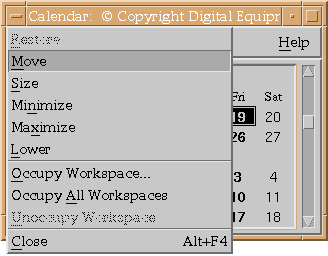
from the Window menu, shown in Figure 2-3. (You can access an
application's Window menu by clicking on the control in the top left
corner of its main window.)
- Managing workspaces
Pressing MB3 on a workspace control button displays a menu that
enables you to add, delete, or rename workspaces.
Figure 2-3 Window Manager Menu
2.1.3 Application Manager
Application Manager is a repository for applications and tools
available on a system. It supports application groups---those provided
with the New Desktop (shown in Table 2-1) and those you create (see
Section 4.4).
To view the Application Manager window, single click on the Application
Manager icon, shown in Figure 2-2. From the Application Manager
screen, you can select a group by double clicking on its icon. A screen
with icons representing each application in the group is displayed.
From this screen, you can start any application by double clicking on
its icon.
Table 2-1 Preconfigured Application Groups
| Group |
Contents |
|
DECwindows Apps
|
Applications such as DECwindows Mail, Calendar, FileView, Cardfiler,
and all other DECwindows applications supplied with DECwindows Motif
prior to Version 1.2--4
|
|
DECwindows Utilities
|
Most of the standard X utilities
|
|
Desktop Apps
|
CDE applications
|
|
Desktop Tools
|
Tools for common user tasks, such as comparing files, showing logical
names, and viewing images
|
For more information about Application Manager, see its online help and
the Common Desktop Environment: User's Guide.
The New Desktop's Calculator application offers the following
features:
- Three modes: Scientific (default), Logical, and Financial.
- Three trigonometric bases in Scientific mode.
- Four numeric bases: decimal, octal, hexadecimal, and binary.
- Ten memory registers for storing values, for use in each mode. The
values can be recalled and exchanged between a specified register and
the display area.
You can access the New Desktop's Calculator from the Personal
Applications subpanel. For more information about it, access its help.
The DECwindows desktop Calculator is still available. You can access it
from the DECwindows Apps group in Application Manager.
File Manager presents an iconic representation of files. It allows
intuitive user actions, such as dragging and dropping files. It also
allows files to be placed on the background of the screen for fast
access. You can open several views of different directories or of the
same directory.
File Manager supports four different representations of files:
- Large icons
- Small icons
- File name only
- Hierarchical tree view
You can choose the representation you prefer. If you frequently
navigate up and down your directory tree, you may prefer the
hierarchical directory view.
Note
All executable programs and all command procedures, when invoked from
File Manager by clicking on files with a .EXE or .COM extension, will
be started with an associated DECterm window to capture output. A
DECterm window is created regardless of the type of executable program
or command procedure. If you do not want the DECterm window to appear,
which is usually the case, you must create a new action definition file
and an associated action (stub) file for invoking the executable or the
command file. See Section 4.1 for information about creating action
definition files and action files.
|
2.1.5.2 File Filtering and Sorting
Files can be filtered and sorted by several criteria. To set filtering
options, select View from the File Manager menu bar; then, from the
View menu, select Set Filter Options. Filters for various data types
can be turned on or off. For example, you can choose to view only files
of the type COM_FILE or all files except files of the type COM_FILE
(see Section 3.4.2.1). The filtering options also allow filtering by an
explicit file type (for example, .RDB) and filtering by file name
versions. You can choose to see all versions of your files or only the
highest version.
To set sorting criteria, select View from the File Manager menu bar,
then select Set View Options. You can choose to sort alphabetically, by
data type, by modification date, or by size.
For more information about the capabilities of File Manager, see its
online help, the Common Desktop Environment: User's Guide, and
the Common Desktop Environment: Administrator's Guide.
File Manager supports dropping files on the Trash Can icon. Files that
are moved to the Trash Can are not actually deleted and are still
counted in your disk quota. To delete a file, you must shred the
contents of the Trash Can. If the Trash Can contents have not been
shredded, the files can be moved back to their original directory.
Help Viewer, accessible from the Front Panel (see Figure 2-2) and
from every CDE application, presents the help for all CDE applications
within the New Desktop. In addition to application help, several
other types of help are available, including Help on Help, Desktop
Introduction, and On Item Help.
To use On Item Help, select it from the Help subpanel, position the
cursor on the item for which you want help, and single click. Help is
displayed in a full-size window.
For more information about the Help Viewer, see the online help and the
Common Desktop Environment: User's Guide.
The Icon Editor, accessible from the subpanel above the DECterm icon,
enables you to create new icons or edit existing ones. You can resize
icons, add hotspots to icons, and grab screen images and edit them.
For more information about Icon Editor, see its online help and the
Common Desktop Environment: User's Guide.
The printer icon on the Front Panel (see Figure 2-2) is configured
to access the default printer for the desktop. The default printer is
defined by the value of the SYS$PRINT logical on the system.
You can select different print job options for the default printer by
using the Print Dialog. To access the Print Dialog, click on its icon
on the Front Panel.
To print a file using the default printer and the options specified for
it, drag the icon of the file you want to print and drop it on the
Print Dialog icon.
If you would like to use a different printer as your default printer,
see Section 3.4.5.
The Text Editor, accessible from the subpanel above the DECterm icon,
is a full-function editor. It offers the standard text editing
functions as well as more advanced features, including the
drag-and-drop function. The drag-and-drop function can be used for
moving text, copying text, and including entire files in another file.
If you would like to use a different editor as your default editor, see
Section 3.4.6.
Session Manager functions are available from the Startup menu within
Style Manager. From the Startup menu, you can select the application
configuration of your next session. The Startup menu options are shown
in Table 2-2.
Table 2-2 Startup Menu Options
| Option |
Description |
|
Resume current session
|
The next time you log in, your session will start up where you left off
when you logged out---as close as possible to the current configuration.
|
|
Return to home session
|
The next time you log in, your session will start up with a
configuration that you have defined as your home session. If you have
not defined a home session, the system default session is used.
|
|
Ask me at Logout
|
When you log out, you will be prompted to return to your current
session or your home session.
|
|
Logout Confirmation Dialog
|
You can specify whether you want to be prompted to confirm your intent
to log out.
|
|
Set Home Session
|
You can select your current session as your home session. You can do
this at any time during a session. Customizations that you made during
the session are included.
|
2.1.12 Style Manager
Style Manager enables you to control the following components of your
desktop environment:
- Font size
- Backdrops (for each workspace)
- Keyboard attributes, including the language variant and clicking
characteristics
- Mouse attributes
- Beep characteristics
- Screen characteristics, including blanking and backdrop to be used
when the screen is locked
- Window behavior, including how to make windows active (by pointing
or clicking)
- Startup attributes, as described in Section 2.1.11
- Security, which establishes the authorized users of your desktop
|