Software > OpenVMS Systems > Documentation > 732final > 6469 HP OpenVMS Systems Documentation |
Getting Started With the New Desktop
Chapter 4
|
||||||||||||||||||||||||||||||||||||||||||||||||||||||||||||||||||
The integration of applications is not required. You can run any existing DECwindows application from the New Desktop without making any changes to it. |
Minimal integration enables an application to be launched from the CDE desktop with one or more associated actions. To enable this to happen, certain application configuration files are required. You can achieve minimal integration for most applications by using the Create Action application to create the following configuration files for each application:
For some applications, you cannot complete minimal integration with Create Action. For example, you cannot use Create Action to create the action for an application if the command line requires a nonfile argument, such as a parameter. Nor can you use Create Action for an application if the data type must have actions associated with it other than Open and Print. In general, you can use Create Action to create the files you need for minimal integration and then edit the files to supply additional information that you cannot supply with Create Action. In some cases, you must create new files with your editor.
To understand the process of creating configuration files for integrating applications, it is important to understand how the following terms are used in the CDE interface and documentation:
ACTION dtmanpageview
{
LABEL           Man Page Viewer
ARG_COUNT       0
ICON            Dthover
TYPE            COMMAND
WINDOW_TYPE     NO_STDIO
EXEC_STRING     cde$system_defaults:[bin]dthelpview -man \
                -xrm "Dthelpview*manBox*columns: 100"
DESCRIPTION     The Man Page Viewer (Dtmanpageview) action \
                displays a man page in a Quick Help viewer window.
}
|
When creating action definition files for integrating an application, either with the Create Action application or directly with an editor, you must observe the following requirements on OpenVMS Alpha:
CDE$USER_DEFAULTS:[BIN]
CDE$SYSTEM_DEFAULTS:[BIN]
Create Action has the following limitations with regard to specifying arguments:
When you specify arguments, you must be sure to use the correct argument type. By default, prompted arguments (syntax: %"prompt string"%) are of type String, and explicit arguments (syntax: %Arg_n["optional prompt string"]%) are of type File. If you do not want the default argument type, you can specify a different type by using either of the following expressions:
|
%(File)"prompt string"% %(String)Arg_1% |
The %Args% keyword is similar to the %Arg_n% keyword except that the former is replaced with a list of arguments, separated by spaces, that is passed to the action. Whether or not this is appropriate depends on the specific DCL command.
As described in Chapter 9 of the Common Desktop Environment: Advanced User's and System Administrator's Guide, Create Action does the following:
You can access the Create Action application from the Desktop Tools application group in Application Manager. Figure 4-1 shows the main window of the Create Action application.
Figure 4-1 Create Action Main Window
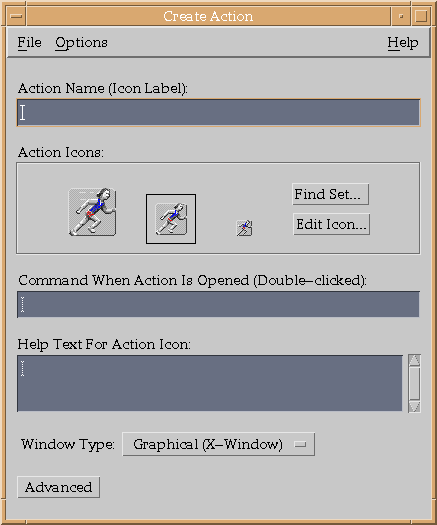
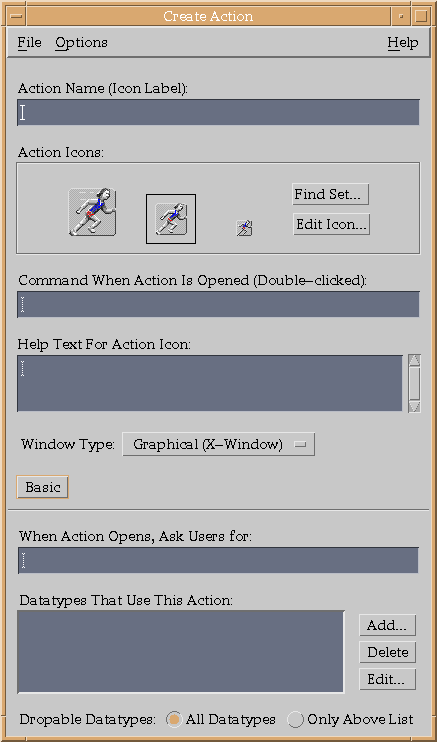
Additional fields are displayed if you select the Advanced option, which is located in the lower left corner of the Create Action main window. These additional fields are shown in Figure 4-2. Table 4-1 describes each field in the Create Action main window and in the expanded (Advanced option) window.
| Field Name | Purpose |
|---|---|
| Initial Fields | |
| Action Name (Icon Label): | This label is displayed next to the icon for the application. |
| Action icon: | This icon represents the application. With Find Set..., you can select an icon from the collection that is included with the New Desktop. With Edit Icon..., you can modify an existing icon or create a new one. |
| Command When Action Is Opened (Double-clicked): | The name of the application you want to access. This name can specify one or more file arguments as operands. The arguments must be specified in the format $ filename . For example: DIFF $1 $2 . |
| Help Text for Action Icon: | This help becomes the On Item help for the Action Icon. The text automatically wraps in the text field. You can explicitly add a continuation line by ending a line with a space, a backslash (\), and Return. If the backslash is not present, subsequent lines will not be displayed. |
| Window Type: | Select the windowing support option required by the application. You have a choice of three types of windows or no window. |
| Advanced | Select this field if your application uses data files and you want to create one or more data types for them. The Create Action window expands to display additional, advanced fields. |
| Advanced Option Fields | |
| When Action Opens, Ask Users for: | Supply a prompt if the application's command line has a required or optional file argument. Otherwise, leave it blank. |
| Datatypes That Use This Action: | If the action can accept any data type, select All Datatypes. If you want to modify any existing data types or create new ones, select Only Above List and then select Add. (Initially, the Datatypes That Use This Action list is empty.) When you select Add, a dialog box called Add Datatypes is displayed. |
Figure 4-2 Create Action Main Window With Advanced Option Fields
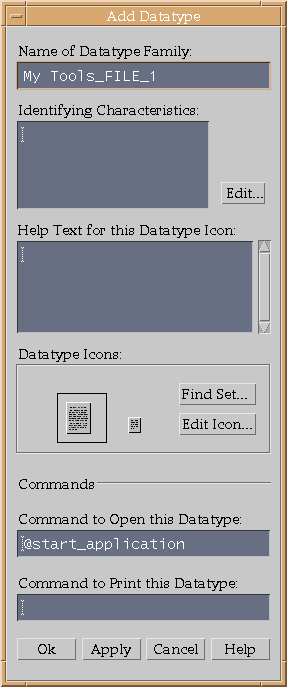
The Create Action application provides the Add Datatype dialog box for modifying an existing data type or creating a new one. The Add Datatype dialog box is shown in Figure 4-3, and the fields are described in Table 4-2.
Figure 4-3 Add Datatype Dialog Box
| Field | Purpose |
|---|---|
| Name of Datatype Family: | If you want to modify an existing data type and retain the same name, leave this field blank. If you want to create a new data type, supply a name. (The name cannot include spaces. The name is not visible to application users; it is used in the actions/data types database to identify the data type definition.) |
| Identifying Characteristics: | To display the Identifying Characteristics dialog box, click on the Edit button. |
| Help Text for this Datatype Icon: | This help becomes the On Item help for the Action Icon. |
| Datatype Icons: | With Find Set..., you can select an icon from the collection that is included with the New Desktop. With Edit Icon..., you can create a new icon or modify an existing one. |
| Command to Open this Datatype: | This command is the same that you supplied for Command When Action is Opened (Double-clicked): and will appear in this field. |
| Command to Print this Datatype: | Enter the Print Dialog command line to suit the application data type. |
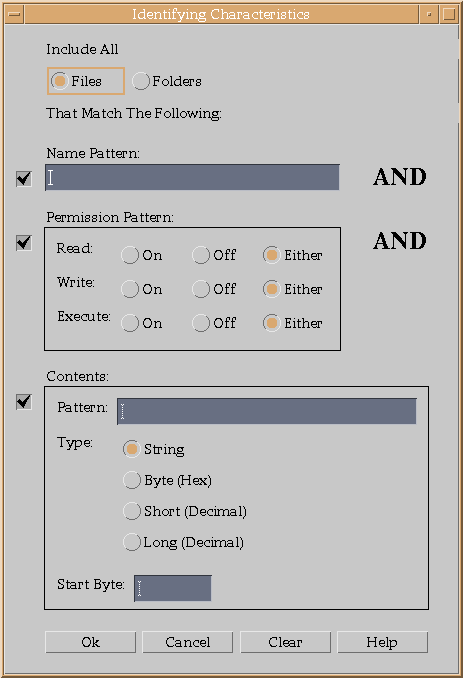
After you respond to the second prompt, Identifying Characteristics, by clicking on the Edit... button, the Identifying Characteristics dialog box is displayed, as shown in Figure 4-4. The fields of this dialog box are described in Table 4-3.
The characteristics are displayed in the Identifying Characteristics field of the Add Datatype dialog box, using the following codes:
Figure 4-4 Identifying Characteristics Dialog Box
| Field | Purpose |
|---|---|
| Files, Folders | The data type applies only to files or only to folders. |
| Name Pattern: | Data typing based on the file name. |
| Permissions Pattern: | Read, write, execute, or delete permission. The Either option for these permissions means that the permission does not matter. The permissions testing does not recognize OpenVMS access control lists (ACLs). |
| Contents: | A pattern to search for, the type of contents, and an optional starting point in the file. Note that this feature can carry a substantial performance penalty when changing or updating views. |
If you invoke the Icon Editor from the Create Action application and edit an icon file, the edits that you make are not automatically shown in the displayed icon when you exit from Icon Editor. After exiting from Icon Editor, you must choose Find Set... and select the newly edited icon to change the display and associate the edited icon with the action.
If you want to edit more than one size of the icon, make all the edits before you select Find Set. If you do not have a complete set of edited icons when you select Find Set..., the missing icons will not be displayed and you will not be able to create them from within the Create Action application.
Recommended integration means that an application is integrated with other CDE components, making it more consistent with the CDE desktop. Recommended integration includes making the following enhancements to your application:
Recommended integration will likely require code changes. This section briefly describes the resources for providing user interfaces in different languages and CDE style error messages. Chapter 5 describes the programming resources for providing the other enhancements.
The New Desktop provides user interfaces in different languages. The language and other culture-specific attributes, such as the symbols and rules for formatting monetary numeric information and dates, are defined in a file called a locale. Each locale is supported by a message catalog, which contains all the text an application will output for a particular language, and by resource files. The DEC C XPG4 localization utilities, briefly described in Table 4-4, are used to create locale files and message catalogs.
Users can specify the language of the user interface when they log in. From the login display, select Options, then select Language. The languages installed on your system, as defined in the locale files, are displayed. You can then select the language for the user interface on your system.
The default locale is the C locale. The notation .lang is used in file specifications in this manual to indicate the locale variable. In the CDE documentation, %L and <lang> are used to indicate the locale variable. |
| Utility | Purpose |
|---|---|
| GENCAT |
Merges one or more message-text source files into a message catalog
file. The message-text source files use a default file type of .MSG.
The message catalog file uses a default file type of .CAT. The GENCAT
syntax is:
GENCAT msgfile [,...] catfile |
| ICONV | Depending on the option that you specify, ICONV either compiles conversion table files (ICONV COMPILE) or converts characters from one codeset to another (ICONV CONVERT). A conversion table file defines how characters in one codeset are converted to characters in another codeset. |
| LOCALE |
Depends on the option that you specify:
|
The locale files are in the directory defined by the logical name SYS$I18N_LOCALE. For more information about the DEC C XPG4 localization utilities, see the OpenVMS Version 6.2 New Features Manual or the OpenVMS Version 7.0 New Features Manual.
New Desktop applications follow a common model for presenting error messages and warnings. Users expect messages to be displayed in message footers, error dialog boxes, or warning dialog boxes, with further explanations in online help, when appropriate. For details about displaying error messages in applications and linking message dialogs to online help, see the Common Desktop Environment: Programmer's Guide.
Optional integration enables you to leverage CDE services to perform specialized tasks, such as providing certain graphical user interface functions and managing multiple workspaces. Custom widgets provide the specialized graphical user interface functions. The Workspace Manager API provides the functions for managing multiple workspaces. For more information about these CDE services, see Chapter 5 and Appendix B of this guide, the Common Desktop Environment: Programmer's Overview, and the Common Desktop Environment: Programmer's Guide.
The New Desktop includes four application groups: DECwindows Apps, DECwindows Utilities, Desktop Apps, and Desktop Tools, as shown in Figure 4-5. Desktop Apps refers to the CDE applications and Desktop Tools refers to the CDE tools.
Figure 4-5 Application Manager
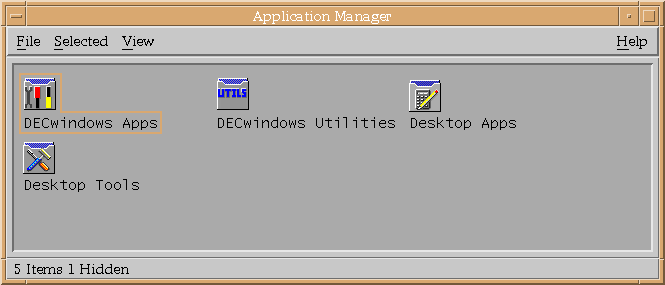
An application group is simply a directory containing action (stub) files. For Application Manager to recognize that a directory is an application group, the directory must reside in one of the application group root directories defined by the logical name DTAPPSEARCHPATH. The directory disk$:[user.DT.APPMANAGER] is one of the application group root directories.
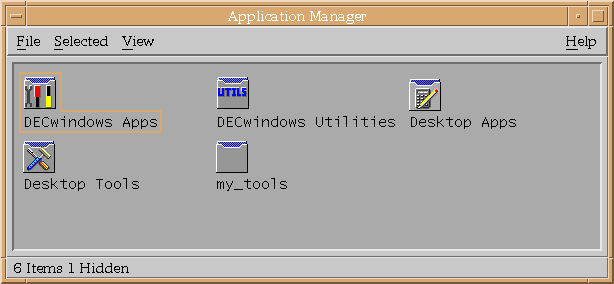
You can create additional application groups to be managed by Application Manager in the following way:
Every time you use this procedure, a new .DT file is added to your disk$:[user.DT.TYPES] directory. You might want to create one file, such as MY_TOOLS.DT, and merge all the actions into this file. A single file can simplify the management of an application group.
Figure 4-6 Application Manager With a New Application Group
| Previous | Next | Contents | Index |