Software > OpenVMS Systems > Documentation > 82final > 6297 HP OpenVMS Systems Documentation |
HP COBOL
|
| Previous | Contents | Index |
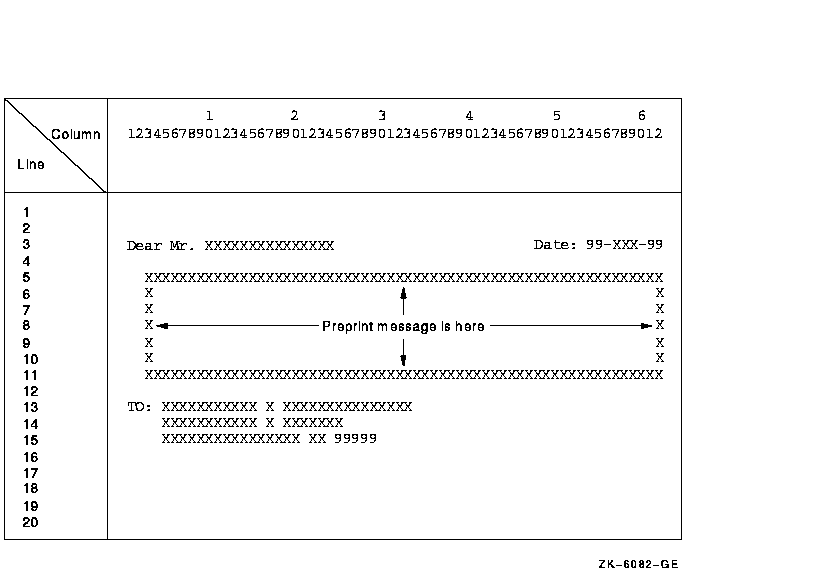
The first report, Figure 10-4, is a preprinted form letter that can be inserted into a business envelope. This report has a logical page length of 20 lines and a width of 80 characters. Note that this report uses only the first 15 lines on the page. Because this is a preprinted form, the program supplies only the following information:
Figure 10-4 A 20-Line Logical Page
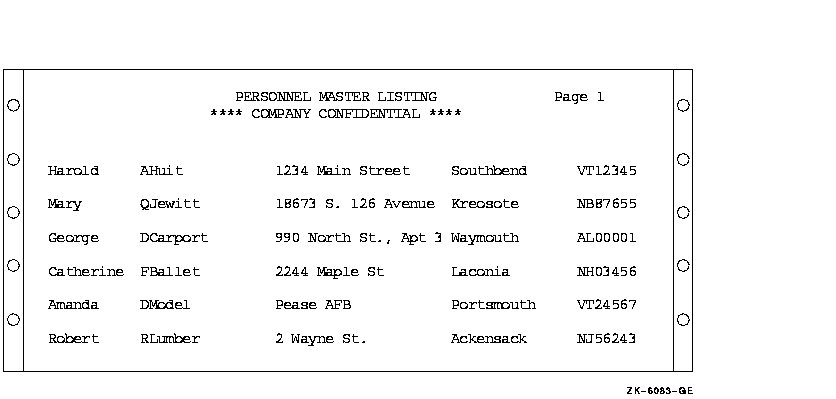
The second report, Figure 10-5, is a double-spaced master listing of all input records. While this report's logical page is identical to the default logical page for the system (in this case, 66 vertical lines and 132 horizontal characters), this report uses only the first 55 lines on the page. Both reports are output to a disk for later printing.
Figure 10-5 A Double-Spaced Master Listing
A linage-file report has sequential organization and access mode, and consists of one or more logical pages. An HP COBOL program that produces a linage-file report uses the LINAGE and LINAGE-COUNTER capabilities in addition to the facilities used for conventional reports.
In contrast to the conventional COBOL report, you can use the LINAGE clause to do the following:
Additionally, a linage-file report has a LINAGE-COUNTER special register assigned to it that monitors the number of lines written to the current logical page.
To program a linage report, you should understand how to do the following:
On OpenVMS, the linage file contains variable length with fixed control records. All advancing information is encoded in the fixed control portion of the record. <>
On Tru64 UNIX, the linage file contains variable length records. All advancing information is written to the file as blank lines. <>
The following sections discuss these topics in detail. Example 10-5 shows an example of a linage-file program.
Your program specifies the format of your report. Using the report layout worksheet you created, you can write an HP COBOL program that defines the logical page area and divides the page into logical page sections for a linage-file report. Figure 10-6 shows the logical page area and the four divisions of a linage-file report.
Figure 10-6 Logical Page Areas for a Linage-File Report

To define the number of lines on a logical page and to divide it into logical page sections, you must include the LINAGE clause as a File Description entry in your program. The LINAGE clause lets you specify the size of the logical page's top and bottom margins and the line where the footing area begins in the page body.
For example, to define how many lines you want your program to skip at the top or bottom of the logical page, use the LINAGE clause with either the LINES AT TOP or the LINES AT BOTTOM phrase. To define a footing area within the logical page, use the LINAGE clause with the WITH FOOTING phrase.
The LINES AT TOP phrase positions the printer on the first print line in the page body. The LINES AT BOTTOM phrase positions the printer at the top of the next logical page once the current page body is complete. The WITH FOOTING phrase defines a footing area in the logical page that controls page-overflow conditions. Additionally, you can insert specific text, such as footnotes or page numbers, on the bottom lines of your logical page.
In addition to defining the logical page area and the number of lines that appear on a page, you must be prepared to handle vertical spacing, horizontal spacing, logical page advancement, and page-overflow. The following sections discuss these topics in detail.
To control the horizontal spacing on a logical page, define every report item from your report layout worksheet in the Working-Storage Section of your HP COBOL program.
To control the vertical spacing on a logical page, use the WRITE statement. The WRITE statement controls whether one or more lines is skipped before or after your program writes a line of the report. For example, to print a line before advancing five lines, use the following:
WRITE... BEFORE ADVANCING 5 LINES. |
To print a line after advancing two lines, use the following:
WRITE... AFTER ADVANCING 2 LINES. |
The LINAGE-COUNTER special register is one method of tracking the number of lines that your program writes on a logical page. When you use the LINAGE-COUNTER special register, each time a line is written or skipped, the register is incremented by 1.
Before the program writes a new line, it checks the LINAGE-COUNTER value to see if the current logical page can accept the new line. If the value equals the maximum number of lines for the page body, the compiler positions the pointer on the first print line of the next page body. The compiler automatically resets this register to 1 each time your program begins a new logical page.
If you choose not to use the LINAGE-COUNTER register, you can advance to the next logical page using the WRITE statement, as explained in Section 10.6.4.
Linage-files automatically advance to the next logical page when the LINAGE-COUNTER value equals the number of lines on the logical page. However, HP COBOL also lets your program control logical page advancement with the WRITE statement.
To manually advance to the next logical page from any line in the current page body and position the printer on the first print line of the next page body, your program must include the WRITE statement with either the BEFORE ADVANCING PAGE clause or the AFTER ADVANCING PAGE clause. For an example of the WRITE statement, see Section 10.6.7.
Section 10.6.5 describes how to handle a page-overflow condition.
A page-overflow condition occurs when your program writes more lines than the logical page can accommodate. Although the compiler automatically advances to the next logical page when you use the LINAGE-COUNTER register, header information is not printed, and the next line begins on the next logical page.
If you want your program to advance to the next page and print page headers on the new page when the page is full, you should include routines in your program that limit the number of lines on each logical page.
Example 10-4 demonstrates how to include these routines in your program using the logical page shown in Figure 10-7.
Figure 10-7 A 28-Line Logical Page
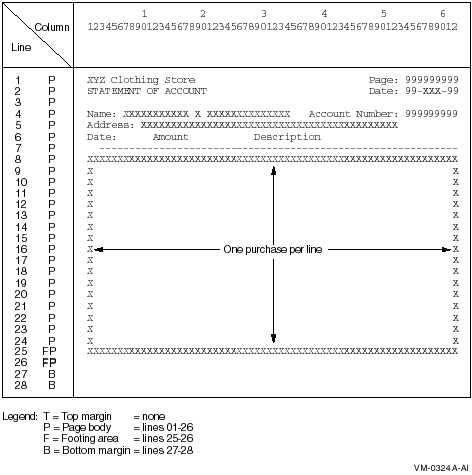
In Figure 10-7, each detail line of the report represents a separate purchase at the XYZ Clothing Store. Each page can contain from 1 to 18 purchase lines. Each customer can have an unlimited number of purchases. A total of purchases for each customer is to appear on line 25 of that customer's last statement page. Headers appear on the top of each page.
The input file, INPUT.DAT, consists of individual purchase records sorted in ascending order by customer account number and purchase date. In Example 10-4, the LINAGE clause defines a footing area so the program can check for an end-of-page condition. When the condition is detected, the program executes its header routine to print lines 1 to 7.
| Example 10-4 Checking for End-of-Page on a 28-Line Logical Page |
|---|
IDENTIFICATION DIVISION.
PROGRAM-ID. REPOVF.
ENVIRONMENT DIVISION.
INPUT-OUTPUT SECTION.
FILE-CONTROL.
    SELECT INPUT-FILE  ASSIGN TO "INPUT.DAT".
    SELECT REPORT-FILE ASSIGN TO "REPORT.DAT".
DATA DIVISION.
FILE SECTION.
FD  INPUT-FILE.
01  INPUT-RECORD.
    02  I-NAME.
        03  I-FIRST          PIC X(10).
        03  I-MID            PIC X.
        03  I-LAST           PIC X(15).
    02  I-ADDRESS.
        03  I-STREET         PIC X(20).
        03  I-CITY           PIC X(15).
        03  I-STATE          PIC XX.
        03  I-ZIP            PIC 99999.
    02  I-ACCOUNT-NUMBER     PIC X(9).
    02  I-PURCHASE-DATE      PIC XXXXXX.
    02  I-PURCHASE-AMOUNT    PIC S9(6)V99.
    02  I-PURCHASE-DESCRIP   PIC X(20).
FD  REPORT-FILE
    LINAGE IS 26 LINES
           WITH FOOTING AT 25
           LINES AT BOTTOM  2.
01  PRINT-LINE               PIC X(80).
WORKING-STORAGE SECTION.
01  HEAD-1.
    02  H1-LC    PIC 99.
    02  FILLER   PIC X(20) VALUE "XYZ Clothing Store  ".
    02  FILLER   PIC X(25) VALUE SPACES.
    02  FILLER   PIC X(6)  VALUE "Page: ".
    02  H1-PAGE  PIC Z(9).
01  HEAD-2.
    02  H2-LC    PIC 99.
    02  FILLER   PIC X(20) VALUE "STATEMENT OF ACCOUNT".
    02  FILLER   PIC X(25) VALUE SPACES.
    02  FILLER   PIC X(6)  VALUE "Date: ".
    02  H2-DATE  PIC X(9).

01  HEAD-3.
    02  H3-LC    PIC 99.
    02  FILLER   PIC X(6)  VALUE "Name: ".
    02  H3-FNAME PIC X(10).
    02  FILLER   PIC X     VALUE SPACE.
    02  H3-MNAME PIC X.
    02  FILLER   PIC X     VALUE SPACE.
    02  H3-LNAME PIC X(15).
    02  FILLER   PIC X(17) VALUE " Account Number: ".
    02  H3-NUM   PIC Z(9).
01  HEAD-4.
    02  H4-LC    PIC 99.
    02  FILLER   PIC X(9)  VALUE "Address: ".
    02  H4-STRT  PIC X(20).
    02  FILLER   PIC X     VALUE SPACE.
    02  H4-CITY  PIC X(15).
    02  FILLER   PIC X     VALUE SPACE.
    02  H4-STATE PIC XX.
    02  FILLER   PIC X     VALUE SPACE.
    02  H4-ZIP   PIC 99999.
01  HEAD-5.
    02  H5-LC    PIC 99.
    02  FILLER   PIC X(4)  VALUE "Date".
    02  FILLER   PIC X(7)  VALUE SPACES.
    02  FILLER   PIC X(6)  VALUE "Amount".
    02  FILLER   PIC X(10) VALUE SPACES.
    02  FILLER   PIC X(11) VALUE "Description".
01  HEAD-6       PIC X(61) VALUE ALL "-".
01  DETAIL-LINE.
    02  DET-LC   PIC 99.
    02  DL-DATE  PIC X(9).
    02  FILLER   PIC X     VALUE SPACE.
    02  DL-AMT   PIC $ZZZ,ZZZ.99-.
    02  FILLER   PIC X     VALUE SPACE.
    02  DL-DESC  PIC X(20).
01  TOTAL-LINE.
    02  TOT-LC   PIC 99.
    02  FILLER   PIC X(25) VALUE "Total purchases to date: ".
    02  TL       PIC $ZZZ,ZZZ,ZZZ.99-.
01  TOTAL-PURCHASES        PIC S9(9)V99.
01  PAGE-NUMBER            PIC S9(9).
01  HOLD-I-ACCOUNT-NUMBER  PIC X(9)   VALUE IS LOW-VALUES.
01  END-OF-FILE            PIC X      VALUE IS "N".
01  THESE-MANY             PIC 99     VALUE IS 1.

PROCEDURE DIVISION.
A000-BEGIN.
    OPEN INPUT  INPUT-FILE
         OUTPUT REPORT-FILE.
    DISPLAY " Enter date--DD-MMM-YY:".
    ACCEPT H2-DATE.
    PERFORM A100-READ-INPUT UNTIL END-OF-FILE = "Y".
A050-WRAP-UP.
    CLOSE INPUT-FILE
          REPORT-FILE.
    DISPLAY "END-OF-JOB".
    STOP RUN.
A100-READ-INPUT.
    READ INPUT-FILE AT END MOVE "Y" TO END-OF-FILE
                           PERFORM A400-PRINT-TOTALS
                           MOVE HIGH-VALUES TO I-ACCOUNT-NUMBER.
    DISPLAY INPUT-RECORD.
    IF END-OF-FILE NOT = "Y"
       AND I-ACCOUNT-NUMBER NOT = HOLD-I-ACCOUNT-NUMBER
              PERFORM A200-NEW-CUSTOMER.
    IF END-OF-FILE NOT = "Y"
       AND I-ACCOUNT-NUMBER = HOLD-I-ACCOUNT-NUMBER
              PERFORM A300-PRINT-DETAIL-LINE.
    MOVE I-ACCOUNT-NUMBER TO HOLD-I-ACCOUNT-NUMBER.
A200-NEW-CUSTOMER.
    IF HOLD-I-ACCOUNT-NUMBER = LOW-VALUES
           PERFORM A600-SET-UP-HEADERS
           PERFORM A500-PRINT-HEADERS
           PERFORM A300-PRINT-DETAIL-LINE
       ELSE
           PERFORM A400-PRINT-TOTALS
           PERFORM A600-SET-UP-HEADERS
           PERFORM A500-PRINT-HEADERS
           PERFORM A300-PRINT-DETAIL-LINE.
A300-PRINT-DETAIL-LINE.
    MOVE I-PURCHASE-DATE    TO DL-DATE.
    MOVE I-PURCHASE-AMOUNT  TO DL-AMT.
    MOVE I-PURCHASE-DESCRIP TO DL-DESC.
* At EOP this last detail line goes in footing area of current page
    WRITE PRINT-LINE FROM DETAIL-LINE
                     AT END-OF-PAGE PERFORM A500-PRINT-HEADERS.
    ADD I-PURCHASE-AMOUNT TO TOTAL-PURCHASES.
A400-PRINT-TOTALS.
    MOVE TOTAL-PURCHASES TO TL.
* Skip to footing area
    COMPUTE THESE-MANY = 25 - LINAGE-COUNTER.
    WRITE PRINT-LINE FROM TOTAL-LINE AFTER ADVANCING THESE-MANY LINES.
    MOVE 0 TO TOTAL-PURCHASES.
A500-PRINT-HEADERS.
    ADD 1 TO PAGE-NUMBER.
    MOVE PAGE-NUMBER TO H1-PAGE.
    WRITE PRINT-LINE FROM HEAD-1 AFTER ADVANCING PAGE.
    WRITE PRINT-LINE FROM HEAD-2.
    MOVE SPACES TO PRINT-LINE.
    WRITE PRINT-LINE.
    WRITE PRINT-LINE FROM HEAD-3.
    WRITE PRINT-LINE FROM HEAD-4.
    WRITE PRINT-LINE FROM HEAD-5.
    WRITE PRINT-LINE FROM HEAD-6.
A600-SET-UP-HEADERS.
    MOVE I-FIRST          TO H3-FNAME.
    MOVE I-MID            TO H3-MNAME.
    MOVE I-LAST           TO H3-LNAME.
    MOVE I-ACCOUNT-NUMBER TO H3-NUM.
    MOVE I-STREET         TO H4-STRT.
    MOVE I-CITY           TO H4-CITY.
    MOVE I-STATE          TO H4-STATE.
    MOVE I-ZIP            TO H4-ZIP.
|
| Previous | Next | Contents | Index |