Software > OpenVMS Systems > Documentation > 82final > 6543 HP OpenVMS Systems |
HP Advanced Server for OpenVMS
|
| Previous | Contents | Index |
The Configuration Manager allows you to specify the maximum percentage of the system's physical memory that the configuration may use, primarily for the number of clients and the data cache size. For example, if you set the value to 50%, and your Advanced Server currently has 200 MB of free memory available (when the Configuration Manager verifies the configuration), the Configuration Manager allows a maximum of 100 MB of memory to be available to support the number of clients and data cache size currently configured for the server.
If, in the preceding example, the Configuration Manager determines that 100 MB is not enough to support the currently configured client capacity and data cache size, then you can do either of the following:
You can specify from 1% to 100% of physical memory. If you set the maximum percentage value too high, other OpenVMS applications might not have enough memory to operate. The default setting is 80%.
To modify the percentage of physical memory the server may use, on the Basic Configuration Parameters screen, enter the percent value in the Percent of Physical Memory Used field.
The Configuration Manager allows you to specify the size of the data cache for the server's file data. A proper setting can decrease the amount of disk I/O, improving server response. You can set this value from 512 Kbytes to 131,072 Kbytes (128 Mbytes). The default setting is 8192 Kbytes (8 Mbtyes). HP recommends a minimum of 128 Kbytes of cache per concurrent client session. For example, if you expect 200 concurrent client sessions, set the data cache size to at least 25,600 Kbytes. When the Advanced Server starts, it allocates pages directly off the free page list to create the data cache. For more information about setting the data cache size, see Section 6.2.2.3.1, Monitoring Data Cache Use by the File Server.
To modify server data cache size, on the Basic Configuration Parameters screen, enter the number of Kbytes in the Data Cache Size field.
The Configuration Manager allows you to specify the maximum number of external authentication signon operations that can take place concurrently. External authentication allows the Advanced Server to do the logon validation for both network accounts and OpenVMS user accounts. For more information about external authentication, see Section 3.1.17, External Authentication.
You can enter any number from 2 through 999. The default value for this parameter is 10.
To modify the maximum number of concurrent signons, on the Basic Configuration Parameters screen, enter the new value in the Maximum Concurrent Signons field.
The Configuration Manager allows you to specify the base priority assigned to main server processes for scheduling purposes. Values from 9 to 12 are most appropriate. Server processes below base priority 9 can be preempted by interactive processes, and processes above base priority 12 will not receive their priority boosts.
To change the base process priority for the server, on the Basic Configuration Parameters screen, enter the value in the OpenVMS Process Priority field.
The Advanced Configuration Parameters screen allows you to modify configuration parameters that are less frequently modified. To change advanced parameters, select the Advanced command button on the Basic Configuration Parameters screen. The screen shown in Figure 7-2, Advanced Configuration Parameters Screen, appears.
Figure 7-2 Advanced Configuration Parameters Screen
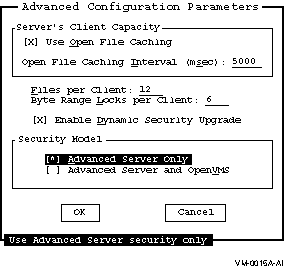
The following sections describe the advanced configuration parameters and how to set them.
When Open File Caching is enabled, the server delays the actual closing of files in case they are reopened shortly. Open File Caching is enabled by default. You can disable Open File Caching by deselecting the Use Open File Caching option on the Advanced Configuration Parameters screen.
To enable or disable Open File Caching, on the Advanced Configuration Parameters screen, select Use Open File Caching. The check box contains an X when open file caching is enabled.
When Open File Caching is enabled, you can specify the amount of time to delay the actual closing of files. The default setting is 5000 msec (milliseconds), which is 5 seconds. You can specify from 0 to 65,535 milliseconds.
To modify the Open File Caching interval, on the Advanced Configuration Parameters screen:
The Configuration Manager allows you to specify the average number of files open per client. This value is used to compute values for a number of other parameters having to do with open files and file I/O. You can specify any nonzero value for this parameter; the default average is 12 open files per client.
To modify the Files per Client value, on the Advanced Configuration Parameters screen, enter the new value in the Files per Client field.
The Configuration Manager allows you to specify the average number of byte range locks held per client. Byte range locks are used by client applications for locking portions of open shared files. You can specify any nonzero value for this parameter; the default is 6 byte range locks per client.
To modify the value of Byte Range Locks per Client, on the Advanced Configuration Parameters screen, enter the new value in the Byte Range Locks per Client field.
The Configuration Manager allows you to specify whether the server performs dynamic upgrading of network security on files it accesses. When enabled, any file the server accesses whose security is specified entirely according to PATHWORKS V5 for OpenVMS (LAN Manager) security, is upgraded to PATHWORKS V6 for OpenVMS (Advanced Server) security. The mapping file created by the V6 Upgrade utility must be in place for dynamic security upgrade to be performed. Refer to the Compaq PATHWORKS for OpenVMS Server Migration Guide for more information about the Upgrade utility. By default, dynamic security upgrade is not enabled.
To enable or disable Dynamic Security Upgrade, on the Advanced Configuration Parameters screen, select the Enable Dynamic Security Upgrade option. The check box contains an X when dynamic security upgrading is enabled.
The Configuration Manager lets you specify the security model that the server uses when checking access to a file, as shown in Table 7-1, Security Model Configuration Parameter Settings.
| Security Model Selected | What the Server Checks |
|---|---|
| Advanced Server Only | A security model in which only network permissions are checked. This is the default. |
| Advanced Server and OpenVMS | A security model in which both network permissions and OpenVMS protections are checked. |
For more information about the security models, see Section 4.1.2,Advanced Server Security Models.
To select the server security model, on the Advanced Configuration Parameters screen, select either Advanced Server Only or Advanced Server and OpenVMS.
You can save the Advanced Configuration Parameters you have modified, or you can quit without saving your changes.
To save advanced configuration parameters changes, on the Advanced Configuration Parameters screen, select the OK button. If any setting is not appropriate, the Configuration Manager displays an Information screen (such as shown in Figure 7-5, Information Screen. If all the settings are appropriate, the Basic Configuration Parameters screen reappears.
To ignore advanced configuration parameters changes, on the Advanced Configuration Parameters screen, select the Cancel button or press Ctrl/C. The Basic Configuration Parameters screen reappears.
The Transport Configuration Parameters screen allows you to specify the types of transports that are enabled on the server, and the type of wide-area network capabilities, if any. To change the transport parameters, select the Tranports command button on the Basic Configuration Parameters screen. The Transport Configuration Parameters screen appears, such as the one shown in Figure 7-3, Transport Configuration Parameters Screen.
Figure 7-3 Transport Configuration Parameters Screen
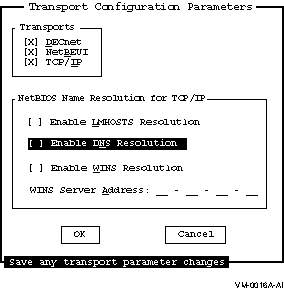
The transport configuration parameters are described in the following sections.
The Configuration Manager lets you enable or disable one or more of the following transports: DECnet, NetBEUI, TCP/IP. (Note that for wide area networking, the TCP/IP transport is required. DECnet also supports wide area networks but the functionality it provides is not as extensive as that provided by TCP/IP. NetBEUI is recommended only for use in small LAN-only environments (approximately 50 nodes or less).) For more information about transports and the protocols they support, see Appendix B, Network Protocols.
To enable and disable a transport, on the Transport Configuration Parameters screen, select the transport names. The transport is enabled if the check box contains an X.
The Configuration Manager lets you select name resolution for wide-area network support, using LMHOSTS, WINS, and DNS name resolution. (You can enable one, two, or all three of these name resolution methods.)
DNS is not configured as a replacement for WINS or LMHOSTS but rather as a supplement. DNS is used primarily for resolving node or computer names; it is not used for resolving domain names. With DNS, the Advanced Server still uses WINS, LMHOSTS, or both methods for resolving domain names and certain other names. |
For additional procedures required to set up wide-area networking, refer to the HP Advanced Server for OpenVMS Server Installation and Configuration Guide.
To enable or disable LMHOSTS, on the Transport Configuration Parameters screen, select Enable LMHOSTS Resolution. The checkbox contains an X when LMHOSTS Resolution is enabled.
To enable or disable DNS name resolution, on the Transport Configuration Parameters screen, select Enable DNS Resolution. The check box contains an X when DNS name resolution is enabled.
To enable or disable WINS name resolution, on the Transport Configuration Parameters screen, select Enable WINS Resolution. The check box contains an X when WINS name resolution is enabled.
When WINS name resolution is enabled, you must supply the TCP/IP address for the WINS Server.
To supply the TCP/IP address for the WINS Server, on the Transport Configuration Parameters screen:
If your Advanced Server runs in an OpenVMS Cluster in the domain and you have it set up for dynamic cluster load balancing using DNS, then enable the use of DNS for NetBIOS name resolution on all servers and clients. Remove any entries for the cluster alias from the LMHOSTS file and from the WINS database on WINS servers that might be used by clients. For information about setting up dynamic load balancing, see Section 2.4.4, Dynamic Cluster Load Balancing in WANs. |
You can save the changes you have made to the transport configuration, or you can quit without saving your changes.
To save transport configuration parameter changes, on the Transport Configuration Parameters screen, choose the OK command button. If any setting is not appropriate, the Configuration Manager displays an Information screen, such as the one shown in Figure 7-5, Information Screen. If all the settings are appropriate, the Basic Configuration Parameter screen reappears.
To ignore transport configuration parameter changes, on the Transport Configuration Parameters screen, choose the Cancel command button, or press Ctrl/C. The Basic Configuration Parameters screen reappears.
When you verify the configuration, the Configuration Manager determines whether the new configuration can be supported.
To verify the new configuration, on the Basic Configuration Parameters screen, select the Verify command button.
If the configuration can be supported, the Configuration Manager displays a Confirmation screen that allows you to accept or reject the new configuration. The Confirmation screen also tells you whether the server must be restarted for the new settings to take effect, or if AUTOGEN and/or reboot will be necessary to use the new configuration.
Figure 7-4 Confirmation Screen

If the configuration cannot be supported, or if it requires AUTOGEN, reboot, or both, the Configuration Manager displays an Information screen, such as the one shown in Figure 7-5, Information Screen, which allows you to view the configuration log file for details.
Figure 7-5 Information Screen

To view the log file, select the View Log File button. The log file shows the OpenVMS SYSGEN parameter changes required to support the new configuration, or why the configuration cannot be supported at all.
To dismiss the Information screen, select the OK button.
You can control the Configuration Manager using a mouse or using keys on the keyboard. Using the mouse, you can navigate through the Configuration Manager screens by pointing and clicking on the desired item to select (highlight) items in the menus, scroll boxes, or dialog boxes. (You must have a DECterm window or equivalent emulator.) Table 7-2, Keys for Controlling the Configuration Manager, lists the keys you use to control the action of the Configuration Manager.
| To... | Do the following... |
|---|---|
| Access the menu bar | Press F10, or press PF1 twice. Use the Tab key to select the first item on the menu bar. |
| Move from one menu to another | Use the left and right arrow keys. |
| Point to a menu item | Use the up and down arrow keys. |
| Select a menu item within a menu | Use the up and down arrow keys, then press the Enter or Return key. |
| Select a menu or an item within a menu | Move to the menu or menu item, then press the Enter or Return key. |
| Exit the menu bar | Press Ctrl/Z. |
| Point to buttons and items in a dialog box | Press the Tab key to advance, and PF1 Tab to back up. |
| Move within a set of buttons or check boxes | Use the arrow keys. |
| Choose among a set of options (radio buttons) | Advance to the currently selected option button using Tab or PF1 Tab. Then use the arrow keys to choose a new option within the set. |
| Change the state of a check box (on or off) | Advance to the check box, then press the space bar to toggle the state of the box. |
| Press a command button | Advance to the button and press the space bar or the Return key. This executes the button's command. |
| Enter new text in a text box | Advance to the text box using Tab or PF1 Tab, and enter the new text. Any previous text is erased. |
| Edit text or edit text in a text box | Advance to the text box using Tab or PF1 Tab. Use the arrow keys to move within existing text. |
| Refresh the display at any time | Press Ctrl/W. |
| Save any changes made in a dialog box, and return to the previous dialog box | At the OK command button, press the Enter or Return key. |
| Discard any changes made in a dialog box and return to the Basic Configuration parameters screen. | At the Cancel command button, press the Enter or Return key; or press Ctrl/C; or press the Enter or Return key at the Quit button on the Basic Configuration Parameters screen. |
Previous versions of the Advanced Server, such as the PATHWORKS for OpenVMS servers, stored server parameters in the LANMAN.INI file. The Advanced Server for OpenVMS stores most server parameters in the OpenVMS Registry, which is similar to the Windows NT Registry. If you are upgrading a system from PATHWORKS V6 for OpenVMS (Advanced Server) to Advanced Server for OpenVMS, the server parameters and settings in the existing LANMAN.INI file are migrated to the registry the first time you run the PWRK$CONFIG.COM configuration procedure, as described in the HP Advanced Server for OpenVMS Server Installation and Configuration Guide.
The OpenVMS Registry, like the Windows NT Registry, is a single clusterwide hierarchical database of configuration information about hardware and software (including both the operating system and applications). The OpenVMS Registry database stores information in a hierarchical structure of keys and associated values. The database is maintained by the OpenVMS Registry server. The OpenVMS Registry server controls all OpenVMS Registry operations, such as maintaining the OpenVMS Registry database, and creating, displaying, modifying, or deleting keys and values.
The OpenVMS Registry is accessible from Windows NT applications as well as from OpenVMS utilities and Advanced Server utilities. HP recommends using the PWRK$REGUTL utility to manage server parameters in the OpenVMS Registry. Section 7.3.4, Using the PWRK$REGUTL Utility to Manage Advanced Server Parameters in the OpenVMS Registry explains how to use this utility. (For more information about managing the OpenVMS Registry, refer to the HP OpenVMS System Manager's Manual or the COM, Registry, and Events for OpenVMS Developer's Guide (included in the OpenVMS Documentation CD-ROM).)
As does the Windows NT Registry, the OpenVMS Registry contains keys and values:
The OpenVMS Registry contains two predefined root keys:
Parameters defining the configuration of the Advanced Server are stored in the root key HKEY_LOCAL_MACHINE . Appendix A, Server Configuration Parameters, lists many of these server parameters and the keys under which each is defined.
Figure 7-6, Example Keys to Advanced Server Registry Values, shows the registry architecture on OpenVMS as displayed by the Windows NT registry editor.
Figure 7-6 Example Keys to Advanced Server Registry Values
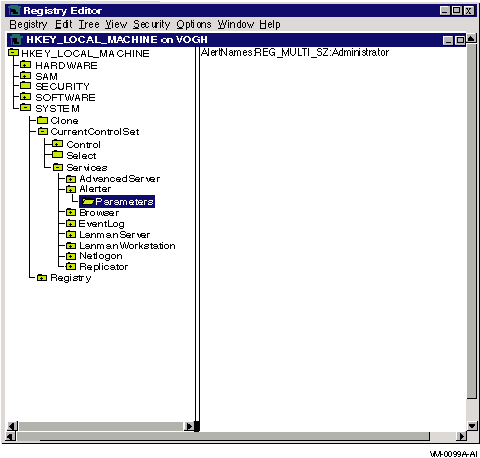
The left-hand pane displays the key hierarchy. The right-hand pane displays:
For more information about server configuration parameters and data that may be associated with them, see Appendix A, Server Configuration Parameters. (Note that this appendix does not list all the server parameters in the OpenVMS Registry. It lists those that you can modify.)
| Previous | Next | Contents | Index |