user_action_procedure is a Windows command or valid file
name. The file must contain one or more Windows command statements to
form a valid command procedure. (See the example in this section.)
Enter the name of the procedure you want Windows to execute using
the following format:
device:\(directory\filename.BAT
where:
- device is the disk on which the procedure is located.
- directory is the folder in which the procedure is located.
- filename.BAT is the name of the command file to be
executed.
Notes
The file name must follow Windows file-naming conventions. However, due
to the processing of spaces in the Java JRE, HP recommends that you do
not use spaces in a path or file name.
HP recommends that you use a
batch file to process and call procedures and applications.
|
- The arguments are listed in the table in Section 7.8.2.1.
The Availability Manager does not interpret the string contents. You
can supply any content in the string that the Windows command-line
interpreter accepts for the user account running the Data Analyzer.
However, if you include arguments in the User Action procedure, they
might displace or overwrite arguments supplied by the Availability
Manager.
You cannot specify positional command-line switches or arguments to the
AT command, although you can include switches in the User Action
procedure substring as qualifiers to the user-supplied command. This is
a limitation of both the Windows command-line interpreter and the way
the entire string is passed from the Availability Manager to Windows.
The Schedule service must be running on the Data Analyzer computer in
order to use the AT command. However, the Schedule service does not run
by default. To start the Schedule service, see the Windows
documentation for instructions in the use of the CONTROL
PANEL->SERVICES->SCHEDULE->[startup button].
Windows Example
To set up a user action, follow these steps:
- Select an event on the Event Customizations page, for example,
HIBIOR (see Figure 7-20).
- Change the Event escalation action to User.
- Enter the name of the program to run. For example:
Figure 7-20 User Action Example
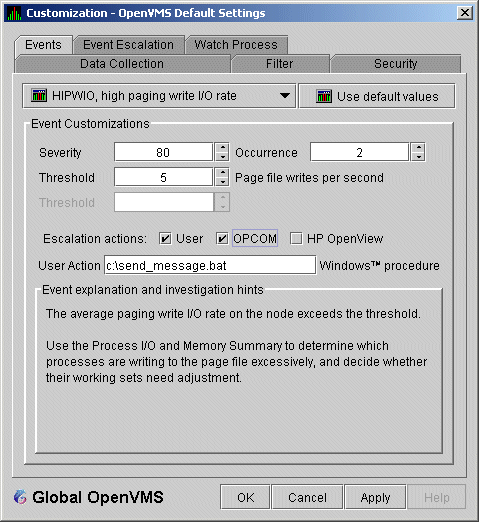
The command line parameters are automatically added when Availability
Manager passes the command to the command processor.
The contents of "send_message.bat" are the following:
net send affc17 "P4:system event: %1 %2 %3 %4"
|
On the target node, AFFC17, a message similar to the following is
displayed:

You can now apply the User Action to one node, all nodes, or a group of
nodes, as explained in Section 7.8.2.
The following sections explain how to change the following security
features:
- Passwords for groups and nodes
- Data Analyzer passwords for OpenVMS and Windows Data Collector nodes
- Security triplets on OpenVMS Data Collector nodes
- Password on a Windows Data Collector node
Note
OpenVMS Data Collector nodes can have more than one password: each
password is part of a security triplet. (Windows nodes allow you to
have only one password per node.)
|
7.9.1 Customizing Passwords for Groups and Nodes
For both the Windows and OpenVMS Customization Pages at the operating
system, group, or node level is a page similar to the one shown in
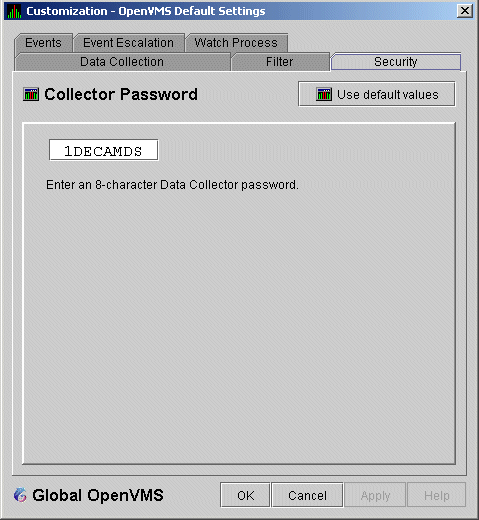
Figure 7-6. It contains a tab labeled Security. If
you select this tab on either system, the Availability Manager displays
a page similar to the one shown in Figure 7-21.
Figure 7-21 OpenVMS Security Customization
The level at which you can make password changes depends on whether you
select the Security tab at the operating system,
group, or node level.
Changing Passwords at the Group Level
If you monitor several groups, but the password for the nodes in one of
those groups is different from the password for nodes in other groups,
right-click the group you want to change, select
Customize from the list, select the
Security tab, and change the password. The new
password is then used for each node that is a member of that group.
Changing Passwords at the Node Level
As a second example, to change the password of one node in a group to a
different password than the other nodes in the group, right-click that
node, select Customize from the list, select the
Security tab, and change the password to one that
differs from the other nodes in the group. For that node, the new
password overrides the group password.
In the second password example, if you want to set the password for the
single node back to the password that the rest of the group uses, click
Use default values. The password value for the node
now comes from the group-level password setting. At this point, if you
change the group password, all nodes in the group get the new password.
Additional information about changing passwords for security is in
Section 7.9.
You can change the passwords that the Windows Data Analyzer uses for
OpenVMS Data Collector nodes and for Windows Data Collector nodes. The
following sections explain how to perform both actions.
When you select Customize OpenVMS... on the
Customize menu of the System Overview window, the
Availability Manager displays a default customization page. On it is a tab
marked Security, which, if you select it, displays the
OpenVMS Security Customization page (Figure 7-21).
To change the default password for the Data Analyzer to use to access
OpenVMS Data Collector nodes, enter a password of exactly 8 uppercase
alphanumeric characters. The Availability Manager will use this password to
access OpenVMS Data Collector nodes. This password must match the
password that is part of the OpenVMS Data Collector security triplet
( Section 1.3.3).
When you are satisfied with your password, click OK.
Exit the Availability Manager, and restart the application for the password to
take effect.
When you select Customize Windows NT... on the
Customize menu of the System Overview window, the
Availability Manager displays a Windows Security Customization page
(Figure 7-22).
Figure 7-22 Windows Security Customization
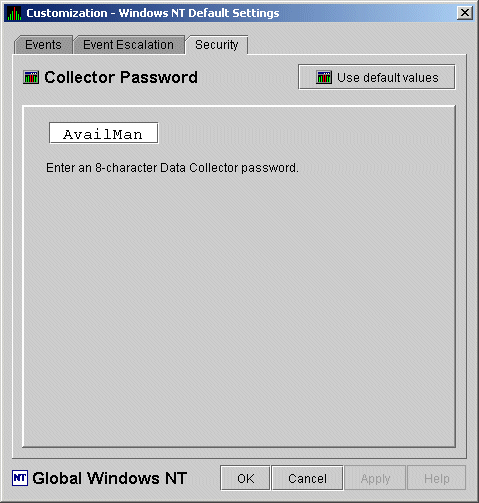
To change the default password for the Data Analyzer to use to access
Windows Data Collector nodes, enter a password of exactly 8
alphanumeric characters. Note that this password is case sensitive; any
time you type it, you must use the original capitalization.
This password must also match the password for the Windows Data
Collector node that you want to access. (See Section 7.9.3 for
instructions for changing that password.)
When you are satisfied with your password, click OK.
Exit and restart the Availability Manager for the password to take effect.
To change the Data Collector password in the Registry, follow these
steps:
- Click the Windows Start button. On the menu
displayed, first select Programs, then
Accessories, and then Command Prompt.
- Type
regedit
after the angle prompt (>).
The system displays a screen for the
Registry Editor, with a list of entries under My Computer.
- On the list displayed, expand the HKEY_LOCAL_MACHINE
entry.
- Double-click SYSTEM.
- Click CurrentControlSet.
- Click Services.
- Click damdrvr.
- Click Parameters.
- Double-click Read Password. Then type a new
8-character alphanumeric password, and click OK to
make the change.
- To store the new password, click Exit under File
on the main menu bar.
- On the Control Panel, select Services and then
Stop for "PerfServ."
- Again on the Control Panel, select Devices and
then Stop for "damdrvr."
- First restart damdrvr under "Devices"
and then restart PerfServ under "Services."
This step completes the change of your Data Collector password.
7.10 Monitoring Processes on a Node
As the Availability Manager monitors all the processes on the system,
you can configure the tool to notify you when particular processes are
created or exit on your system. The Availability Manager can watch up
to eight processes on an individual node or a node that is part of a
group that you select on the Group/Node Inclusion Lists page
(Figure 7-3). (You cannot, however, use this feature to notify you
about processes that should not be there.)
To use the Watch Process feature, right-click a node in the Node pane
to display the Node pane Customization Menu (Figure 7-23).
Figure 7-23 Node Customization Menu
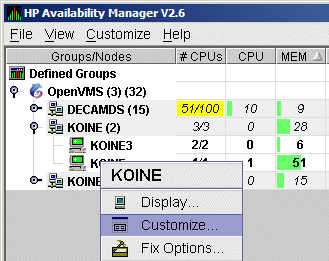
On this menu, select Customize to display the options
available for customizing individual nodes. One of these options is
watch process, which you can select to display the Watch Process page
(Figure 7-24).
Figure 7-24 Process Watch
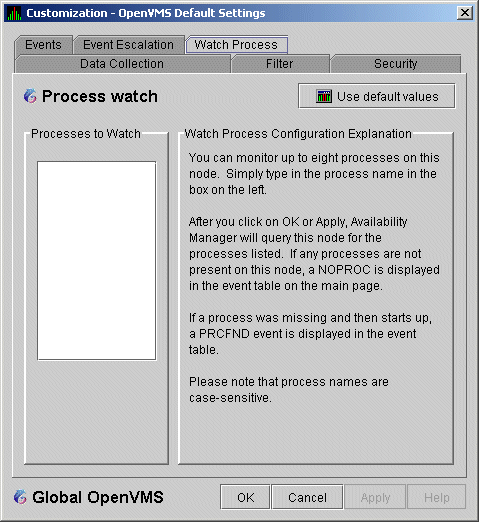
An explanation of the watch process feature is displayed on the right
side of the page. You can enter up to 8 processes in the box on the
left side of the page. After you enter process names, the Availability
Manager monitors these processes on the node that you have selected.
For a process that is not present on the node at the time you entered
it on the Watch Process page, the Availability Manager displays the
following event in the Event pane of the System Overview window
(Figure 2-1):
 NOPROC -- The process process-name has disappeared on
           the node node-name.
|
If a process that was signalled by a NOPROC event reappears on the
node, the Availability Manager displays the following event in the
Event pane of the System Overview window (Figure 2-1):
 PRCFND -- The process process-name has recently
           reappeared on the node node-name.
|