HP OpenVMS Availability Manager User's Guide
HP OpenVMS Availability Manager User's Guide
March 2010
This guide explains how to use HP Availability Manager software to
detect and correct system availability problems.
Revision/Update Information:
This guide supersedes the HP OpenVMS Availability Manager User's Guide, Version 3.1.
Operating System:
Data Analyzer:
Windows 2000 SP 4 or higher;
Windows XP SP 2;
OpenVMS Alpha Versions 8.2 and 8.3;
OpenVMS I64 Versions 8.3 and 8.3-1H1
Data Collector:
OpenVMS VAX Version 6.2 and 7.3;
OpenVMS Alpha Versions 8.2 and 8.3;
OpenVMS I64 Versions 8.3 and 8.3-1H1
Software Version:
HP Availability Manager Version 3.1
Hewlett-Packard Company Palo Alto, California
© Copyright 2010 Hewlett-Packard Development Company, L.P.
Confidential computer software. Valid license from HP required for
possession, use or copying. Consistent with FAR 12.211 and 12.212,
Commercial Computer Software, Computer Software Documentation, and
Technical Data for Commercial Items are licensed to the U.S. Government
under vendor's standard commercial license.
The information contained herein is subject to change without notice.
The only warranties for HP products and services are set forth in the
express warranty statements accompanying such products and services.
Nothing herein should be construed as constituting an additional
warranty. HP shall not be liable for technical or editorial errors or
omissions contained herein.
Intel and Itanium are trademarks or registered trademarks of Intel
Corporation or its subsidiaries in the United States and other
countries.
Microsoft and Windows are U.S. registered trademarks of Microsoft
Corporation.
Java is a US trademark of Sun Microsystems, Inc.
Printed in the US
ZK6552
Preface
Intended Audience
This guide is intended for system managers who install and use HP
Availability Manager software. It is assumed that the system managers
who use this product are familiar with Microsoft Windows terms and
functions.
Note
The term Windows as it is used in this manual refers
to either Windows 2000 or Windows XP but not to any other
Windows product.
|
Document Structure
This guide contains the following chapters and appendixes:
- Chapter 1 provides an overview of Availability Manager software,
including security features.
- Chapter 2 tells how to set up and configure the Data Analyzer and
Data server, how to start the Data Server and Data Analyzer, use the
main System Overview window, select a group of nodes and individual
nodes, and use online help.
- Chapter 3 tells how to select nodes and display node data; it
also explains what node data is.
- Chapter 4 tells how to display OpenVMS Cluster summary and
detailed data; it also explains what cluster data is.
- Chapter 5 tells how to display and interpret events.
- Chapter 6 tells how to take a variety of corrective actions,
called fixes, to improve system availability.
- Chapter 7 describes the tasks you can perform to filter, select,
and customize the display of data and events.
- Appendix A contains a table of CPU process states that are
referred to in Section 3.2.2.4 and in Section 3.3.1.
- Appendix B contains a table of OpenVMS and Windows events that
can be displayed in the Event pane discussed in Chapter 5.
- Appendix C describes the events that can be signaled for each
type of OpenVMS data that is collected.
Related Documents
The following manuals provide additional information:
- HP OpenVMS System Manager's Manual describes tasks for managing an OpenVMS system. It
also describes installing a product with the POLYCENTER Software Installation Utility.
- HP OpenVMS System Management Utilities Reference Manual describes utilities you can use to manage an OpenVMS
system.
- HP OpenVMS Programming Concepts Manual explains OpenVMS lock management concepts.
For additional information about HP OpenVMS products and services, see:
http://www.hp.com/go/openvms
|
Reader's Comments
HP welcomes your comments on this manual. Please send your comments or
suggestions to:
How to Order Additional Documentation
For information about how to order additional documentation, see:
http://www.hp.com/go/openvms/doc/order
|
Conventions
The following conventions are used in this guide:
|
Ctrl/
x
|
A sequence such as Ctrl/
x indicates that you must hold down the key labeled Ctrl while
you press another key or a pointing device button.
|
|
PF1
x
|
A sequence such as PF1
x indicates that you must first press and release the key
labeled PF1 and then press and release another key or a pointing device
button.
|
|
[Return]
|
In examples, a key name enclosed in a box indicates that you press a
key on the keyboard. (In text, a key name is not enclosed in a box.)
In the HTML version of this document, this convention appears as
brackets, rather than a box.
|
|
...
|
A horizontal ellipsis in examples indicates one of the following
possibilities:
- Additional optional arguments in a statement have been omitted.
- The preceding item or items can be repeated one or more times.
- Additional parameters, values, or other information can be entered.
|
.
.
.
|
A vertical ellipsis indicates the omission of items from a code example
or command format; the items are omitted because they are not important
to the topic being discussed.
|
|
( )
|
In command format descriptions, parentheses indicate that you must
enclose choices in parentheses if you specify more than one.
|
|
[ ]
|
In command format descriptions, brackets indicate optional choices. You
can choose one or more items or no items. Do not type the brackets on
the command line. However, you must include the brackets in the syntax
for OpenVMS directory specifications and for a substring specification
in an assignment statement.
|
|
|
|
In command format descriptions, vertical bars separate choices within
brackets or braces. Within brackets, the choices are optional; within
braces, at least one choice is required. Do not type the vertical bars
on the command line.
|
|
{ }
|
In command format descriptions, braces indicate required choices; you
must choose at least one of the items listed. Do not type the braces on
the command line.
|
|
bold type
|
Bold type represents the introduction of a new term. It also represents
the name of an argument, an attribute, or a reason.
|
|
italic type
|
Italic type indicates important information, complete titles of
manuals, or variables. Variables include information that varies in
system output (Internal error
number), in command lines (/PRODUCER=
name), and in command parameters in text (where
dd represents the predefined code for the device type).
|
|
UPPERCASE TYPE
|
Uppercase type indicates a command, the name of a routine, the name of
a file, or the abbreviation for a system privilege.
|
|
Example
|
This typeface indicates code examples, command examples, and
interactive screen displays. In text, this type also identifies URLs,
UNIX commands and pathnames, PC-based commands and folders, and certain
elements of the C programming language.
|
|
-
|
A hyphen at the end of a command format description, command line, or
code line indicates that the command or statement continues on the
following line.
|
|
numbers
|
All numbers in text are assumed to be decimal unless otherwise noted.
Nondecimal radixes---binary, octal, or hexadecimal---are explicitly
indicated.
|
Chapter 1
Overview
This chapter answers the following questions:
- What is the HP Availability Manager?
- How does the Availability Manager work?
- How does the Availability Manager maintain security?
- How does the Availability Manager identify possible performance problems?
1.1 What Is the HP Availability Manager?
The HP Availability Manager is a system management tool that allows you
to monitor, from an OpenVMS or Windows node, one or more OpenVMS nodes
on an extended local area network (LAN).
The Availability Manager helps
system managers and analysts target a specific node or process for
detailed analysis. This tool collects system and process data from
multiple OpenVMS nodes simultaneously, analyzes the data, and displays
the output using a graphical user interface (GUI).
Features and Benefits
The Availability Manager offers many features that can help system managers
improve the availability, accessibility, and performance of OpenVMS
nodes and clusters.
| Feature |
Description |
|
Immediate notification of problems
|
Based on its analysis of data, the Availability Manager notifies you
immediately if any node you are monitoring is experiencing a
performance problem, especially one that affects the node's
accessibility to users. At a glance, you can see whether a problem is a
persistent one that warrants further investigation and correction.
|
|
Centralized management
|
Provides centralized management of remote nodes within an extended
local area network (LAN).
|
|
Intuitive interface
|
Provides an easy-to-learn and easy-to-use graphical user interface
(GUI). An earlier version of the tool, DECamds, uses a
Motif GUI to display information about OpenVMS nodes. The Availability Manager
uses a Java
GUI to display information about OpenVMS nodes on an OpenVMS or a
Windows node.
|
|
Correction capability
|
Allows real-time intervention, including adjustment of node and process
parameters, even when remote nodes are hung.
|
|
Uses its own protocol
|
An important advantage of the
Availability Manager is that it uses its own network protocol. Unlike
most performance monitors,
the Availability Manager does not rely on TCP/IP or any other standard
protocol. Therefore, even if a standard protocol is unavailable, the
Availability Manager can continue to operate.
|
|
Customization
|
Using a wide range of customization options, you can customize the
Availability Manager to meet the requirements of your particular site.
For example, you can change the severity levels of the events that are
displayed and escalate their importance.
|
|
Scalability
|
Makes it easier to monitor multiple OpenVMS nodes.
|
Figure 1-1 is an example of the initial System Overview window of the
Availability Manager.
Figure 1-1 System Overview Window

The System Overview window is divided into the following sections:
- In the upper section of the display is a list of user-defined
groups and a list of nodes in each group. You can compress the display
to only the name of a group by clicking the handle preceding the group
name. The summary group line remains, showing the collected information
for all the nodes in the group.
If a node name displays a red icon,
you can hold the cursor over the icon, the node name, or the number in
the Events column to display a tooltip explaining what the problem is;
for example, for the node DBGAVC, the following message is displayed:
HIHRDP, high hard page fault rate
|
This section of the window is called the Group/Node
pane.
- In the lower section of the window events are posted, alerting you
to possible problems on your system. The items on the pane vary,
depending on the severity of the problem: the most severe problems are
displayed first. This section of the window is called the Event
pane.
1.2 How Does the Availability Manager Work?
The Availability Manager consists of the following parts:
- Data Collector
Runs on OpenVMS nodes and has two purposes:
- accepts requests for data from a Data Analyzer
- allows a Data Analyzer or Data Server to communicate with other
Data Collectors
- Data Analyzer
Runs on an OpenVMS or Windows node. It displays collected data in
an easy-to-use graphic user interface (GUI).
- Data Server
Runs on an OpenVMS or Windows node. It allows the Data Collector
and Data Analyzer to communicate over a wide area network (WAN) using
the Internet Protocol (IP) suite.
The next two sections describe how these parts work together on an
extended LAN and on a WAN.
The Data Analyzer and Data Collector communicate over an extended LAN
using an IEEE 802.3 Extended Packet format protocol. Once a connection
between the Data Analyzer and the Data Collector is established, the
Data Analyzer instructs the Data Collector to gather specific system
and process data.
Although the Data Analyzer can be run on a member of a monitored
cluster, it is typically run on a system that is not a member of a
monitored cluster. Because of this, the Data Analyzer does not hang if
the cluster hangs.
When the Data Analyzer and Data Collectors reside on the same extended
LAN, they can communicate directly with each other. Restrictions on
this direct communication setup are as follows:
- Only one Data Analyzer can run on a system at one time.
- Communication between the Data Analyzer and Data Collectors is not
routable in an IP network.
Note
The Availability Manager protocol is based on the 802.3 Extended Packet Format
(also known as SNAP). The IEEE Availability Manager protocol values are as
follows:
        Protocol ID:        08-00-2B-80-48
        Multicast Address:  09-00-2B-02-01-09
|
If your routers filter protocols in your network, add these values to
your network protocols so that the private transport is propagated over
the routers.
|
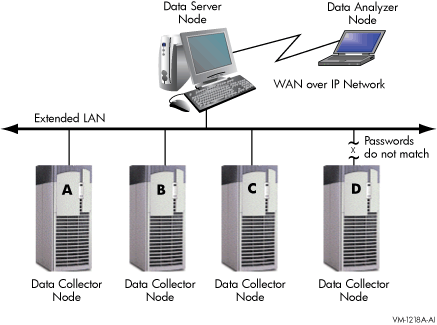
Figure 1-2 shows a possible configuration of nodes running Data
Analyzers and Data Collectors on an extended LAN.
Figure 1-2 Availability Manager Node Configuration for an
Extended LAN

In Figure 1-2, the Data Analyzer can monitor nodes A, B, and C across
the network. The password on node D does not match the password of the
Data Analyzer; therefore, the Data Analyzer cannot monitor node D.
For information about password security, see Section 1.3.
Requesting and Receiving Information over an Extended LAN
After installing the Availability Manager software, you can begin to
request information from Data Collectors on one or more nodes.
Requesting and receiving information requires the Availability Manager to
perform several steps, which are shown in Figure 1-3 and explained in
the text following the figure.
Figure 1-3 Requesting and Receiving Information over an
Extended LAN
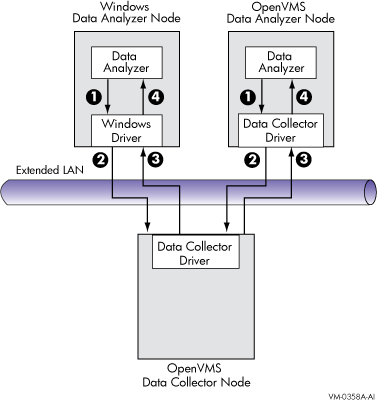
The following steps correspond to the numbers in Figure 1-3.
- The Data Analyzer passes a user's request for
data to the driver on the Data Analyzer node:
- On Windows systems, the Windows driver is part of the Windows kit.
- On OpenVMS systems, the OpenVMS driver is called the Data Collector
driver and is included in the Data Collector kit. This is the same
driver that is on the Data Collector node.
- The driver on the Data Analyzer transmits the
request across the network to the driver on the Data Collector node.
- The driver on the Data Collector transmits the
requested information as data over the network to the driver on the
Data Analyzer node.
- The driver on the Data Analyzer node passes
the data to the Data Analyzer, which displays the data.
In step 4, the Data Analyzer also checks the data against various
thresholds and conditions, and posts events if the thresholds are
exceeded or the conditions met. The following section explains how data
analysis and event detection work.
Data Collector Notes
There are some characteristics to note about the Data Collector drivers
on OpenVMS and Windows.
- The Data Collector on a Data Collector node can collect data for
more than one Data Analyzer node at the same time.
- The Data Collector driver on an OpenVMS Data Analyzer node can only
support one Data Analyzer at a time.
- The Data Collector driver on a Windows Data Analyzer node can only
support one Data Analyzer connection to a network adapter at a time.
1.2.2 Data Analyzer and Data Collector Connected over a WAN
The Data Analyzer can communicate only with Data Collectors that are on
an extended LAN. (LANs are usually limited to a building or even just
to a computer room.) However, you might need to run a Data Analyzer on
a node that is not part of an extended LAN---for example, from home or
at another site. To do this, you must add a Data Server node to your
extended LAN.
The purpose of the Data Server node is to relay data between the Data
Analyzer and Data Collectors. The Data Server formats data for
transport to and from the Data Analyzer over a WAN.
Figure 1-4 shows an example of adding a Data Server and WAN
connection to Figure 1-2.
Figure 1-4 Availability Manager Node Configuration for a
WAN
In Figure 1-4, the Data Analyzer monitors Data Collector nodes by
passing data through the Data Server. When you start the Data Analyzer,
you direct it to connect to the Data Server over the WAN. Once the
connection is established, the Data Analyzer can connect to Data
Collectors through the Data Server and start collecting data.
Requesting and Receiving Information over a WAN
After installing the Availability Manager software, you can begin to
request information from Data Collectors on one or more nodes.
Requesting and receiving information requires the Availability Manager to
perform several steps, which are shown in Figure 1-5 and explained in
the text following the figure.
Figure 1-5 Requesting and Receiving Information Over a
WAN
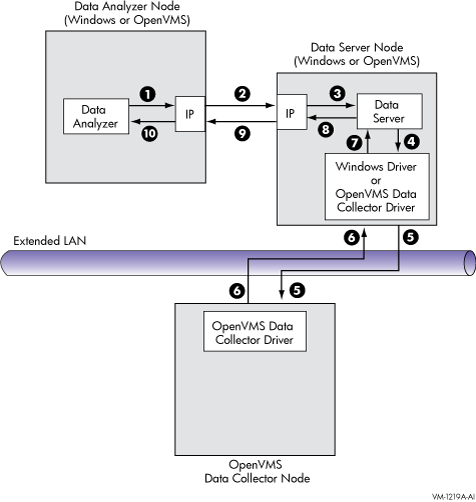
The following steps correspond to the numbers in Figure 1-5.
- The Data Analyzer passes a user's request for
data to the IP socket connection on the Data Analyzer node.
- Using a secure socket, the IP socket transmits
the request to the IP socket connection on the Data Server node.
- The IP socket on the Data Server node passes
the request to the Data Server.
- The Data Server passes the request to the IP
socket on the Data Server node:
- On Windows systems, the Windows driver is part of the Windows kit.
- On OpenVMS systems, the OpenVMS driver is called the Data Collector
driver and is included in the Data Collector kit. This is the same
driver that is on the Data Collector node.
- The driver on the Data Server transmits the
request across the network to the driver on the Data Collector node.
- The driver on the Data Collector transmits the
requested information as data over the network to the driver on the
Data Server node.
- The driver on the Data Server node passes the
data to the Data Server.
- The Data Server passes the data to the IP
socket connection.
- The IP socket on the Data Server node
transmits the data to the IP socket on the Data Analyzer node.
- The IP socket on the Data Analyzer node
passes the data to the Data Analyzer, which displays the data.
In step 10, the Data Analyzer also checks the data for any events that
need to be posted. The following section explains how data analysis and
event detection work.
Note
More than one Windows or OpenVMS Data Analyzer node can connect to a
Data Server node.
|
1.3 How Does the Availability Manager Maintain Security?
The Availability Manager uses passwords to maintain security. Passwords are
eight alphanumeric characters long.
The Data Analyzer stores passwords in its customization file.
On OpenVMS Data Collector nodes, passwords are part of a three-part
security code called a security triplet.
The following sections explain these security methods further.
For monitoring to take place, the password on a Data Analyzer node must
match the password section of the security triplet on each OpenVMS Data
Collector node. OpenVMS Data Collectors also impose other security
measures, which are explained in Section 1.3.2. This password match is
used whether or not a Data Server is involved in the connection between
the Data Analyzer and the Data Collector.
Figure 1-6 illustrates how you can use passwords to limit access to
node information.
Figure 1-6 Availability Manager Password Matching
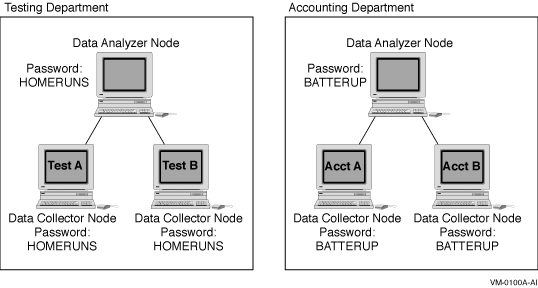
As shown in Figure 1-6, the Testing Department's Data Analyzer, whose
password is HOMERUNS, can access only OpenVMS Data Collector nodes with
the HOMERUNS password as part of their security triplets. The same is
true of the Accounting Department's Data Analyzer, whose password is
BATTERUP; it can access only OpenVMS Data Collector nodes with the
BATTERUP password as part of their security triplets.
The Availability Manager sets a default password when you install the Data
Analyzer. To change that password, you must use the OpenVMS Security
Customization page (see Figure 7-21), which is explained in
Chapter 7.
OpenVMS Data Collector nodes have the following security features:
- Availability Manager data-transfer security
Each
OpenVMS node running as a Data Collector has a file containing a list
of security triplets. For Data Analyzer and Data Collector nodes to
exchange data, the passwords on these nodes must match.
In
addition, the triplet specifies the type of access a Data Analyzer has.
By specifying the hardware address of the Data Analyzer, the triplet
can also restrict which Data Analyzer nodes are able to access the Data
Collector.
Section 1.3.3 explains security triplets and how to edit
them.
- Availability Manager security log
An OpenVMS Data Collector logs all access denials and executed
write instructions to the operator communications manager (OPCOM).
Messages are displayed on all terminals that have OPCOM enabled (with
the REPLY/ENABLE command). OPCOM also puts messages in the
SYS$MANAGER:OPERATOR.LOG file.
Each security log entry contains the
network address of the initiator. If access is denied, the log entry
also indicates whether a read or write was attempted. If a write
operation was performed, the log entry indicates the process identifier
(PID) of the affected process.
- OpenVMS file protection and process privileges
When the Availability Manager is installed, it creates a directory
(SYS$COMMON:[AMDS$AM]) and sets directory and file protections on it so
that only the SYSTEM account can read the files in that directory. For
additional security on these system-level directories and files, you
can create access control lists (ACLs) to restrict and set alarms on
write access to the security files.
For more information about
creating ACLs, see the HP OpenVMS Guide to System Security.
1.3.3 Changing Security Triplets on OpenVMS Data Collector Nodes
To change security triplets on an OpenVMS Data Collector node, you must
edit the AMDS$DRIVER_ACCESS.DAT file, which is installed on all Data
Collector nodes. The following sections explain what a security triplet
is, how the Data Collector uses it, and how to change it.
A security triplet determines which nodes can access system data from
an OpenVMS Data Collector node. The AMDS$DRIVER_ACCESS.DAT file on
OpenVMS Data Collector nodes lists security triplets.
On OpenVMS Data Collector nodes, the AMDS$AM_CONFIG logical translates
to the location of the
default security file, AMDS$DRIVER_ACCESS.DAT.
This file is installed on all OpenVMS Data Collector nodes.
A security triplet is a three-part record whose fields are separated by
backslashes (\). A triplet consists of the following fields:
- A network address (hardware address or wildcard character)
- An 8-character alphanumeric password
The password is not case
sensitive (so the passwords "testtest" and
"TESTTEST" are considered to be the same).
- A read, write, or control (R, W, or C) access verification code
The exclamation point (!) is a comment delimiter; any characters to the
right of the comment delimiter are ignored.
Example
All Data Collector nodes in group FINANCE have the following
AMDS$DRIVER_ACCESS.DAT file:
*\FINGROUP\R   ! Let anyone with FINGROUP password read
               !
2.1\DEVGROUP\W ! Let only DECnet node 2.1 with
               ! DEVGROUP password perform fixes (writes)
|
Note
The configuration files for DECamds and the Availability Manager are
separate; only one set is used, depending on which startup command
procedure you use to start the driver.
For more information about the configuration file setup for both
DECamds and the Availability Manager, see the HP Availability Manager Installation Instructions.
|
On each Data Collector node on which you want to change security, you
must edit the AMDS$DRIVER_ACCESS.DAT file. The data in the
AMDS$DRIVER_ACCESS.DAT file is set up as follows:
Network address\password\access
|
Use a backslash character (\) to separate the three fields.
To edit the AMDS$DRIVER_ACCESS.DAT file, follow these steps:
- Edit the network address.
The network address can be either of
the following:
- Hardware address
The hardware address field is the physical
hardware address in the LAN device chip. It is used if you have
multiple LAN devices or are running the HP DECnet-Plus for OpenVMS
networking software on the system (not the HP DECnet Phase IV for
OpenVMS networking software).
For devices provided by HP, the
hardware address is in the form 08-00-2B-xx-xx-xx, where the
08-00-2B portion is HP's valid range of LAN addresses as defined by the
IEEE 802 standards, and the xx-xx-xx portion is chip specific.
To determine the value of the hardware address on a node, use the
OpenVMS System Dump Analyzer (SDA) as follows:
$ ANALYZE/SYSTEM
SDA> SHOW LAN
|
These commands display a list of available devices. Choose the
template device of the LAN device you will be using, and then enter the
following command:
SDA> SHOW LAN/DEVICE=xxA0
|
- Wildcard address
The wildcard character (*) allows any incoming
triplet with a matching password field to access the Data Collector
node. Use the wildcard character to allow read access and to run the
console application from any node in your network.
Caution: Use of the wildcard character for
write-access or control-access security triplets enables any person
using that node to perform system-altering fixes.
- Edit the password field.
The password field must
be an 8-byte alphanumeric field. The Availability Manager forces
upper-case on the password, so "aaaaaaaa" and "AAAAAAAA" are
essentially the same password to the Data Collector.
The password
field gives you a second level of protection when you want to use the
wildcard address denotation to allow multiple modes of access to your
monitored system.
- Enter R, W, or C as an access code:
- R means READONLY access to the Data Analyzer.
- W means READ/WRITE access to the Data Analyzer. (WRITE implies
READ.)
- C means CONTROL access to the Data Analyzer. CONTROL allows you to
manipulate objects from which data are derived. (CONTROL implies both
WRITE and READ.)
The following security triplets are all valid; an explanation follows
the exclamation point (!).
*\1decamds\r   ! Anyone with password "1decamds" can monitor
*\1decamds\w   ! Anyone with password "1decamds" can monitor or write
2.1\1decamds\r ! Only node 2.1 with password "1decamds" can monitor
2.1\1decamds\w ! Only node 2.1 with password "1decamds" can monitor and
write
08-00-2b-03-23-cd\1decamds\w ! Allows a particular hardware address to
write
08-00-2b-03-23-cd\1decamds\r ! Allows a particular hardware address to read
node
|
OpenVMS Data Collector nodes accept more than one password. Therefore,
you might have several security triplets in an AMDS$DRIVER_ACCESS.DAT
file for one Data Collector node. For example:
*\1DECAMDS\R
*\KOINECLS\R
*\KOINEFIX\W
*\AVAILMAN\C
|
In this example, Data Analyzer nodes with the passwords 1DECAMDS and
KOINECLS are able to see the Data Collector data, but only the Data
Analyzer node with the KOINEFIX password is able to write or change
information, including performing fixes, on the Data Collector node.
The Data Analyzer node with the AVAILMAN password is able to perform
switched LAN fixes and other control functions.
You can choose to set up your AMDS$DRIVER_ACCESS.DAT file to allow
anyone on the local LAN to read from your system, but to allow only
certain nodes to write or change process or device characteristics on
your system. For example:
*\1DECAMDS\R
08-00-2B-03-23-CD\2NODEFIX\C
|
In this example, any Data Analyzer node using the 1DECAMDS password can
read data from your system. However, only the Data Analyzer node with
the hardware address 08-00-2B-03-23-CD and the password 2NODEFIX can
perform fixes and other control functions.
Note
After editing the AMDS$DRIVER_ACCESS.DAT file, you must stop and then
restart the Data Collector. This action loads the new data into the
driver.
|
1.3.4 Processing Security Triplets
The Availability Manager performs these steps when using security triplets to
ensure security among Data Analyzer and Data Collector nodes:
- A multicast "Hello" message is broadcast at regular
intervals to all nodes within the LAN indicating the availability of a
Data Collector node to communicate with a Data Analyzer node.
- The node running the Data Analyzer receives the message,
returns a password to the Data Collector, and requests system data from
the Data Collector.
- The password and network address of the Data Analyzer are used to
search the security triplets in the AMDS$DRIVER_ACCESS.DAT file.
- If the Data Analyzer password and network address match one of the
security triplets on the Data Collector, then the Data Collector and
the Data Analyzer can exchange information.
- If the Data Analyzer password and network address do not match any
of the security triplets, then access is denied and a message is logged
to OPCOM. (See Table 1-2 for more information on logging this type
of message.) In addition, the Data Analyzer receives a message stating
that access to that node is not permitted.
Table 1-1 describes how the Data Collector node interprets a
security triplet match.
Table 1-1 Security Triplet Verification
| Security Triplet |
Interpretation |
|
08-00-2B-12-34-56\HOMETOWN\W
|
The Data Analyzer has write access to the node only when the Data
Analyzer is run from a node with this hardware address (multiadapter or
DECnet-Plus system) and with the password HOMETOWN.
|
|
2.1\HOMETOWN\R
|
The Data Analyzer has read access to the node when run from a node with
DECnet for OpenVMS Phase IV address 2.1 and the password HOMETOWN.
|
|
*\HOMETOWN\R
|
Any Data Analyzer with the password HOMETOWN has read access to the
node.
|
Sending Messages to OPCOM
The logical names shown in Table 1-2 control the sending of messages
to OPCOM and are defined in the AMDS$LOGICALS.COM file on the Data
Collector node.
To put these changes into effect, restart the Data Collector with the
following command:
$ @SYS$STARTUP:AMDS$STARTUP RESTART
|
When the Data Analyzer detects problems on your system, it uses a
combination of methods to bring these problems to the attention of the
system manager. It examines both the types of data collected and how
often it is collected and analyzed to determine problem areas to be
signaled.
Performance problems are also posted in the Event pane, which is in the
lower portion of the System Overview window (Figure 1-1).
The following topics are related to the method of detecting problems
and posting events:
- Collecting and analyzing data
- Posting events
1.4.1 Collecting and Analyzing Data
This section explains how the Data Analyzer collects and analyzes data.
It also defines related terms.
The data that the Data Analyzer collects is grouped into data
collections. These collections are composed of related
data---for example, CPU data, memory data, and so on. Usually, the data
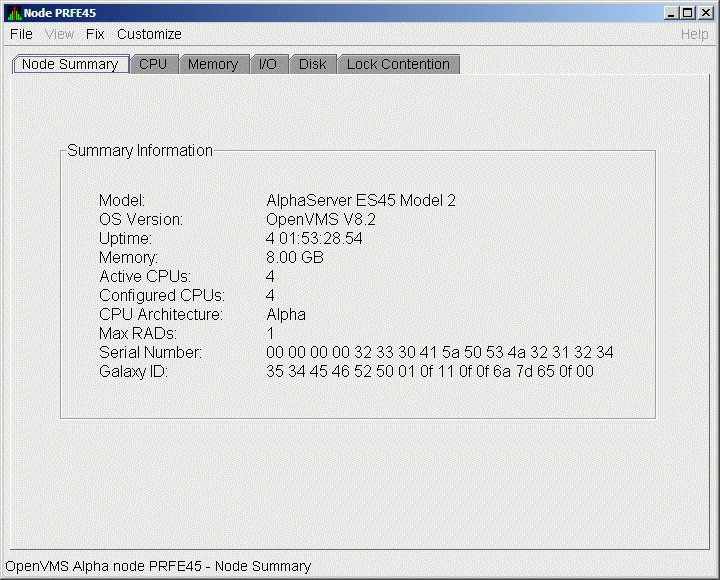
items on the tabs (like the ones displayed in Figure 1-7) consist of
one data collection.
Figure 1-7 Sample Node Summary
An event is a problem or potential problem associated
with resource availability. Events are associated with various data
collections. For example, the CPU Process data collection shown in
Figure 1-8 is associated with the PRCCUR, PRCMWT, and PRCPWT events.
(Appendix B describes events, and Appendix C describes the events
that each type of data collection can signal.) For these events to be
signalled, you must enable the CPU Process data collection, as
described in Section 1.4.1.2.
Users can also customize criteria for events, which is described in
Section 1.4.2.
You can use the Data Analyzer to collect data either as a background
activity or as a foreground activity.
Note that for either type of data collection, if you collect data for a
specific node, only that node is affected. If you collect data for a
group, all the nodes in that group are affected.
1.4.1.3 Data Collection Intervals
Data collection intervals, which are displayed on the
Data Collection customization page
(Figure 1-8), specify the frequency of data collection. Table 1-3
describes these intervals.
Table 1-3 Data Collection Intervals
| Interval (in seconds) |
Type of Data Collection |
Description |
|
NoEvent
|
Background
|
How often data is collected if no events have been posted for that type
of data.
The Data Analyzer starts background data collection at the
NoEvent interval (for example, every 75 seconds). If
no events have been posted for that type of data, the Data Analyzer
starts a new collection cycle every 75 seconds.
|
|
Event
|
Background
|
How often data is collected if any events have been posted for that
type of data.
The Data Analyzer continues background data collection at the
Event interval until all events for that type of data
have been removed from the Event pane. Data collection then resumes at
the
NoEvent interval.
|
|
Display
|
Foreground
|
How often data is collected when the page for a specific node is open.
The Data Analyzer starts foreground data collection at the
Display interval and continues this rate of collection
until the display is closed. Data collection then resumes as a
background activity.
|
The Data Analyzer evaluates each data collection for events. The Data
Analyzer posts events when data values in a data collection meet or
exceed user-defined thresholds and occurrences.
Values for thresholds and occurrences are displayed on Event
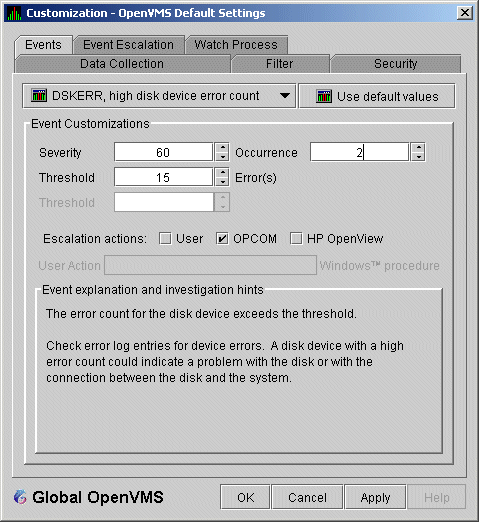
Customization pages similar to the one shown in Figure 1-9.
Thresholds and occurrences are described in the next section.
Figure 1-9 Sample Event Customization
1.4.2.1 Thresholds and Occurrences
Thresholds and occurrences are criteria that the Data Analyzer uses for
posting events.
A threshold is a value against which data in a data
collection is compared. An occurrence is a value that
represents the number of consecutive data collections that meet or
exceed the threshold.
Both thresholds and occurrences are customizable values that you can
adjust according to the needs of your system. For details about how to
change the values for thresholds and occurrences, see Chapter 7.
Relationship Between Thresholds and Occurrences
For a particular event, when the data collected meet or exceed the
threshold, the data collection enters a threshold-exceeded state. When
the number of consecutive data collections to enter this state meets or
exceeds the value in the Occurrence box (see Figure 1-9), the Data
Analyzer displays (posts) the event in the Event pane.
A closer look at Figure 1-9 shows the relationship between thresholds
and occurrences. For the
DSKERR, high disk device error count
event, a threshold of 15 errors has been set. A value of 2 in the
Occurrence box indicates that the number of errors during 2 consecutive
data collections must meet or exceed the threshold of 15 for the
DSKERR
event to be posted.
Chapter 2
Getting Started
Note
Before you start this chapter, be sure to read the explanation of data
collections, events, thresholds, and occurrences, as well as background
and foreground data collection in Chapter 1.
|
This chapter provides the following information:
- How to configure and start the Availability Manager Data Collector
- How to start the Availability Manager Data Analyzer
- How to configure secure communications between the Data Analyzer
and Data Server
- How to start the Availability Manager Data Server
- How to use the main System Overview window
- How to display basic node data
- How to get help when you need it
- How to print a Data Analyzer page
For information about installing the HP Availability Manager on OpenVMS or
Windows systems, see the HP Availability Manager Installation Instructions. You can access these
instructions from the documentation link at the Availability Manager web page
at the following URL:
http://www.hp.com/products/openvms/availabilitymanager
|
The installation instructions also include an explanation of how to
install and use both DECamds and the Availability Manager on the same system.
Configuration tasks include defining logical names and protecting
passwords. After you complete these tasks, you can start the Data
Collector. The following sections describe all of these operations.
OpenVMS kits for DECamds Version 7.3-2B and Availability Manager
Version 3.1 provide a template file that system managers can
modify to define the logical names used by the Data Collector. You can
copy the file SYS$MANAGER:AMDS$SYSTARTUP.TEMPLATE to
SYS$MANAGER:AMDS$SYSTARTUP.COM and edit it to change the default
logicals that are used to start the Data Collector and to find its
configuration files.
The most common logicals, especially in a mixed-environment cluster
configuration, are the ones shown in Table 2-1:
Table 2-1 Common Availability Manager Data Collector Logical Names
| Logical |
Description |
|
AMDS$GROUP_NAME
|
Specifies the group that this node will be associated with when it is
monitored.
|
|
AMDS$DEVICE
|
For nodes with more than one network adapter, allows you to specify
which adapter the Data Collector should use.
|
|
AMDS$RM_DEFAULT_INTERVAL
|
The number of seconds between multicast "Hello" messages from
the Data Collector to the Data Analyzer node when the Data Collector is
inactive or minimally active.
The minimum value is 5. The maximum value is 300.
|
|
AMDS$RM_SECONDARY_INTERVAL
|
The number of seconds between multicast "Hello" messages from
the Data Collector to the Data Analyzer node when the Data Collector is
active.
The minimum value is 5. The maximum value is 1800.
|
Note
Multicast "Hello" messages are notifications
from nodes running the Data Collector to the Data Analyzer. This is the
way the Data Analyzer discovers Data Collectors on the network.
|
The Data Collector on a node transmits multicast "Hello"
messages for any Data Analyzer or Data Server on the extended LAN to
receive. The rate at which these messages are transmitted is regulated
by the settings of the following logicals:
AMDS$RM_DEFAULT_INTERVAL
AMDS$RM_SECONDARY_INTERVAL
These logicals are contained in the file SYS$MANAGER:AMDS$LOGICALS.COM.
The shorter the time interval, the faster the node is discovered and
configured.
To change passwords to allow a Data Analyzer to monitor a node, edit
the following file:
SYS$MANAGER:AMDS$DRIVER_ACCESS.DAT
|
The passwords section of the file is close to the end of the file,
after the Password documentation section. The passwords in this file
correspond to the passwords in the Security page shown in
Section 7.9.1. Note that you can specify a list of passwords in this
file. See the comments in the file for details.
Beginning with OpenVMS Version 7.2, the files needed to run the Data
Collector on OpenVMS nodes are shipped with the OpenVMS operating
system. However, if you want the latest Data Collector software, you
must install it from the Availability Manager Data Collector kit.
Once the Data Collector is running on a node, you can monitor that node
using DECamds or the Availability Manager Data Analyzer.
For the Data Collector to access requests to collect data and to
support the Data Analyzer, start the Data Collector by entering the
following command:
$ @SYS$STARTUP:AMDS$STARTUP START
|
To start the Data Collector when the system boots, add the following
command to the SYS$MANAGER:SYSTARTUP_VMS.COM file:
$ @SYS$STARTUP:AMDS$STARTUP START
|
If you make changes to either the AMDS$DRIVER_ACCESS.DAT or
AMDS$LOGICALS.COM, restart the driver to load the changes. Enter the
following command:
$ @SYS$STARTUP:AMDS$STARTUP RESTART
|
Note
You can start the Data Collector on all the nodes in a cluster by using
the following SYSMAN command:
$ RUN SYS$SYSTEM:SYSMAN
SYSMAN> SET ENVIRONMENT/CLUSTER
SYSMAN> DO @SYS$STARTUP:AMDS$STARTUP START
SYSMAN> EXIT
$
|
This method works for any AMDS$STARTUP option.
|
2.2 How to start the Data Analyzer
This section describes what you need to do after the Availability Manager Data
Analyzer is installed.
Starting the Data Analyzer is somewhat different on OpenVMS than on
Windows systems. However, on both systems, starting the Data Analyzer
automatically starts the Java graphical user interface (GUI), which
allows you to view information that is collected from Data Collectors
running on OpenVMS nodes.
The following sections describe the sequence of steps required to start
the Data Analyzer on an OpenVMS node and on a Windows node.
To start a Data Analyzer on an OpenVMS node, make sure that:
- The Data Analyzer is installed on the node from which you want to
monitor other nodes.
- The Data Collector is started (see Section 2.1.3).
Starting the Data Collector accomplishes the following important tasks:
- Defines the various AMDS$* logicals needed by the Data Analyzer.
- Allows the Data Analyzer to communicate with the Data Collector on
the network.
To start the Data Analyzer,
enter the following command:
The Data Analyzer displays the Network Connection dialog box, which is
shown in Figure 2-20.
Note
For a list of qualifiers you can use with the AVAIL/ANALYZER command,
see the HP Availability Manager Installation Instructions, or enter HELP AVAIL at the DCL dollar prompt and
then enter the qualifier.
|
2.2.2 Starting the Data Analyzer on a Windows Node
To start the Data Analyzer on a Windows node, first make sure that the
Availability Manager Windows kit is installed on the node.
To start the Data Analyzer, follow these steps:
- Click
Start ---> Programs.
- Select Availability Manager.
- Select Data Analyzer Startup.
The Data Analyzer displays the Network Connection Dialog box, which is
shown in Figure 2-20.
At this point, you must determine whether you need to use a Data Server
to communicate with the Data Collectors. For an overview of what a Data
Server is and how it works, see Section 1.2.2.
If the analyzer system is on the same LAN as the Data Collectors, you
can use a network adapter on the analyzer system to connect with the
Data Collectors. If this is the case, you do not need to set up the
Data Server. To continue starting the Data Analyzer without a Data
Server, go to Section 2.6.
If the Data Analyzer is on a different LAN than the Data Collectors,
you must set up the Data Server on a server system
that is on the same LAN as the Data Collectors. To set up secure
communication between the Data Analyzer and Data Server, see
Section 2.4.
Note
The Data Collector on an OpenVMS system only allows one Data Analyzer
or Data Server to use it for communicating with other Data Collectors
(see section Data Collector Notes under section Section 1.2.1). If you want to
run both the Data Server and Data Analyzer on the same OpenVMS system,
HP recommends that you run the Data Server to communicate with the
other Data Collectors, and then let the Data Analyzer connect to the
Data Server. This setup is similar to the one shown in Figure 1-4
and section Requesting and Receiving Information over a WAN under section Section 1.2.2. In this case,
the Data Analyzer and Data Server are running on the same node (Data
Server node), and use an internal IP connection for communications.
|
2.4 Setting Up Secure Server Communications Between the Data Analyzer and Data Server
Note
The following terminology is used in the next sections:
- Data Server refers to the Availability Manager Data
Server software.
- Server system refers to the hardware that runs the
Data Server software.
- Analyzer system refers to the hardware that runs
the Data Analyzer software.
- Combined kit refers to the kit that includes both
the Data Analyzer and the Data Server kit.
Note the following:
- The server system and analyzer system can be either an OpenVMS
system or a Windows system.
- Any analyzer system can connect to any server system. The operating
system and hardware platform make no difference to the operation of the
Availability Manager.
|
To collect data over a WAN, the Data Analyzer communicates with a Data
Server. The Data Server is a Java-based program that runs on OpenVMS or
Windows. Except for differences in starting the Data Server on OpenVMS
and Windows, the following section applies to both operating systems.
The Availability Manager uses an encrypted connection for secure communication
between the Data Analyzer and the Data Server. The following sections
describe how to set up the Data Analyzer and Data Server to use a
secure communication link.
The Availability Manager uses Transport Layer Security (TLS) Version 1 for
secure communication between the Data Analyzer and the Data Server. TLS
is an extension of Secure Sockets Layer (SSL) Version 3.0, which is the
most widely used protocol for security on the web.
TLS uses public key cryptography (also called
asymmetric cryptography) to guarantee secure communication over a
network. This type of cryptography uses an encryption algorithm that
produces a pair of keys:
- A public key provides authentication, and is made public to any
interested party as a trusted certificate.
- A private key that works with trusted certificates to provide
privacy and data integrity
What one key encrypts, only the other key can decrypt. Together, these
two keys are known as an asymmetric key pair.
Key Pairs, Key Stores, and Trust Stores
Before you can use the Data Server, you must create an asymmetric key
pair. This key pair is associated with the Data Server, and is used by
the Data Server and Data Analyzer to establish an encrypted
communication link between them.
The Data Server stores the public and private key associated with it in
a key store . The Data Server key store is the file
AM$KeyStore.jks and resides on the server system. On OpenVMS systems,
this file is in the AMDS$AM_CONFIG: directory. On Windows systems, the
key store is in the installation folder. Currently, HP supports
configurations in which the Data Server has only one key pair in a key
store.
The Data Server public key is also stored by the Data Analyzer in a
trust store on the analyzer system. The Data Analyzer
trust store is the file AM$TrustStore.jks. On OpenVMS systems, this
file is in the AMDS$AM_CONFIG: directory. On Windows systems, the trust
store is in the installation folder. A trust store for a particular
Data Analyzer holds the public key for each Data Server with which it
communicates.
You create and store the key pair after installing either the combined
kit (for OpenVMS) or the Availability Manager kit (for Windows). The next
sections describe how to perform the following tasks:
- Creating the key pair from either the server or analyzer system
- Store the key pair in a key store on a server system
- Store the public key in a trust store on an analyzer system
2.4.2 Methods of Setting Up Secure Communications
The key store and trust store are created and maintained by dialog
boxes in the Data Analyzer. The Data Analyzer is used for key
management because it is the part of the Availability Manager that uses a GUI
interface. By using the GUI interface, keys are managed the same way on
OpenVMS and Windows platforms. This also keeps the Data Server from
having the overhead of the dialog boxes used for creating and
maintaining key and trust stores.
There are two basic methods of setting up secure communications. Both
methods create a key store for the Data Server and a trust store for
the Data Analyzer. The difference is that one creates the key store
using the server system, and the other creates the key store from the
analyzer system. Using one method or the other is sufficient to set up
secure communications between the Data Analyzer and Data Server.
Creating the key store from the server system is the simplest method.
You create the key store and export the public key using the Data
Analyzer on the server system, copy the public key to the analyzer
system, and import the public key with the Data Analyzer on the
analyzer system. For a description of this method, see Section 2.4.3.
Using this method assumes that you can use the Data Analyzer's GUI
interface on the server system. You can start the Data Analyzer on the
server system and display the GUI on the following:
- the server graphics console
- another OpenVMS system that does have a graphics console
- a Windows system that has software to accept and display an X
Windows GUI
If this is not possible, use the alternate method to create and
maintain key stores in Section 2.4.2.2.
With this method, you create the key store and export the public key
using the Data Analyzer on the analyzer system, and copy the key store
to the server system. This method is described in Section 2.4.4.
The following section describes how to set up the Data Server from the
server system. It also describes the key setup for the Data Analyzer
that runs on the server system. The procedure involves the following
tasks:
- Creating the key pair for the Data Server, including the option of
generating and storing the trust store for the Data Analyzer on the
server system,
- Storing the key pair in the Data Server's key store on the server
system
- Storing the public key for another Data Analyzer to use
When you complete these steps, the Data Server can accept connections
from any Data Analyzer on the server system or on other systems.
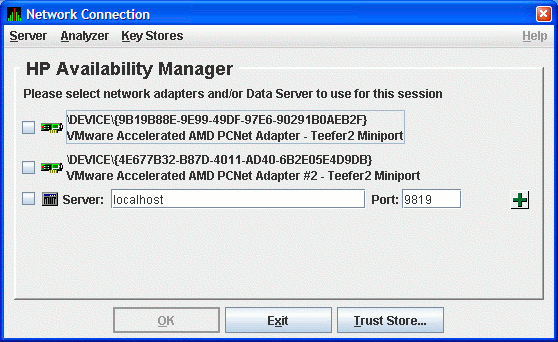
- Start the Data Analyzer on the server system according to the
instructions in Section 2.2. When the Data Analyzer starts, it
displays the Network Connection dialog box as shown in Figure 2-1.
Figure 2-1 Network Connection Dialog Box
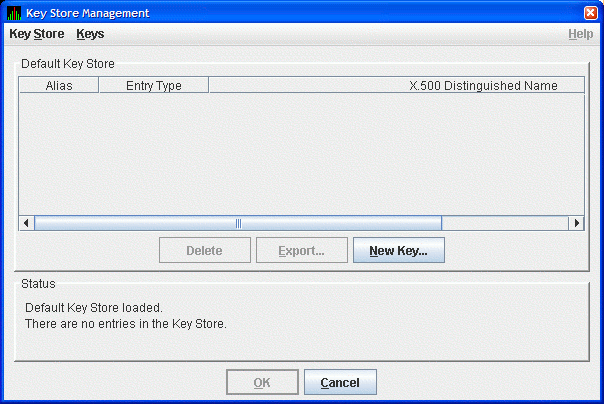
- From the Server menu, select Key Store... to open
the default key store for this system.
The Availability Manager displays the Key Store Management dialog box as shown
in Figure 2-2.
Figure 2-2 Key Store Management Dialog Box
- In the Key Store Management dialog box, click New Key...
to display the Generate New Key Pair dialog box as shown in
Figure 2-3.
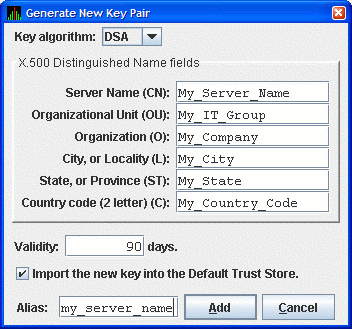
Figure 2-3 Generate New Key Pair Dialog Box
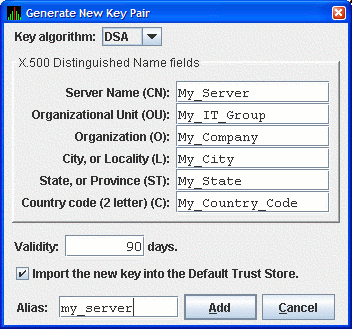
To create a new key pair, fill in the fields in this dialog box.
The information you enter in the Generate New Key Pair dialog box
includes fields that pertains to an X.500 Distinguished
Name. HP recommends that you enter the name of the server
system in the Server Name field (CN) and in Alias field. ("Alias" is
simply a name that is used to track items in the key store and is not
part of the generated key.)
Currently, the Availability Manager does not
verify whether or not a key has expired. Therefore, the Validity field
is not used. However, for the field to work in future versions, HP
recommends that you enter a large value if you are creating a key that
must be valid for a long time.
To run the Data Analyzer on the server system and have it connect to
the Data Server on the server system, check the Default Trust Store
check box. This creates a trust store for the Data Analyzer that
contains the public key for accessing the Data Server on the server
system.
When you finish entering information to create a new key
pair for the Data Server, click Add (it might take a few
seconds to create the key). If you checked the Default Trust Store
check box, the default trust store for this key pair is created for the
Data Analyzer running on the server system.
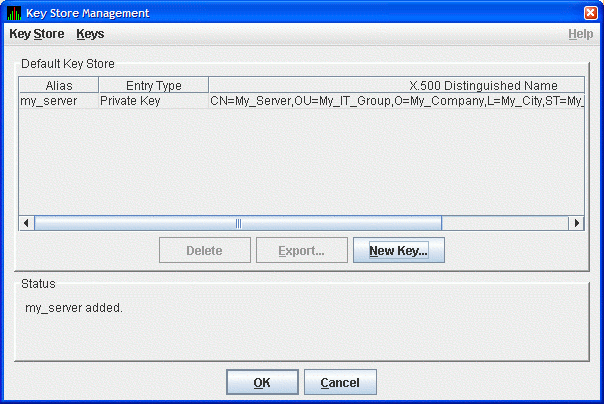
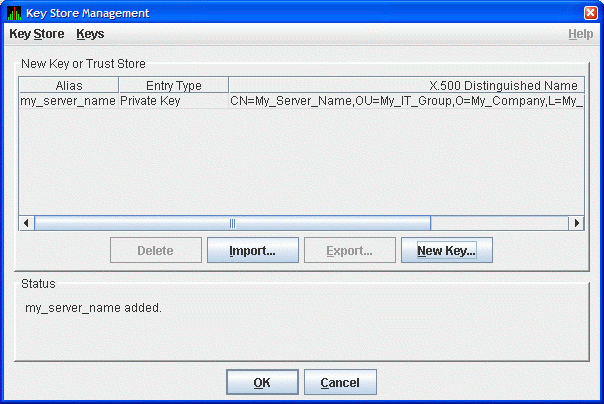
The Key Store
Management dialog box shown in Figure 2-4 now displays one key pair,
reflecting the information you entered in the Generate New Key Pair
dialog box.
Figure 2-4 Key Store Management Dialog Box Showing Key
Pair
If the only system you want to run the Data Analyzer is
the server system, then do the following:
- Click on OK in the Key Store Management dialog box to save
the key store on the server system.
- Follow the instructions in Section 2.6 to start and configure the
Data Analyzer.
To run the Data Analyzer on other systems, see Section 2.4.3.2.
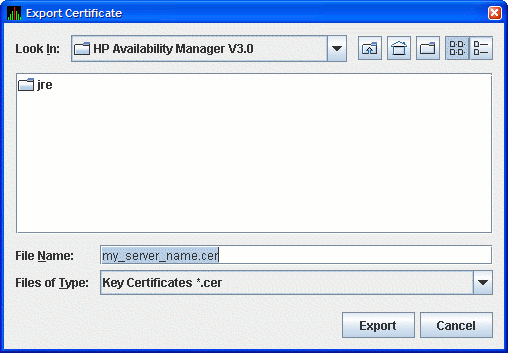
To run the Data Analyzer on other systems, and to connect to the Data
Server on this system, you must export the public key for the Data
Server as a trusted certificate. To do this, click the
key pair name in the Key Store Management dialog box. This action
enables the Export... button. Click Export... to
export the public key in a trusted certificate. The Availability Manager
displays the Export Certificate dialog box as shown in Figure 2-5.
Figure 2-5 Export Certificate Dialog Box
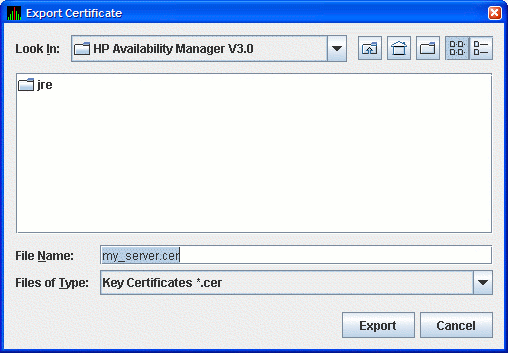
Store the trusted certificate in the folder and file name of your
choice. Any file name with a CER extension works, although naming the
file the same as the server alias can make it easier to identify. Click
Export to complete this process.
Important
Remember the location of this certificate. This certificate is used in
Section 2.4.5.
|
2.4.3.3 Save the Key Store
To save the key store on the server system, click OK in the
Key Store Management dialog box. Then see Section 2.4.5 to import the
trusted certificate into the Data Analyzer trust store.
The process for setting up the Data Server from an analyzer system
involves the following tasks:
- Creating the key store for the Data Server on the server system.
- Exporting the public key as a trusted certificate for other
analyzer systems.
- Saving the key store.
- Copying the key store to the server system.
- Delete the key and trust store from the analyzer system.
- Exporting the public key to the server system from an existing
server system using an analyzer system.
2.4.4.1 Creating the Key Store for the Data Server
Start the Data Analyzer on the analyzer system. When the Data Analyzer
starts, it displays the Network Connection dialog box as shown in
Figure 2-6.
Figure 2-6 Network Connection Dialog Box
From the Key Stores menu, click New Trust or Key
Store.... The Availability Manager displays the Key Store Management
dialog box, shown in Figure 2-7.
Figure 2-7 Key Store Management Dialog Box
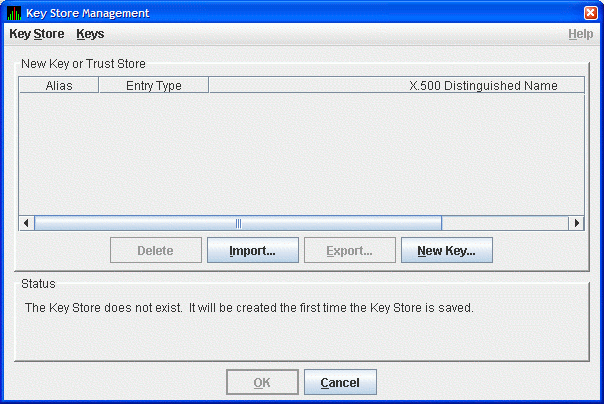
In the Key Store Management dialog box, click New Key... to
display the Generate New Key Pair dialog box as shown in Figure 2-8.
To create a new key pair, fill in the fields in this dialog box. For a
description of these fields, see Section 2.4.3.1.
Figure 2-8 Generate New Key Pair Dialog Box
When you finish entering information in the Generate New Key Pair
dialog box, click Add (it might take a few seconds to create
the key). If you checked the Default Trust Store check box, the default
Trust Store for this key pair is created for the Data Analyzer running
on the this analyzer system.
The Key Store Management dialog box (Figure 2-9) now displays the
new key pair, reflecting the information you entered.
Figure 2-9 Key Store Management Dialog Box with One
Entry
This step finishes the setup needed for this analyzer system. If this
is the only Data Analyzer that needs to connect to this Data Server, go
to Section 2.4.4.4.
For other Data Analyzers that need to connect to the Data Server,
export the public key as described in this section.
In the Key Store Management dialog box, select the Data Server key pair
by clicking the key entry. This enables the Export... button
in the dialog box. Click Export... to extract the Data
Server's public key and store it in a file as a trusted certificate.
The Export Certificate dialog box is displayed as shown in
Figure 2-10.
Figure 2-10 Export Certificate Dialog Box
Store the trusted certificate in the folder and file name of your
choice. Any file name with the CER extension works, although accepting
the default can make the file easier to identify. Click on the Export
button to complete this process.
Important
Remember the location of this certificate. This certificate is used in
Section 2.4.5.
|
2.4.4.3 Saving the Key Store for the Server System
Now that you have created the key pair for the Data Server, you must
save the pair in a key store. In the Key Store Management dialog box,
select the Key Store menu, and then select Save. This
displays the Save Key Store dialog box as shown in Figure 2-11.
Figure 2-11 Save Key Store Dialog Box
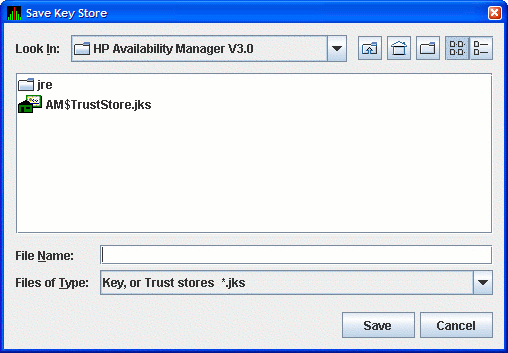
Note
If you checked the Default Trust Store check box in Figure 2-8, the
file AM$TrustStore.jks appears.
|
Save the key store in the folder and file name of your choice. Any file
name with a JKS extension works, although naming the file the same as
the server alias can make the file easier to identify. Enter this file
name in the File Name: field, and click Save to save the key
store. In the Key Store Management dialog box, click Cancel to
dismiss the dialog box.
The key store is now ready for the server system. Copy the file to the
server system. If you use FTP to transfer the file, be sure to use the
binary transfer mode.
Once the file is copied, move it to the location and file name that the
Data Server looks for when it starts. On OpenVMS, the location is
AMDS$AM_CONFIG: directory. On Windows, the location is the installation
directory. Make sure that the file is named AM$KeyStore.jks.
Once you have created the key store and copied it to the server system,
it is recommended that you delete the key and trust store on the
analyzer system. This sets up the analyzer system to create a key store
for another Data Server, or to create the trust store by importing the
trusted certificates from each Data Server into the Data Analyzer.
This concludes the Data Server setup on the server system. If you want
to create a key store for another Data Server, go to Section 2.4.4.
Otherwise, go to Section 2.4.5, which describes how to import the Data
Server's public key into the trust store of other Data Analyzers.
The next section describes how to obtain the public key from an
existing Data Server. This step allows the Data Analyzer to connect to
the Data Server.
This section describes how to obtain a Data Server's public key from
the analyzer system.
Copy the key store from the server system to a place that is accessible
to the analyzer system. On OpenVMS, the key store is
AMDS$AM_CONFIG:AM$KEYSTORE.JKS. On Windows, it is AM$KeyStore.jks in
the Availability Manager installation directory. If you use FTP, be sure to
use the binary mode to transfer the key store successfully.
2.4.4.6.2 Export the Key Store Public Key to a Trusted Certificate
This step extracts the Data Server public key from the key store by
exporting it to a trusted certificate.
Start the Data Analyzer on the analyzer system. When the Availability Manager
starts, it displays the Network Connection dialog box as shown in
Figure 2-12.
Figure 2-12 Network Connection Dialog Box
From the Key Stores menu, select Open Trust or Key
Store... to open the Open Key or Trust Store dialog box as shown
in Figure 2-13.
Figure 2-13 Open Key or Trust Store Dialog Box
In this dialog box, locate the key store file by selecting the name of
the key store file, and clicking Open. The opened key store is
displayed in the Key Store Management dialog box as shown in
Figure 2-14.
Figure 2-14 Key Store Management Dialog Box
Select the key pair entry in the dialog box. This enables the
Export... button. Click Export... to export the
public key of the key pair into a trusted certificate. The
Availability Manager displays the Export Certificate dialog box as shown in
Figure 2-15.
Figure 2-15 Export Certificate Dialog Box
Store the trusted certificate in the folder and file name of your
choice. Any file with the CER extension works, although accepting the
default can make the file easier to identify. Click Export to
complete this process. You now have the trusted certificate.
Important
Remember the location of this certificate. This certificate is used in
Section 2.4.5.
|
2.4.5 Key Setup for a Data Analyzer to Connect to an Existing Data Server
This section describes how to set up a trust store for a Data Analyzer
to connect to an existing Data Server. The steps involve the following
tasks:
- Obtaining the Data Server's public key from its key store as a
trusted certificate.
- Copying the trusted certificate to the analyzer system.
- Importing the trusted certificate into the Data Analyzer's trust
store.
2.4.5.1 Obtaining the Data Server Public Key
First enter the Data Server's public key into the trust store of the
Data Analyzer. This transfer involves exporting the key into a trusted
certificate from the key store, and importing the key into the Data
Analyzer's trust store.
The following sections describe how to export the the public key into a
trusted certificate. If you need to export the public key, determine
which of the following applies to you.
Make sure you have the Data Server's public key in a trusted
certificate for the next step.
Copy the trusted certificate from the server system to the analyzer
system. Note that the trusted certificate contains binary data, so you
must use binary mode if FTP is the file transport. The certificate is
now ready for importing to the Data Analyzer's trust store.
Start the Data Analyzer on the analyzer system. From the Analyzer menu,
select Trust Store to open the default trust store for this
system. The Availability Manager displays the Trust Store Management dialog
box as shown in Figure 2-16.
Figure 2-16 Trust Store Management Dialog Box
Click Import... to import the trusted certificate. The
Availability Manager displays the Import Certificate dialog box as shown in
Figure 2-17.
Figure 2-17 Import Certificate Dialog Box
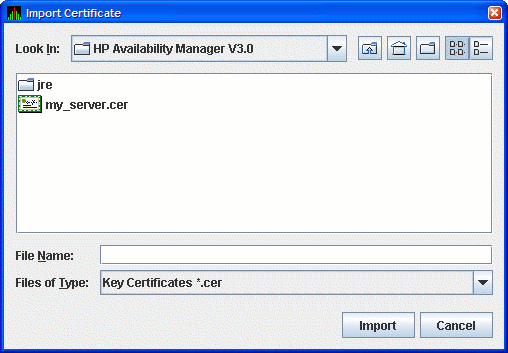
Select the name of the trusted certificate, and click Import.
The Availability Manager displays the Assign Alias for Certificate dialog box
as shown in Figure 2-18.
Figure 2-18 Assign Alias for Certificate Dialog Box
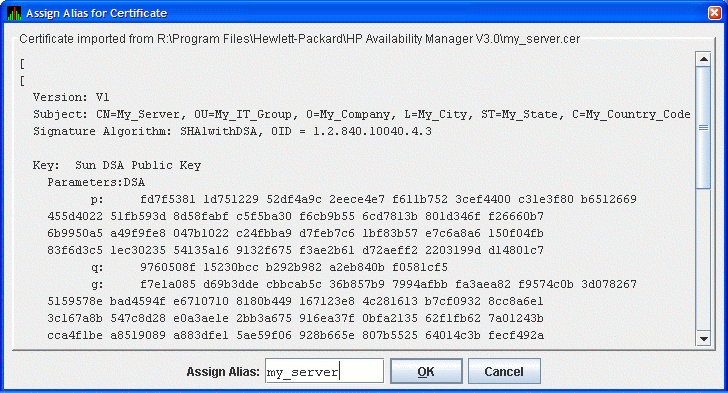
This dialog box displays the trusted certificate. Enter the alias name
for the certificate in the Assign Alias field. Although you can put any
text in this field, it is best to choose the same alias name that the
Data Server uses. Then click OK to continue. The Availability Manager
displays the Trust Store Management dialog box with the imported key as
shown in Figure 2-19.
Figure 2-19 Trust Store Management Dialog Box
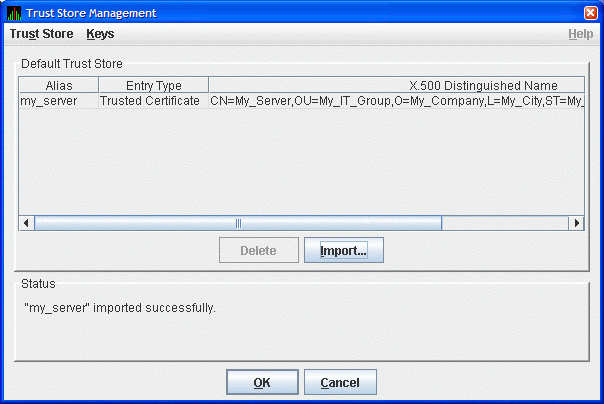
In the Trust Store Management dialog box, click OK to save the
trusted certificate in the Data Analyzer trust store.
This sets up the Data Analyzer to connect to a Data Server. The Data
Analyzer supports connections to multiple Data Servers. To connect to
multiple Data Servers, export the public key for each Data Server and
import it into the Data Analyzer.
This completes the Data Analyzer key configuration. You are now ready
to run the Data Analyzer and connect to the Data Server.
This section describes tasks you must perform after the Availability Manager
Data Server is installed.
Starting the Data Server is somewhat different on OpenVMS than on
Windows systems. However, on both systems, the Data Server listens for
connections from Data Analyzers once it is started.
The Data Server is designed to run in a minimal environment. It only
outputs text messages to log various events and Data Analyzer
connections. Because of this design, it can be run in a batch job on
OpenVMS, or as a startup task on Windows.
The following sections contain the sequence of steps required to start
the Data Server on an OpenVMS node and a Windows node.
The first step is to decide which platform is to run the Data Server:
Windows or OpenVMS.
To start a Data Server on an OpenVMS System (Alpha or I64), make sure
the following conditions are met:
- The Data Server is installed on a node that is on the same LAN as
your OpenVMS systems.
- The Data Collector is started (see Section 2.1.3).
Starting the Data Collector is important for these reasons:
- Defines the various AMDS$* logicals needed by the Data Server.
- Allows the Data Server to communicate to the Data Collector on the
network.
After you install and configure the Data Collector and Data Server and
start the Data Collector, enter the following command to start the Data
Server:
Note
For a list of qualifiers you can use with the AVAIL/SERVER command, see
the HP Availability Manager Installation Instructions, or enter HELP AVAIL and then the qualifier name at
the DCL dollar prompt.
|
2.5.2 Starting the Data Server on Windows
To install and configure the Availability Manager, follow the steps in the
HP Availability Manager Installation Instructions. Then, to start the Data Server, click Click Start
-> Programs -> HP Availability Manager -> Data Server Startup.
If you are running a firewall on your server system, ensure that the
firewall allows communication over the port the Data Server uses. The
default port number is 9819, and the type of connection for the port is
TCP.
The following section describes the steps needed to get the Data
Analyzer to connect to one or more network adapters, or connect to one
or more Data Servers. The Data Analyzer supports any combination of
available network adapters and Data Servers.
These steps assume that the Data Servers are already running on the
server systems.
Start the Data Analyzer on the analyzer system as described in
Section 2.2. The Availability Manager displays the Network Connection dialog
box, shown in Figure 2-20.
Figure 2-20 Network Connection Dialog Box
Figure 2-20 shows two entries for the two network adapters on this
particular system. The last entry is where you enter the IP address and
port number of a Data Server. To use one or more of these network
adapters, check the check box to the left of each network adapter, and
click OK. The Data Analyzer starts, using the network adapters
you have chosen. To start using the Data Analyzer, see the instructions
in Section 2.8.
To connect to one or more Data Servers, enter the IP address of each
server, along with the IP port that the Data Server uses for
communication. There are a number of possible forms for the IP address:
- Alphanumeric IP address - Alpha1.denver.newscorp.com
- Numeric IP address - 136.132.15.32
- WINS entry for a Windows system - WXPSRV1
- Analyzer system name synonym - Localhost
The default IP address shown in the dialog box is "localhost".
Localhost is a synonym for the IP address of the Analyzer system
itself. Use the "localhost" default or enter the IP address of the Data
Server, the IP port the Data Server is using in the Port: field, and
click on the plus sign button to register the entry. The data for the
new Data Server entry is displayed in the dialog box. You can repeat
this process to enter all the Data Servers you want to use.
Note
You can use the "localhost" name to allow more than one Data Analyzer
instance to access data from a particular network adapter on the
system. See Figure 1-4 for a figure that is similar to the following
example that illustrates how this is done.
For instance, Data Server node ACCPNT is connected to Data Collector
nodes Edmund and Lucy through network adapter A on ACCPNT. If you start
the Data Analyzer on ACCPNT and have it use adapter A to gather data,
this instance of the Data Analyzer is the only instance that can use
adapter A to access Edmund and Lucy. If you want more than one Data
Analyzer to access Edmund and Lucy through node ACCPNT, then use the
Data Server instead. Start the Data Server on ACCPNT and have it use
adapter A. Then you can start the Data Analyzer on ACCPNT, use the
"localhost" name to access the Data Server running on ACCPNT, and
gather data from Edmund and Lucy. Another person using the Data
Analyzer on a Data Analyzer node can also gather data from Edmund and
Lucy from ACCPNT by connecting to the Data Server on ACCPNT.
Using the Data Server in this manner allows you to run the Data
Analyzer on a Data Server node without restricting access to its
network adapters.
|
Figure 2-21 shows an example of this procedure. The IP address
entered is Aslan, the WINS entry for the Data Server system, and the
port number entered is 9819.
Figure 2-21 Network Connection Dialog Box with One Data Server
Entry
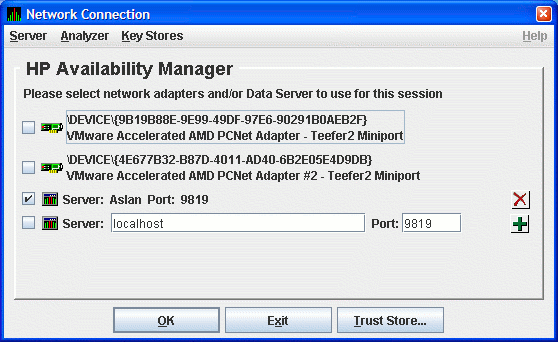
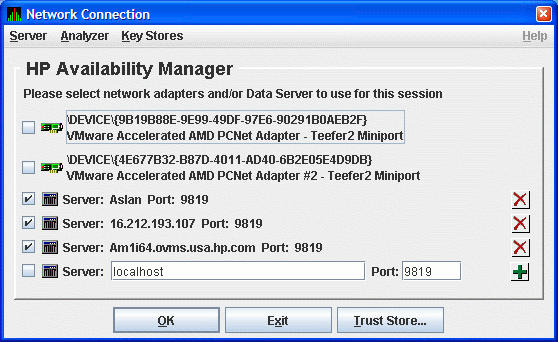
Figure 2-22 shows the result of adding a second Data Server using the
numeric form of the IP address.
Figure 2-22 Network Connection Dialog Box with Two Data Server
Entries
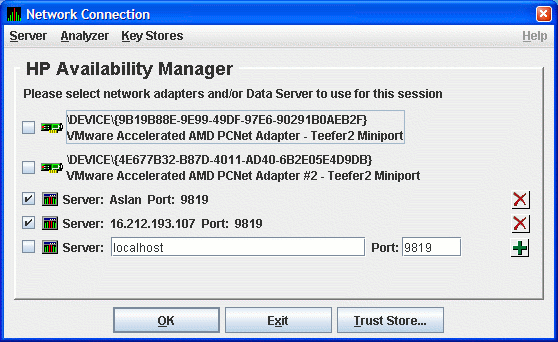
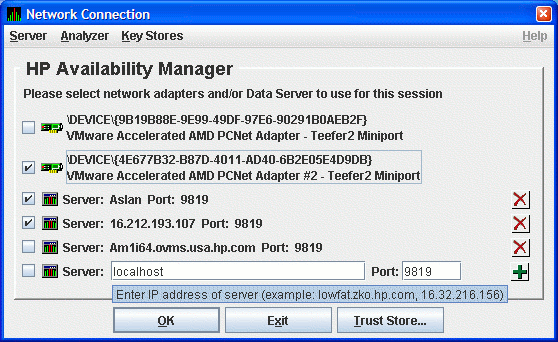
Figure 2-23 shows the result of adding a third Data Server using the
alphanumeric form of the IP address.
Figure 2-23 Network Connection Dialog Box with Three Data
Server Entries
To remove a Data Server entry from the Network Connection dialog box,
click the delete button (X) to the right side of the Data Server entry.
To start collecting data, check the network adapter and Data Server
entries you want to use, and click OK. This process is
described in Section 2.7.
This section contains some additional information about handling keys,
key stores and trust stores.
Note the following:
- The Key Store menu item on the Server and the Key Stores menu open
the default Data Server key store (AM$KeyStore.jks). This default key
store name is what the Data Server uses when it starts. You can save
key stores with other file names, but when you copy the key store to
the server system for the Data Server to use, you must rename it to the
default key store name.
- The Trust Store menu item on the Analyzer and Key Stores menus and
the Trust Store button open the default Data Analyzer trust store
(AM$TrustStore.jks). This default trust store name is what the Data
Analyzer uses when it starts. You can save trust stores with other file
names, but when you copy the trust store to the analyzer system for the
Data Analyzer to use, you must rename it to the default trust store
name.
- The other menu items on the Key Stores menu open generic key or
trust stores that you are prompted to name when you open or save any of
them.
2.6.1.2 Export and Import Made Easy
The Availability Manager allows you to open multiple key and trust stores
using the menus on the Network Connection dialog box. The Key Store and
Trust Store Management dialog boxes allow you to drag and drop items
interchangeably between dialog boxes (and to the file system or desktop
on Windows). This operation can make import and export easier if you
open the key and trust stores locally or if you use network shares to
open them.
The certificate that you create is a "self-signed" one. This
means that the person who creates the certificate also signs off on its
legitimacy. This type of certificate is also called a
root certificate.
When you start the Data Analyzer, it displays the Network Connection
dialog box. This dialog box shows the available network adapters on the
system, and any Data Servers that have been entered. You can choose
which networks adapters and Data Servers the Data Analyzer uses for
collecting data by check the check box of each entry.
Figure 2-24 shows a Network Connection dialog box with the two
available network adapters on the system, and three Data Servers. Three
of the entries are checked. Section 2.8 uses this example to document
how to use the Data Analyzer.
Figure 2-24 Sample Network Connection Dialog Box with Three
Checked Entries
2.8 Using the System Overview Window
After you click OK on the Network Connection dialog box, the
Data Analyzer displays the System Overview window Figure 2-25 and
monitors the network for multicast "Hello" messages from
nodes running the Data Collector. It follows these steps:
- After receiving a multicast "Hello" message from the
Data Collector, the Data Analyzer attempts to connect to a node. This
is called the attempting collection state.
The
Data Analyzer notifies you of this and other states in the System
Overview window, which is shown in Figure 2-25.
- The Data Collector performs a security check on the Data Analyzer
connection attempt.
- If the Data Analyzer passes the security check while the
Availability Manager is attempting the connection, the connection succeeds,
and data
collection starts. This is called the data collection
state.
- If the Data Analyzer fails the security check, the node is in the
connection failed state.
- While the Data Analyzer collects data, if a node goes down, or a
network connection fails between the graphical user interface and the
node, that node is placed in the path lost state.
The colors of the icons preceding each node name in Figure 2-25
indicate the state of the node.
Figure 2-25 System Overview Window
The color code of each node state is explained in Table 2-2.
Table 2-2 Explanation of Color Codes in the System Overview Window
| Color |
Description |
|
Brown
|
Attempts to configure nodes have failed---for example, because the
nodes are in a connection failed state. A tooltip, which is described
in Section 2.8.2.1, explains the reason for the failure.
|
|
Yellow
|
Nodes are in the attempting collection state; that is, the security
check of the nodes is in progress. Nodes that remain in this state more
than several seconds indicate network connectivity problems with the
Data Analyzer.
|
|
Black
|
Nodes are in a path lost state; that is, the network path to the node
has been lost or the node is not running.
|
|
Red
|
Nodes are in the data collection state---that is, they are collecting
data---but the nodes have exceeded a threshold, causing events to be
posted. Note that if an event causes the output of any message besides
an informational one, a node is displayed in red.
|
|
Green
|
Nodes are in the data collection state; that is, the security check was
successful, and the nodes are collecting data.
|
The System Overview window is divided into two segments, or
panes: the Group/Node pane and the Event pane.
When you start the Data Analyzer, the System Overview window (see
Figure 2-25), displays information on connection lines at the top of
the pane (that is, lines starting with "Device",
"Aslan" and "16.212.8.229" in Figure 2-25). The
items on these lines measure throughput and congestion on each
connection. The following table describes the column headings.
| Heading |
Description |
|
MEM
|
These numbers monitor the memory statistics of Data Server. The first
number is the amount of memory used. The second number is the total
memory available. The colored bar represents the percentage of memory
used. A blue bar is used for values up to 60%, yellow up to 80%, and
red up to 100%.
|
|
PFLTS
|
These numbers are the number of Data Analyzers connected to the Data
Server, and measure the delay from when a packet is queued from the
Data Server LAN connection to when it is sent to the Data Analyzer. The
delay is measured in milliseconds. The data is in the form C - X/A/N
where
C - Connection count
X - Maximum delay
A - Average delay
N - Minimum delay
The colored bar represents the average delay, with the maximum set
at 500ms. A blue bar is used for values up to 250ms, yellow up to
400ms, and red for 400ms.
|
|
PFW/COM
|
These numbers measure the delay from when a packet is queued in the
Data Analyzer to when it is written to the Data Server. The delay is
measured in milliseconds. The data is in the form X/A/N where
X - Maximum delay
A - Average delay
N - Minimum delay
The colored bar represents the average delay, with the maximum set
at 500ms. A blue bar is used for values up to 250ms, yellow up to
400ms, and red for 400ms.
|
|
BIO
|
These numbers monitor the packets that have been read using this
connection, including multicast "Hello" messages for nodes
that are not being monitored. The first number is the number of packets
per second. The second number is the number of bytes per second. Note
that for wide area network connection, this does not include any
overhead that TCP/IP introduces when transmitting the data. The blue
bar represents the number of packets read in the last monitoring
interval. A full bar represents 50 or more packets per second.
|
|
DIO
|
The first (or only) number is the number of packets currently waiting
on the server to be read on this connection. A number consistently
greater than 0 indicates congestion or a failing connection. The yellow
bar also reflects this number. A full bar represents 50 or more packets
in the queue.
The second number (when shown) is a count of the number of packets
that have been discarded because the write queue on the server grew too
large. A red bar indicates the number of packets that were discarded in
the last monitoring interval. A full bar represents 50 or more packets
discarded.
|
|
CPUQs
|
These numbers monitor the packets that have been written using this
connection. The first number is the number of packets per second. The
second number is the number of bytes per second. Note that for wide
area network connections, this does not include any overhead that
TCP/IP introduces when transmitting the data. The blue bar represents
the number of packets written in the last monitoring interval. A full
bar represents 50 or more packets per second.
|
|
EVENTS
|
The first (or only) number is the number of packets currently waiting
to be written to the server on this connection. A number consistently
greater than 0 indicates congestion. For a WAN connection, this might
indicate a slow or failing connection. The yellow bar reflects this
number. A full bar represents 50 or more packets in the queue.
The second number (when shown) is a count of the number of packets
that have been discarded because the write queue grew too large. The
red bar indicates the number of packets that were discarded in the last
monitoring interval. A full bar represents 50 or more packets discarded.
|
|
PROC CT
|
The status shows the state of the server connection. If the status is
ERROR or FAILED, the error text is in the
HW Model field.
|
|
OS VERSION
|
The version and build number show what version of the Availability Manager
that the Data Server is running.
|
If the number of packets waiting or discarded is consistently large,
you might notice that the data displayed in the application updates at
a slower rate. In extreme cases, nodes might turn black, indicating a
lost connection with the node when, in reality, the problem is the
congestion between the Data Analyzer and the Data Server.
If you have a problem with congestion, consider scaling back the number
of nodes or the amount of data being collected, or lengthening the
collection intervals.
Note
Most of these fields have a tooltip describing the field contents and
some additional data. The tooltips can be rather large. To ensure that
the tooltip stays up as long as you need to read it, move the mouse
slightly over the field to keep the tooltip visible.
|
The rest of the Group/Node pane displays information about the OpenVMS
groups and nodes that the Data Analyzer has found. By default, within
each group, the Data Analyzer displays the nodes with which it can
establish a connection. (If the Data Analyzer finds Windows nodes,
those are also displayed.)
Groups are set up during installation on Data Collector nodes and are
user-definable. Be sure to define groups by cluster membership. If a
node is not a member of a cluster, then you can define a group by
function, type of hardware, or geographical location.
If you want to change the groups being monitored, you need to use a
customization option to make changes. See Section 7.4.1 for
instructions.
Note
HP recommends that you define a cluster as its own group. This is
necessary for the Lock Contention, Disk Summary, Disk Volume, and
Cluster data collections to function correctly.
|
2.8.1.2 Displaying Group Information
Groups---and the nodes in each group with which the Data Analyzer is
able to establish a connection---are displayed in the Group/Node pane
of the System Overview window (see Figure 2-25).
To display only groups in the Group/Node pane, click the handle in
front of a group name to a horizontal position, and the nodes in that
group are removed, as shown for both groups in Figure 2-26. (Clicking
the handle into a vertical position displays nodes again.)
Figure 2-26 Group Overview Pane

The numbers in parentheses after "OpenVMS" (in the Group/Node
pane of the System Overview window) are the following:
- The first number in parentheses is the total number of groups that
are listed.
- The second number in parentheses is the total number of nodes in
all the listed groups with which the Data Analyzer can establish a
connection.
On each group name row, following the name of the group, the number in
parentheses is the number of nodes in that group with which the Data
Analyzer has established a connection.
On a group name row under the OS Version heading are color-coded
numbers indicating the number of nodes in that group that are one of
five color-coded states. These states are explained in Table 2-2.
Additional summary information about the entire group is on the group
line. CPU, MEM, BIO, and DIO numbers are averages. The rest of the
number are totals for all of the nodes in the group.
Notice the small triangle in the BIO heading in Figure 2-26. The
direction of the triangle indicates that the nodes are sorted in
descending order of BIO rates. Click on the triangle to reserve the
sort order, or click on another column header to select a new item on
which to sort data.
In the Group/Node pane, only nodes within a group are sorted. The
groups remain in alphabetical order. You can sort groups in the Group
Overview window by changing the sort order of one of the data column
headings (see Figure 2-26).
The Group/Node pane of the System Overview window allows you to focus
on resource usage activity at a high level and to display more specific
data whenever you want. This section explains the basic use of the
Group/Node pane. For more information, see Chapter 3.
Even when nodes are not displayed on the System Overview window or the
Group/Node pane, you can display important node information by placing
the cursor over a group name or icon. By holding the cursor over the
KOINE group name, for example, the tooltip similar to the one shown in
Figure 2-27 is displayed, containing summary node information.
Figure 2-27 Tooltip Example: Summary Node Information
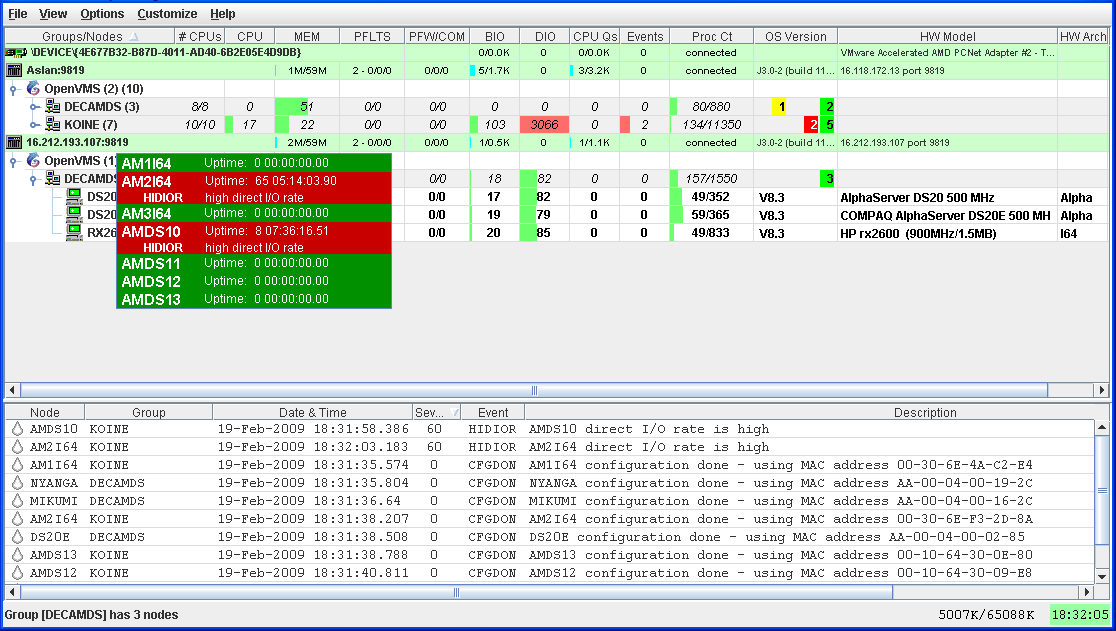
Note
Most of these fields have a tooltip describing the field contents and
some additional data. The tooltips can be rather large. To ensure that
the tooltip stays up as long as you need to read it, move the mouse
slightly over the field to keep the tooltip visible.
|
Possible tooltip colors and their meanings are in Table 2-3.
Table 2-3 Explanation of Tooltip Colors
| Color |
Meaning |
|
Brown
|
Indicates why the configuration of the node failed.
|
|
Yellow
|
Shows number of Data Collector multicast "Hello"
messages received and the number of attempts to configure the node
("Configuration packets sent"). Nodes that remain in this
state more than several seconds indicate network connectivity problems
with the Data Analyzer.
|
|
Black
|
Shows the following:
|
|
For nodes that were in the data collection state (see Table 2-2),
and communication was then lost:
-- When the connection to the node was lost ("Path lost at
time").
-- When that node was booted ("Boot time:
time").
-- What the uptime of the node was ("Uptime:
time").
|
|
|
For nodes that were in the connection failed state (see Table 2-2):
-- When the connection to the node was lost ("Path lost at
time").
-- The reason the node was not configured.
|
|
|
Red
|
Nodes have exceeded a threshold, causing events to be posted for the
node. If an event causes the output of any message besides an
informational one, a node is displayed in red.
|
|
Green
|
The security check was successful, and the nodes are collecting data;
node uptime is shown.
|
The Group/Node pane is designed to display monitored nodes in a single
pane. This format works well for sites that have relatively few nodes
to monitor. However, for large sites that have many groups and nodes,
scrolling through the display can be time-consuming. To help those with
large sites, two additional windows are available:
- The Group Overview window
- The Single-Group window
2.8.2.2 Displaying a Group Overview Window
The first window to help you view large sites is the Group Overview
window. To view all the group name row data easily, click on the View
menu at the top of the page and select "Group Overview." The
Group Overview window that is displayed (Figure 2-28) is similar to
the Group Overview pane in Figure 2-26.
Figure 2-28 Group Overview Window

This display is designed to provide an overview of all the groups being
monitored. If you want more information about a group, place the cursor
over the group name or icon. A tooltip is displayed with additional
information about nodes in the group similar to the one displayed in
Figure 2-27.
You can also double-click a group name to display a Single-Group
window, as explained in Section 2.8.2.3.
The second window to help you view large sites is the Single-Group
window. This display shows the nodes in one group (see Figure 2-29).
To obtain this display, you can also right-click the group name in the
Group/Node pane and select the "Display" option. A separate
window appears with only the nodes in the group you have selected (see
Figure 2-29). This window is useful in simultaneously displaying
groups that are not adjacent in the list in the Group/Node pane.
Figure 2-29 OpenVMS Single-Group Window
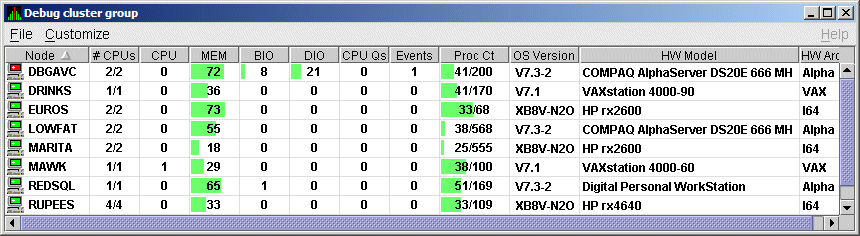
Within each group of nodes displayed, the Data Analyzer displays all
the nodes with which it can communicate. If some nodes in the group are
not displayed, it is because the Data Analyzer has not received a
multicast "Hello" message from the Data Collector on that
node.
The display includes the following items:
- A list of the nodes in the group along with summary data for each
node. In Figure 2-25, the Debug cluster group contains 9 nodes.
- A color-coded monitor icon preceding each node name indicates the
state of the node. See Table 2-2 for explanations of states these
colors indicate.
- For various node data items, some graphs indicate the percentage of
an item that is being used; other graphs are totals.
Green graphs
indicate percentages below a customized threshold; red graphs indicate
percentages above a customized threshold. Some data items are numbers,
not percentages; for example, CPUs, CPU queues, and events.
More information about node data is in Chapter 3.
Somewhat different information is displayed for a group of Windows
nodes. For more information, see Section 3.1.2.
To display more information about an individual node, double-click a
node name or in the Single-Group window or the
Group/Node pane. You can also right-click a node name and select the
"Display..." option. The Data Analyzer displays the Node
Summary page shown in Figure 2-30. (The data on this page is
explained in more detail in Chapter 3.)
Figure 2-30 OpenVMS Node Summary
At the top of the Node Summary page are tabs that correspond to types
of node data displayed in the Group/Node pane. If you double-click a
field under a column heading in the Group/Node pane,
the Data Analyzer displays a page that provides more information about
that field. For example, if you click a value under "CPU",
the Data Analyzer displays a page similar to the one shown in
Figure 3-6.
By default, the only data collected for a node is the data displayed in
the Node pane (Figure 2-29). This data is called a node
summary data collection. The events in the Event pane of the
System Overview window (see Figure 2-25) are produced when node
summary data is processed. See Appendix C for a list of events
associated with node summary data.
If you want to signal additional events that are listed in
Appendix C, you must collect the data associated with those events.
To collect this data by default, you must enable background data
collection for the data. Background and foreground data collections are
explained in more detail in Section 1.4.1.2.
For OpenVMS nodes, if you want background data collection (and the
associated event detection), you must turn on data
collection for each type of data you want to collect. On Windows nodes,
background data collection is always enabled and cannot be turned off.
To turn on various types of data to be collected, follow these steps:
- In the System Overview window (Figure 2-25), click the
Customize menu.
- Click Customize OpenVMS....
- Click the Data Collection tab.
The Data Analyzer then displays the Data Collection Customization page
(Figure 2-31).
Figure 2-31 Data Collection Customization
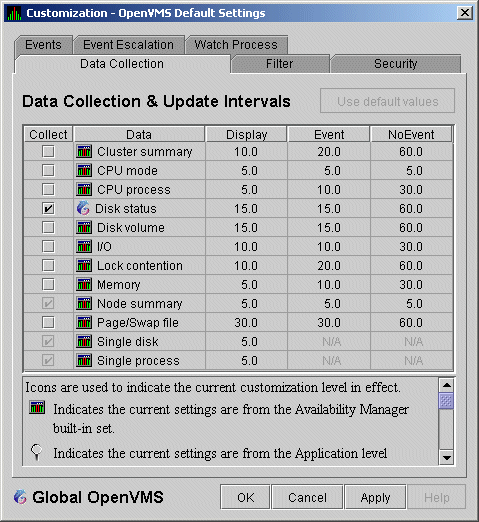
The following types of data are collected by default:
- Node summary
- Single disk
- Single process
To turn on a type of data collection, select the checkbox for that type
of data collection in the "Collect" column. For example, to
collect CPU process data, check the checkbox for "CPU
process" in the Collect column. Clicking the checkbox again clears
it.
When you click a data collection name, the Explanation section at the
bottom of the page tells where the data for a particular data
collection is displayed. Table 7-3 summarizes this information.
You cannot turn off the collection of single disk and single process
data. These types of data are collected by default when you open a
Single Disk Summary page or a Process Information page, respectively.
On the Data Collection Customization page, you can change the intervals
at which data is collected. Collection intervals are explained in
Chapter 7.
You can sort data in many OpenVMS displays. The following list provides
some examples. To sort the values in a field, click the corresponding
column heading. To reverse the sort order, click the column heading
again.
Depending on the field, you can sort data alphabetically or
numerically. An alphabetical sort is performed using ASCII character
values; for example, dollar signs ($) precede letters in the sort order.