|
» |
|
|
|
|
|
|
|
|
Ajo Jose Panoor, OpenVMS LAN Engineering
Anand Ramaswamy, OpenVMS LAN Engineering
Richard Stockdale, OpenVMS LAN Engineering
|
|
|
|
|
When setting up a LAN, there are a few techniques that can be useful for troubleshooting. This article will cover the following points:
- LAN configuration-Know what LAN devices are on the system
- LAN application configuration-Know what applications are using each device
- LAN counters-Provide information about each LAN device
- LAN buffer management-Know what buffers should be maintained to avoid errors
- LAN trace-Know how to interpret the trace logs
- LAN setup issues-Common setup issues in the customer environment
|
|
|
|
|
|
First, it is important to determine what LAN devices are configured on the system. This can be done in a few different ways:
- Looking at devices on the console—On Alpha systems, the console command SHOW CONFIG displays the system configuration. For any devices that the console firmware does not recognize, the display simply lists the PCI Device ID, PCI Vendor ID, PCI Subsystem ID, and PCI Subvendor ID. You can then search for these IDs in SYS$SYSTEM: SYS$CONFIG.DAT to see if VMS could configure the device. On i64 systems, the EFI console displays bootable devices as the system runs through self-test. You can look at the devices in the Boot Configuration menu. The EFI utility VMS_SHOW on the VMS EFI partition displays most of the LAN devices as well.
- Using LANCP on a live system—LANCP is invoked by the command $ RUN SYS$SYSTEM:LANCP, via $ MC LANCP, by defining LANCP as a foreign command, or by defining DCL$PATH to include SYS$SYSTEM then issuing the command $ LANCP. The LANCP command SHOW CONFIGURATION lists the LAN devices configured on the system.
- Using the System Dump Analyzer (SDA) on a live system—SDA is invoked by the command $ ANALYZE/SYSTEM on a live system. The CLUE CONFIGURATION/ADAPTER command displays the I/O configuration. The SDA command LAN CONFIGURATION displays LAN device data similar to the LANCP SHOW CONFIGURATION command.
- Analyzing a crash dump—SDA is invoked by the command $ ANALYZE/CRASH SYS$SYSTEM:SYSDUMP.DMP for a crash dump. The CLUE CONFIGURATION/ADAPTER command displays the I/O configuration. The SDA command LAN CONFIGURATION displays LAN device data similar to the LANCP SHOW CONFIGURATION command.
|
|
|
|
|
|
The next step is to determine the characteristics of each application (user) running on each LAN device. This can be accomplished with these commands:
- LANCP command-SHOW CONFIGURATION/USERS:
- SDA command-SHOW LAN:
- SDA command-SHOW LAN/DEVICE=EIA6 or SHOW LAN/CLIENT=DECNET:
|
|
|
|
|
|
SDA includes LAN-specific commands that provide information about each LAN device and LAN application. The following list summarizes some of the general SDA commands that are related to LANs:
- SHOW LAN/FULL—Displays detailed information about each LAN device
- SHOW LAN/ERROR—Displays LAN errors
- SHOW LAN/COUNTERS—Displays the LAN device and application counters
- SHOW LAN/WEIRD—Displays LAN anomalies
- SHOW LAN/QUEUES—Displays the LAN queue structures
- SHOW LAN/TIME—Displays the time of major LAN events
- SHOW LAN/VCI—Displays VCI structure information
Additional qualifiers limit the display to a medium type or specific device. These qualifiers are /DEVICE=devname, /CLIENT=clientname,/UNIT=unitname, and /CSMACD. The qualifier /CSMACD selects Ethernet devices only. The other three-/DEVICE=devname, /CLIENT=clientname,/UNIT=unitname-are synonymous. You can specify a client name with /DEVICE or /UNIT, and similarly with device and unit name. Client names include SCA, DECNET, LAT, MOPRC, IP, DIAG, ELN, BIOS, LAST, USER, ARP, RARP, MOPDL, LOOP, BRIDGE, DNAME, ENCRY, DTIME, LTM, AMDS, DECNETV, PATHWRK, IPV6.
The LAN-specific SDA extension image is SYS$LIBRARY:LAN$SDA.EXE. This image implements a set of LAN commands which mirror some of the display functions of LANCP, including configuration information, counters, and trace information. Additional displays expand on the data available by the SDA command SHOW LAN.
The LAN SDA commands are:
- LAN HELP—Displays help for the SDA LAN extension. LAN commands are implemented in the SDA extension LAN$SDA.EXE.
- LAN CONFIGURATION—Displays LAN device configuration information. Normally, it is similar to the LANCP SHOW CONFIGURATION command, but may vary from release to release.
- LAN COUNTERS—Displays LAN device counters, similar to the LANCP SHOW DEVICE/COUNTERS command.
- LAN INTERNAL_COUNTERS—Displays LAN driver internal counters, similar to the LANCP SHOW DEVICE/INTERNAL_COUNTERS/DEBUG/ZERO command.
- LAN QUEUES—Displays the request and pending queues maintained by the LAN driver and the LAN common routines for a device.
- LAN RINGS—Displays the ring structures maintained by a LAN driver for communicating transmit and receive information to the device.
- LAN TRACE—Displays LAN driver trace information collected for a LAN device.
- LAN TRACE/CONTEXT—Displays LAN driver trace context for a LAN device, consisting of the definition of the trace mask bits.
- LAN TRACE/REVERSE—Displays LAN driver trace information collected for a LAN device in reverse order, from latest to earliest.
An additional qualifier limits the display to a specific device: /DEVICE=devname, where devname is the name of a LAN device.
Note that not all device-specific commands are implemented for all devices, such as LAN INTERNAL_ COUNTERS and LAN RINGS.
LAN Control Program (LANCP)
The LAN Control Program (LANCP) is the main mechanism within OpenVMS for controlling and displaying information about LAN devices. LANCP is invoked by the command $ RUN SYS$SYSTEM: LANCP, via $ MC LANCP, by defining LANCP as a foreign command, or by defining DCL$PATH to include SYS$SYSTEM then issuing the command $ LANCP. Help is available within the program and in the HP OpenVMS System Management Utilities Reference Manual.
|
|
|
|
|
|
For most configurations, the LAN driver and LAN common routines maintain a reasonable number of buffers that minimize the possibility of lost packets.
During transmit, a relatively small number of buffers is sufficient to attain the performance capabilities of a LAN device. Each LAN driver sets up the transmit path according to the hardware specifications and arranges the number of transmit buffers and transmit segments without user input. The only way packets can be lost on transmit is if a transmit error occurs.
During receive, sufficient buffers must be available to the LAN device to support the incoming packet rate. The LAN device has some buffering, and the receive buffers that are given to the LAN device constitute the remaining buffering. The LAN driver attempts to filter and deliver receive packets to applications as fast as they are copied to receive buffers by the device. When the LAN driver doesn't keep up with the receive stream, buffering becomes exhausted and packets are discarded by the device. Packets are also discarded because the packet was corrupted or damaged, resulting in a CRC error.
When a receive packet is discarded, the reason is reflected in the LAN counters:
- CRC error—The packet was damaged during transmission, so the calculated CRC does not match the CRC in the packet. To address these errors, look at the network cable running from the LAN device to its termination point at the switch, hub, or other LAN device (for point-to-point links). Also be sure to verify the duplex setting, as a duplex mode mismatch can result in CRC errors. A software bug in the LAN driver can also affect the transmit or receive operation of the LAN device, resulting in CRC errors.
- Length error—The length of the packet doesn't match the expected packet length. It was either damaged in transmit, even though the CRC is good (some switches regenerate CRCs), or the application that constructed the packet included the wrong length. To address these errors, determine which application is generating the errors and fix it. LAN driver tracing can be used to trace received packets and locate the source of the errors.
- Data overrun error or system buffer unavailable error—The LAN device exhausted its internal buffering and was unable to avoid losing an incoming packet. This can happen if device access to memory is slower than the incoming data rate or if the device has no available buffers for the receive data. A data overrun error is generally synonymous with a system buffer unavailable error. How these counters are maintained for a LAN device is driver- and device-specific. To address these errors, supply more receive buffers as described below. If the errors are the result of DMA performance issues, you may need to relocate the LAN device to another slot, perhaps on a PCI where the LAN device can get the bandwidth it needs. If the LAN device is a low-performance EISA or ISA NIC, you can replace it with a higher-performance adapter.
- User buffer unavailable error—For QIO applications, such as DECnet Phase IV, the LAN driver discards receive packets if the application has not provided a buffer, or the number of buffers that the application is allowed to accumulate is exceeded. To address these errors, increase the receive buffer count for the application. For DECnet Phase IV, set the line receive buffers to a larger value. For this and other QIO applications, the LAN QIO parameter that is significant is NMA$C_PCLI_BFN-i.e., the number of user buffers, which has a maximum allowed value of 255. This value multiplied by the device buffer size is charged to the process BYTLM quota.
Supplying more receive buffers
To supply more receive buffers to a LAN device, you can adjust the minimum and maximum buffers using LANCP commands. An application can include these parameters in a setmode set_mac request, parameters NMA$C_PCLI_MINRCV and NMA$C_PCLI_MAXRCV. The permitted range for these parameters is 32 to 1536 buffers.
For example, for device EWC, let's set the minimum receive buffers to 512 and maximum receive buffers to 768. We must first define the values in the permanent device database so the values get set automatically when LANACP is started. Then the current values can be adjusted:
$ MC LANCP define device/min_buffers=512/max_buffers=768 ewc
$ MC LANCP set device/min_buffers=512/max_buffers=768 ewc
See the LAN chapter in the HP OpenVMS I/O User's Reference Manual for more details.
|
|
|
|
|
|
LAN driver trace support was introduced to the LAN drivers in V7.1-2 and V7.2. The trace support is intended for debug and analysis of LAN drivers and devices. Tracing is enabled and disabled via LANCP without needing to reboot the system. Tracing is not free-the trace buffers in the driver use non-paged pool (from 65 k to 32mb depending on the size of the trace buffer selected), and recording trace data costs some performance (the cost depends on what is being measured).
Trace facility usage
The trace facility is documented in the LANCP chapter of the HP OpenVMS System Management Utilities Reference Manual.
As discussed earlier, you can view the trace data using the SDA command LAN TRACE. On the running system, you can view the trace data using the LANCP command SHOW DEVICE/TRACE, which displays the trace context followed by the trace entries in order from earliest to latest.
Trace data display columns
The trace data display heading columns are as follows:
- Sequence #—The sequence numbers start at 1, increment to 4 billion, then go back to 0. If there is a gap in the sequence numbers being displayed, an asterisk follows the number. The number of gaps is given at the end of the trace display. There is only a gap when the trace data is being collected faster than it can be displayed.
- EntryTimeStamp—System uptime in seconds.
- Time—The system time of the event. This time matches the time values that are recorded by the LAN drivers and displayed by SDA. This time may be inconsistent across CPUs, since time differences between CPUs are not accounted for. You can use the CPU number displayed in the Misc column to understand the time differences.
- Description—Text description of the event.
- XmtOut—Number of transmits to the device outstanding at the time of the event. Since this is an 8-bit value, it is limited to 255.
- RcvOut—Number of receive buffers owned by the device at the time of the event. Since this is an 8-bit value, it is limited to 255.
- Misc—An additional byte of information.
- AddlData—3 additional longwords of information specific to the particular driver. The first is the packet size for transmit and receive entries; the second and third are part of the packet data that is displayed for the transmit and receive data entries.
- If the entry is a "transmit issued" or "receive done" event and the trace mask includes the bits for transmit data or receive data, the entry following the event is the packet that was transmitted or received, displayed in dump format, however much of it has been traced.
|
|
|
|
|
|
Ethernet, including Fast Ethernet, Gigabit Ethernet, and 10-Gigabit Ethernet, is the most common LAN technology used on Alpha and i64 systems. Early Alpha systems used Turbo Channel, FutureBus+, and XMI-based Ethernet Network Interface Cards (NICs). The next-generation Alpha systems introduced EISA, ISA, PCMCIA, and PCI NICs. The latest generation Alpha and current i64 systems support PCI and PCI-X based NICs. This section focuses on these NICs. NICs are also known as LAN adapters, LAN controllers, or LAN devices. Some LAN adapters are embedded on a system module and are called LAN on motherboard (LOM) implementations.
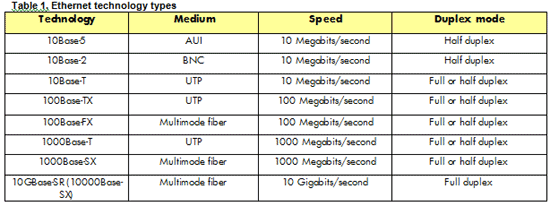
Different technologies and mediums have been used throughout the life of Ethernet. While these are fully documented in IEEE specs, the list in table 1 attempts to summarize the different types in order to clear up any confusion over terminology.
Auto-negotiation, parallel detection, and auto sense
The most common difficulty in setting up a LAN is selecting the correct speed and duplex mode. In an attempt to simplify this problem, the industry has introduced features like auto-negotiation (NWAY), parallel detection, and auto sense. These features are quite helpful when they are understood and used correctly.
Auto-negotiation is a handshake between two link partners (a link partner is one end of a point-to-point connection) using Fast Link Pulse (FLP) bursts to negotiate the highest common operating mode possible. If an auto-negotiating device determines that its link partner is not capable of auto-negotiation, it can utilize parallel detection. The parallel detection function is an auto-negotiating device's means to establish links with non-negotiating, fixed-speed devices. If the auto-negotiating device sends out FLPs but only receives Normal Link Pulses it knows it's connected to a 10 Megabit/second device. Conversely, if the auto-negotiation device sends out FLPs and receives FLPs but the FLP burst does not form a specific code word, then the link partner is a 100 Megabit/second device. Parallel detection does not determine the duplex mode; in general, it will automatically select half-duplex mode. Auto-negotiation and parallel detection are mainly performed by hardware but may be initiated and monitored by the LAN device driver. For Gigabit, the content of the FLP data has been extended to allow for 1000Base-T half and full duplex.
Auto sense is a method used by LAN devices that do not support auto-negotiation to determine the speed of the link partner. Auto sense is also used to select between AUI, BNC, and twisted pair modes for those LAN devices that support all three. While auto-sensing the speed, the LAN device is configured to run at 10 Megabits/second half duplex, and the LAN driver checks for a valid link. If a valid link is not detected, the driver sets the LAN device to 100 Megabits/second half duplex. Auto sense cannot determine the duplex mode, so the LAN driver normally selects half duplex. The same technique is used to determine the medium type.
Setting the Ethernet operating mode
A system manager can select the operating mode of the NIC in two ways. On Alpha systems, a console environment variable can be set at the SRM console. For example, a DE500-BA is identified by the console as an EW device with the console environment variable EWx0_MODE, where x is the controller letter number. When the LAN driver initializes the LAN device, it uses the console setting to set up the device. On Alpha systems and i64 systems, the device characteristics can be set using LANCP.
Some users understand the different operating modes and how they are set but are sometimes unclear as to which device supports which mode. Most Alpha SRM consoles don't inform the user that they have set the mode incorrectly. The LAN drivers do not inform the user of a bad setting, but they will usually choose a default setting if an incorrect setting was selected. One method of determining how the device has been set is to use the LANCP command SHOW DEV EWA/CHARACTERISTICS.
Ethernet setup problems
Users who understand the different modes of operation and also which NIC supports what mode can still run into setup problems. Most setup problems occur because the user has set the NIC operating mode incorrectly for the type of device it is attached to. Nearly all users connect their NIC to a hub or a switch and, less often, they connect one NIC to another NIC. It's important to understand that a hub, or repeater, is most often a fixed-speed, half-duplex device with all ports existing in the same collision domain. A switch, or bridge, is normally a dual-speed device supporting full or half duplex, auto-negotiation, and parallel detection. Most switches are manageable and the user can often disable these features. Each port of a switch represents a separate collision domain. A switch will only forward frames to a specific port, whereas a hub will replicate the frame on all ports. Multicast and Broadcast frames will of course be forwarded to all ports of a switch, subject to any filtering imposed on the switch by a network manager.
The following recommendations will help avoid setup problems with switches and hubs:
- When connecting a NIC that supports auto-negotiation to a switch that supports auto-negotiation, ensure that auto-negotiation is enabled for both the NIC and the switch.
- When connecting a NIC that does not support auto-negotiation to a switch that does support auto-negotiation, ensure that the NIC is set to half-duplex mode.
- When connecting a NIC to a 100Base-TX hub, ensure that the NIC is set to 100Base-TX half duplex.
- When connecting a NIC to a 10Base-T hub, ensure that the NIC is set to 10Base-T half duplex.
- When connecting a NIC to another NIC, ensure that both NICs are set to the same mode.
- When using a 100Base-FX-based NIC, ensure that both link partners have the same duplex mode set.
If these recommendations are not followed, problems will most likely result-the most common problem being the wrong duplex mode has been selected. When the wrong duplex mode is selected, it's possible that the link partners will continue to exchange frames, though the majority of them will be lost. This will force the application to handle lost frames, resulting in poor application performance. Examining the LAN counters will most often reveal this issue. For more information, refer to the section "LAN counters".
The following situations can lead to the wrong duplex mode being selected, as well as other problems:
- A NIC is set to 100Base-TX full duplex and is attached to a switch that is auto-negotiating—In this case, the device driver for the NIC has disabled auto-negotiation because it was told to do so when the user selected 100Base-TX full-duplex mode. The switch will attempt to negotiate but will fail since the NIC isn't participating. The switch will use parallel detection. The switch will most likely select the correct speed but will select half-duplex mode even though the NIC is running full-duplex mode.
- A NIC is set to auto-negotiate and is connected to a hub—In this case, the behavior is different for different families of NICs. For example, the Tulip/DE500 family does not perform parallel detection because of hardware limitations. Generally, the LAN device driver will attempt to auto-negotiate endlessly and the link will never come up. This situation can also be detected from the LAN counters. The number of auto-negotiation resets will increment at about once every 3 seconds and carrier check failures will also increment. (The Intel� 82559/DE600 family does perform parallel detection when auto-negotiation fails and will select the correct speed and duplex mode. This means that when using the Intel 82559/DE600 NICs the above suggestions for hubs don't necessarily have to be followed.)
- A NIC is set to a speed that is different from the speed of the hub it is attached to—This is not a good situation. In one case, a NIC set to 100Base-TX half duplex was connected to a 10Base-T hub. For some hubs, this would bring down every network connection within the collision domain. The reverse situation, a NIC set to 100Base-TX half duplex connected to a 100Base-TX hub, is less catastrophic, though the link will mostly likely remain down. In either case, the number of carrier check failures in the LAN counters will be incrementing. The LAN driver may also log transmit timeouts.
For Alpha systems, there are problems that can occur before VMS is actually involved, mainly at the SRM console level (>>>). These problems won't affect the LAN counters and the user will have to take care to observe the messages at the console.
- A NIC is set to auto-negotiate but auto—negotiation fails-This can happen for several reasons. Some are described above, but the real problem in this case is that the console LAN driver may default to 100Base-TX full duplex, causing the same catastrophic problems mentioned above.
- The console environment variable for the NIC operating mode may change—This has happened on some platforms after performing an SRM console firmware upgrade. It usually sets the mode to Twist (10 megabits half-duplex).
For i64 systems, the console setting is assumed to be auto-negotiation. The EFI firmware does auto-negotiation or parallel detection, and the VMS boot driver and runtime driver are expected to attempt to configure the device using auto-negotiation and parallel detection.
|
|
|