|
For the purpose of
illustration we will use a very simple application written in the C programming
language. For future reference, more
complex sample applications in various languages, as well as an ACMS application,
are included in the WSIT kit.
The math application
has two routines, sum and product. The interface is exposed in the
file DISK$:[VTJ]math.c
The purpose of the
WSIT tools is to generate a Java class that presents a Java version of the
math.C routines. The Java interface
should look similar to the figure below.
WSIT provides the following tools:
The use of these tools will become clear as we look at the typical development
steps. For now just know that these
tools exist.
OBJ2IDL.EXE (I64 only) takes an OpenVMS object file (.obj) as input
and generates an XML description of the applications interface. Referred to in this article as an XML IDL
file.
STDL2IDL.JAR theACMS equivalent to obj2idl.exe. It takes an ACMS STDL description as input and
generates an XML description of the applications interface. Referred to in this article as an XML IDL
file.
VALIDATE.JAR takes an XML IDL file and validates the XML against the OpenVMS IDL schema.
IDL2CODE.JAR takes an XML IDL file and generates a Java class with
the same interface. The Java class knows how to call the original non-Java
application.
Typical Development Steps
Step 1: Prepare the application. [Not required but highly encouraged]
Step 2: Describe the interface with an XML Interface Definition Language (IDL) file.
- Tools: OBJ2IDL.EXE (for C,BASIC,COBOL,FORTRAN),
STDL2IDL.JAR (for ACMS), VALIDATE.JAR
Step 3: Generate Java wrapper based on XML IDL file from step 2.
Step 4: Test the generated code from a client.
- Tools: IDL2CODE.JAR(WSIT version 1.1 or higher)
Step 1: Prepare the application [not required but highly encouraged]
Before using any
integration technology, you should evaluate the original application. The application
is likely to have been written long ago and will benefit from having a wrapper
expose a new and clean interface. The new interface will expose the legacy
implementation. Separating the interface from the implementation provides
encapsulation and the ability to easily extend and reuse the
implementation.
To avoid
complexity, these new interfaces should be tested with a simple client before
you use the Web Services Integration Toolkit. When you know that the interface
classes are working properly, you can use WSIT to extend the use of the new
interface to the Java environment.

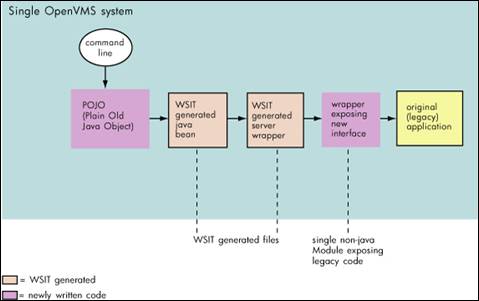
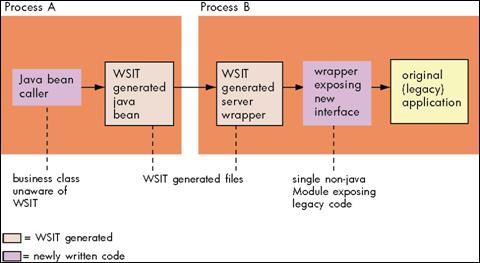
After you have prepared the application,
WSIT can extend the features of the new interface to Java, as shown in the
following diagram.

Step 2: Describe the interface
The WSIT
development tools generate and consume a simple XML file that describes an
application's interface.
You create an
XML IDL file using the tool named OBJ2IDL.EXE
(for 3GL languages) or STDL2IDL.JAR
(for ACMS).
Note: OBJ2IDL.EXE runs on OpenVMS I64 only. If you are using WSIT on OpenVMS Alpha, you
can create the XML IDL file manually in any editor using the many samples as a
guide. If you have both OpenVMS I64 and
Alpha systems, run OBJ2IDL.EXE on I64 and copy the resulting XML IDL file to
your Alpha system.
To generate an
XML IDL File for the math.c application interface, use the command line below.
The obj2idl executable accepts a switch -f which specifies the name of the
object file from which to extract the interface definition. The object file
must be compiled with /debug /noopt.
The XML file
generated by the obj2idl tool is shown in the appendix. Even those unfamiliar
with XML should be able to understand what this file is doing.
Whenever you use
the obj2idl tool you must verify that the XML IDL file correctly describes the
interface being exposed. If it does not, manually update the XML IDL file until
the interface definition is correct.
If you have
modified the XML file you can ensure that it is still well-formed and valid by
using the tool VALIDATE.JAR. For those unfamiliar with XML, an XML file is
considered well formed if it is syntactically correct. The file is considered
valid if it is semantically correct. The XML rules for validity are defined in
the file openvms-integration.xsd.
The validate
tool is an executable jar file that accepts the following arguments:
-x DISK$:[VTJ]math.xml is a switch that
specifies the name of the XML file to be validated.
-s wsi$root:[tools]openvms-integration.xsd is a switch that specifies the
XML schema file defining the semantic rules for validating the XML file
specified with the switch -x.
Step 3: Generate code
The IDL2CODE.JAR tool generates the
necessary code to wrap the routines described in the XML IDL file. There are two components generated:
1. One WSIT server wrapper: this code knows how
to call the routines in math.obj.
2. One WSIT JavaBean: This code is the Java
version of the routines in the math application. It also knows how to call the
server wrapper.

The figure below
illustrates how to use the idl2code
tool. The main routine in the tool is named com.hp.wsi.Generator. The
arguments are as follows:
-i math.xml is a required switch
that specifies the name of the xml file that describes the interface being
wrapped.
-a math is a required switch that specifies the name to be used for the
generated files.
-c SJ is an optional switch that specifies that one or more sample clients should be
generate. The argument S will generate a command line based interface
client. The argument J will generate a
JSP web based interface client. We will look at the clients in more detail in
later. Note that this switch was added in WSIT version V1.1. If you are using
an earlier version, the switch will be ignored.
-o [.generated] is an optional switch that specifies a root directory
where the generated files should be placed.
Note: the command below illustrates a new
switch added in WSIT Version 1.1. If you are using an earlier version of WSIT
the switch -c SJ will be ignored in the command line.
Build the generated server wrapper
The Server build procedure creates an executable named math.exe. This file was
linked with math.obj. Then math.exe is automatically copied to the WSIT
deployment directory wsi$root:[deploy]
Build the generated JavaBean
The JavaBean build procedure creates a JAR file that contains the WSI Java classes
used to call the server wrapper generated earlier.
Congratulations! You have used WSIT to
generate a wrapper for the math applications routines. The generated Java wrapper is packaged in
DISK$:[VTJ.generated.math]math.jar
Step 4: Test the generated code from a client
In the previous step the switch -c SJ
was used to tell the WSIT generator to generate a sample client with a command
line interface (S) and to also
generate a sample client with a JSP interface (J). These samples are provided for your convenience. They are intended to ease testing and
development when using WSIT.
Using the generated POJO client sample
Normally
this class will be written to integrate the WSIT generated JavaBean with the
Java technology of your choice.
The
sample must first be built as illustrated in the figure below.
The sample client is able to make calls to the methods of the generated
JavaBean. There is a limitation that
only methods with primitive arguments can be called. To see which methods the
sample client can call use the switch -m as in the figure below.
To call the sum and product methods with arguments of 5 and 2 use the commands below.
Using the generated JSP client sample
As with the POJO sample, the JSP sample client must first be built as illustrated
in the figure below.
To deploy the JSP, copy the mathJsp.War file to a web server servlet deployment
directory. For example, if you have Tomcat on OpenVMS, the command may look
like this:

Once the war file has been copied, you can view the JSP pages by using a URL
similar to the one shown below. (Replace yourwebserver.hp.com with the actual
name of your web server.) By default, Tomcat listens on port 8080. If the system
manger changed the port number, replace 8080 with the new number.

The following screen captures illustrate the JSP sample client calling the C Math application.
Web Page 2: The MathJSP Application Methods
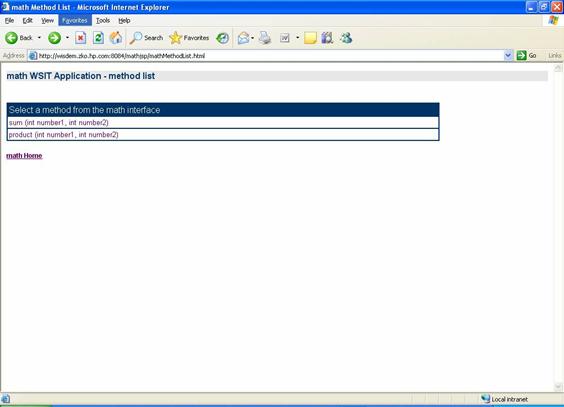
Web Page 3: The MathJSP Application Method sum

|